1000mm Newton + 4X Powermate
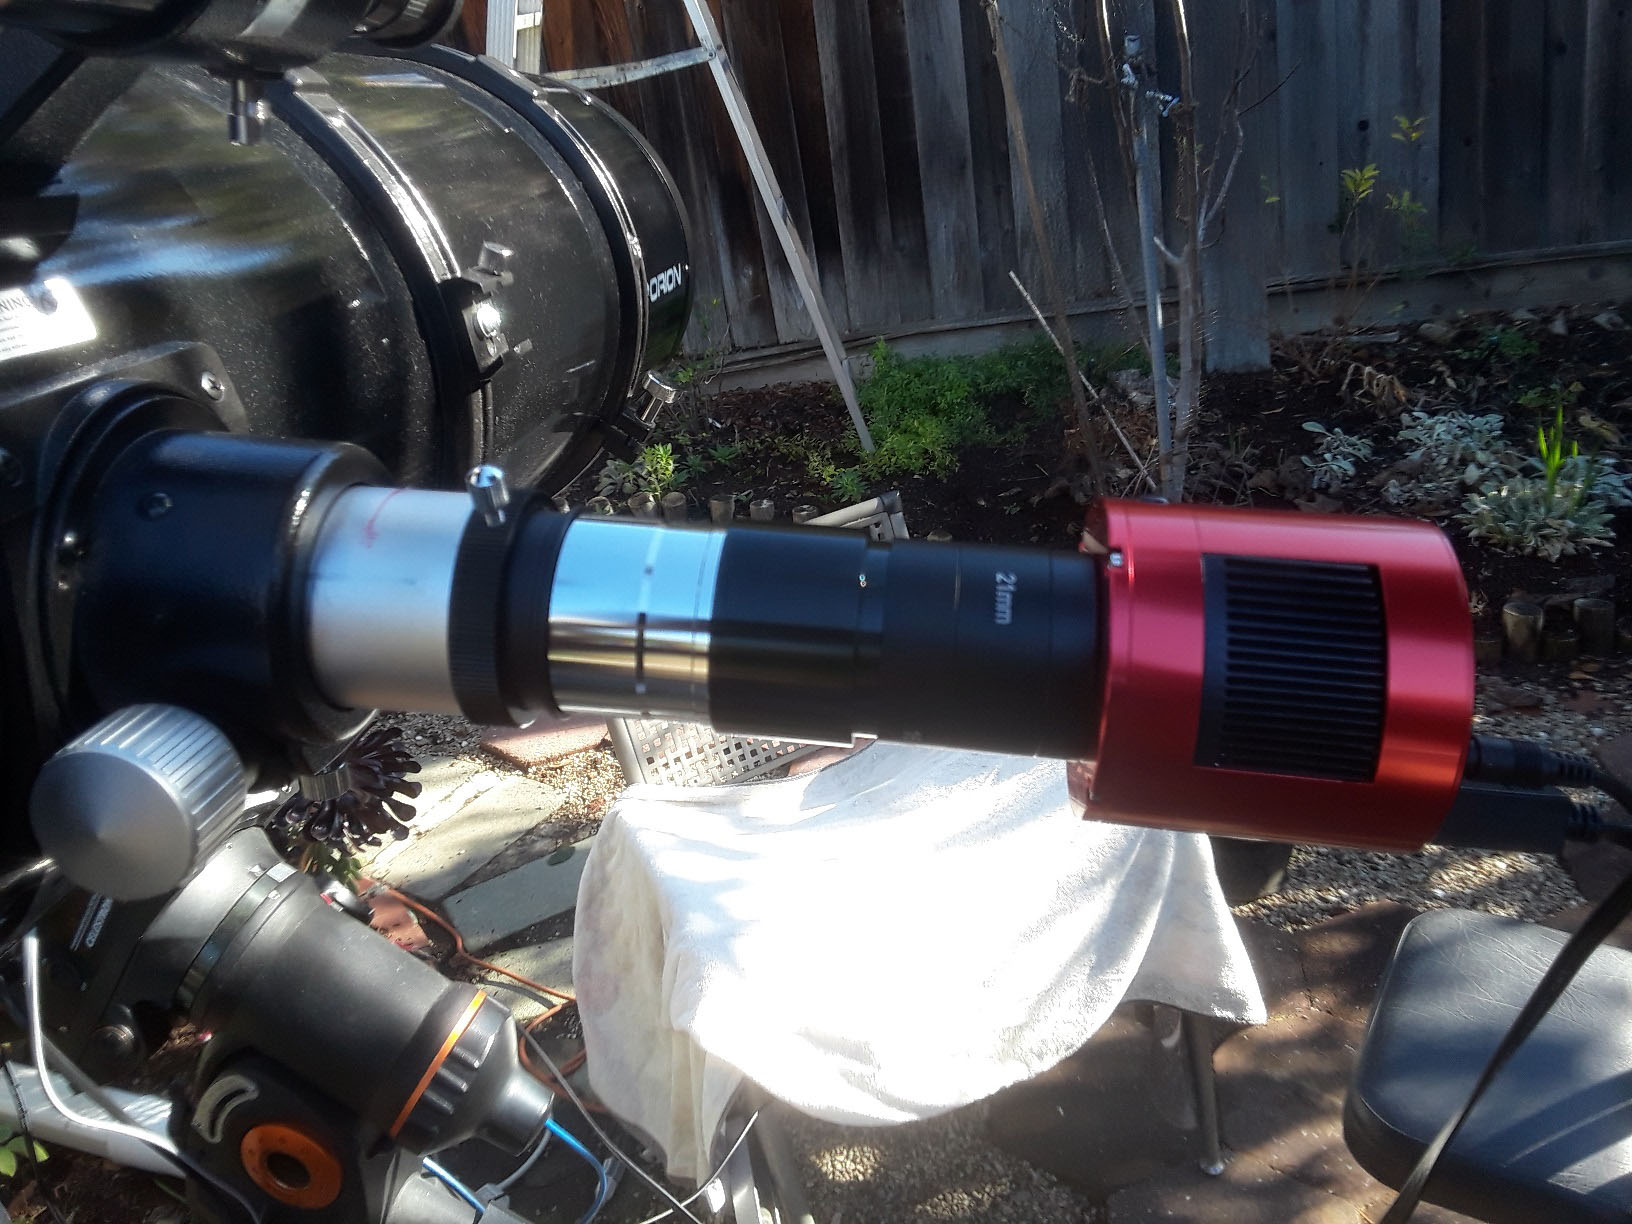
Powermate to scope
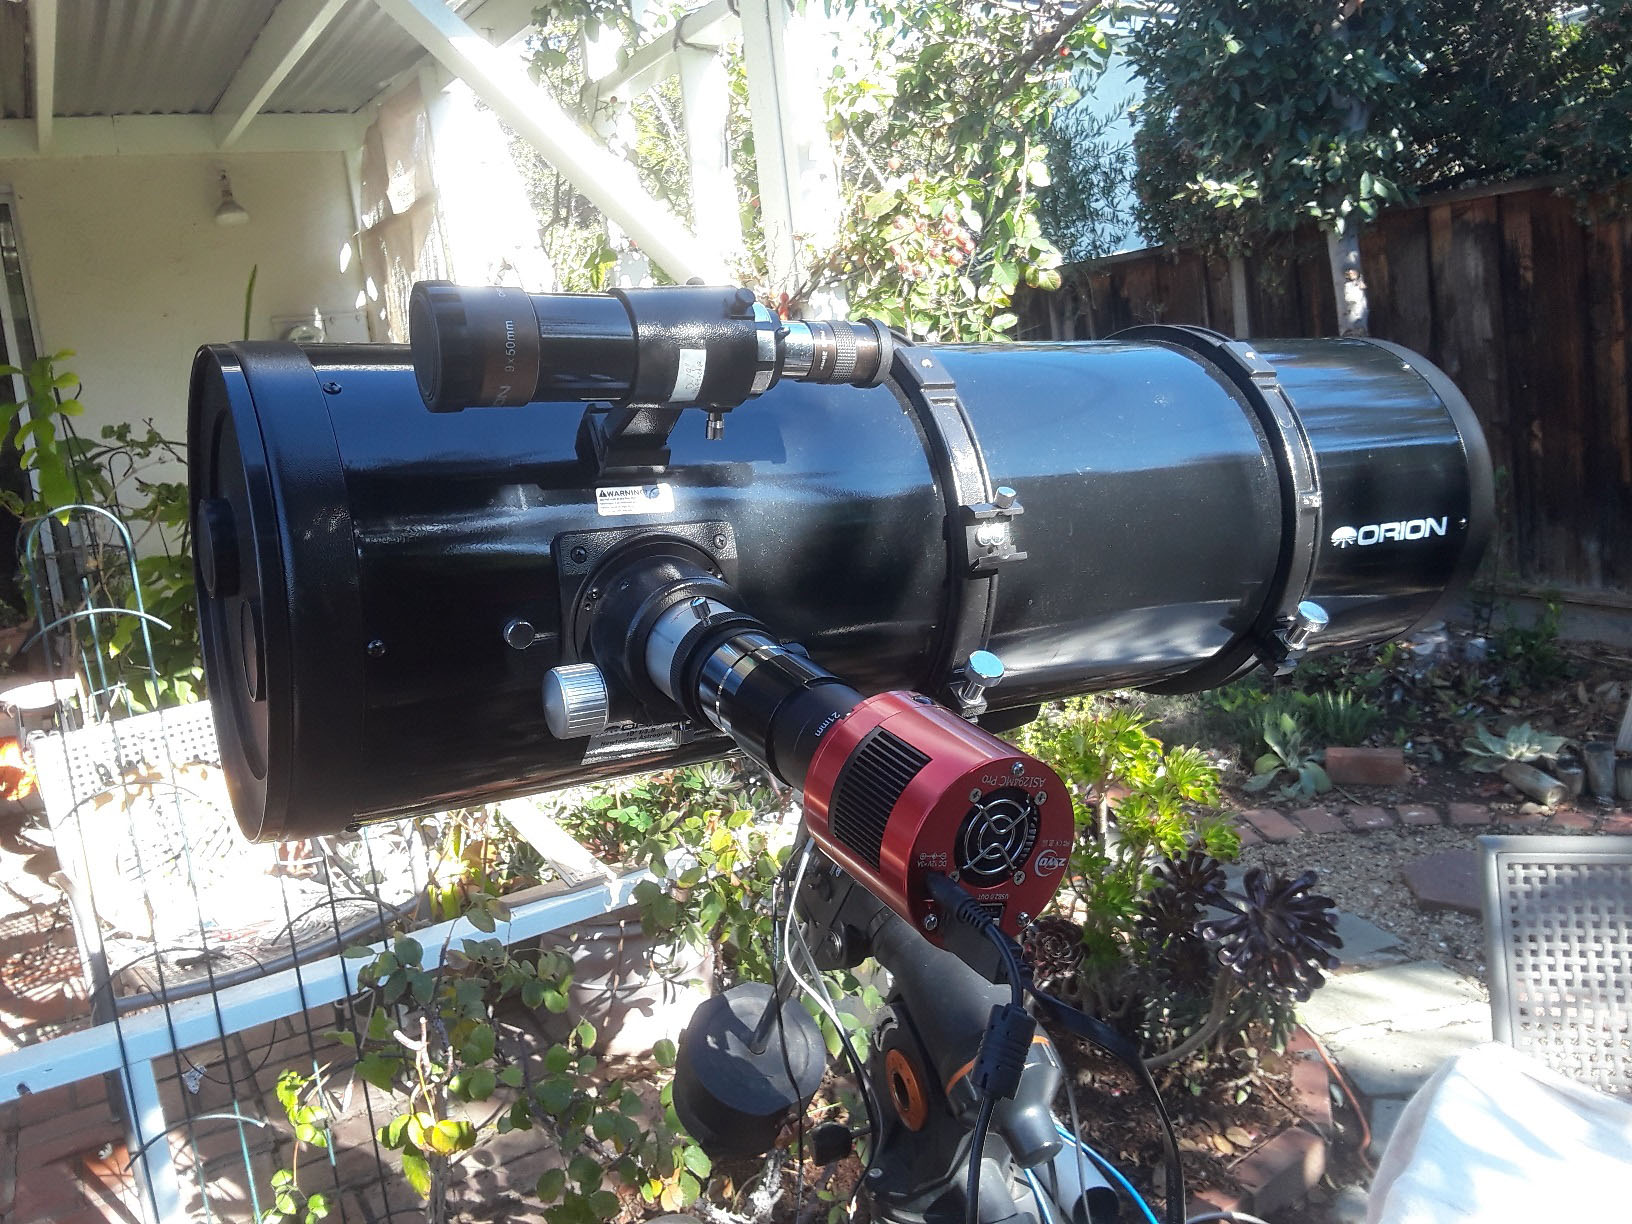
Telescope

| 日 | 月 | 火 | 水 | 木 | 金 | 土 |
|---|---|---|---|---|---|---|
| « 1月 | ||||||
| 1 | 2 | 3 | 4 | 5 | 6 | |
| 7 | 8 | 9 | 10 | 11 | 12 | 13 |
| 14 | 15 | 16 | 17 | 18 | 19 | 20 |
| 21 | 22 | 23 | 24 | 25 | 26 | 27 |
| 28 | 29 | 30 | ||||
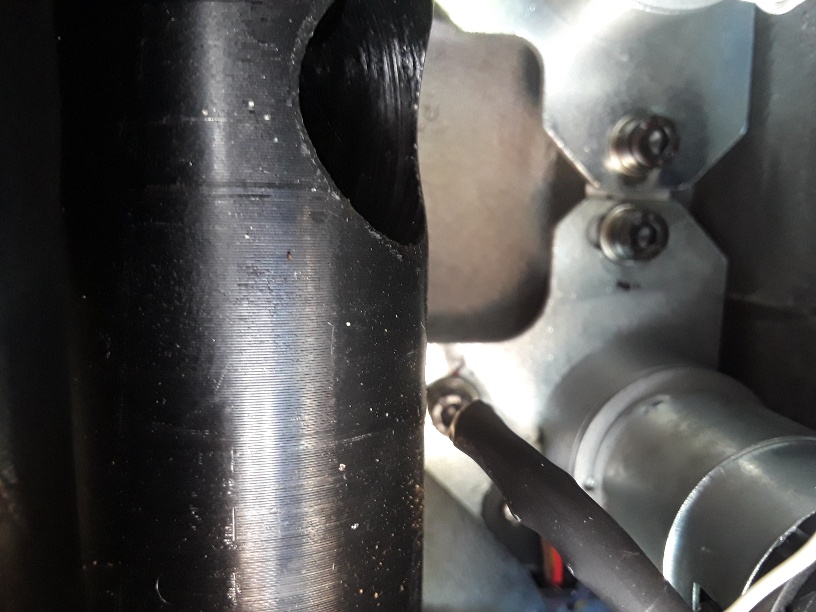
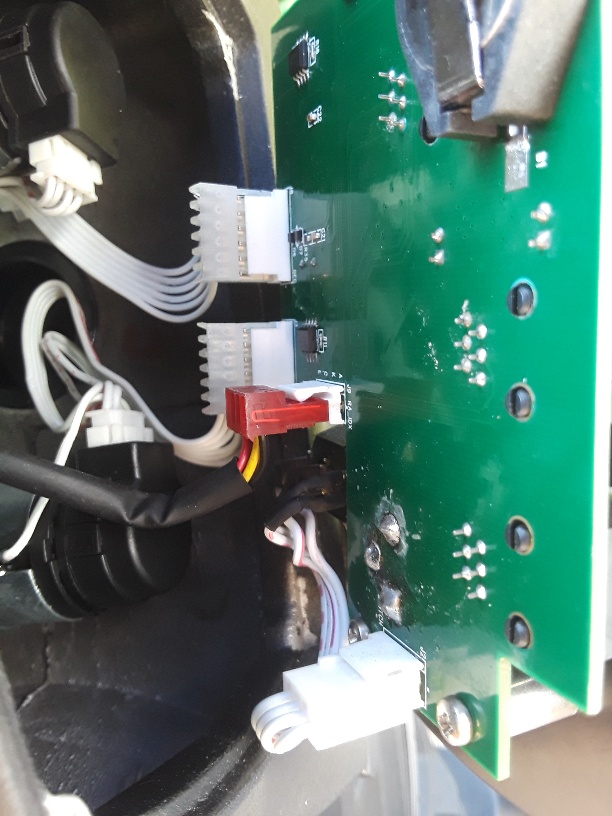
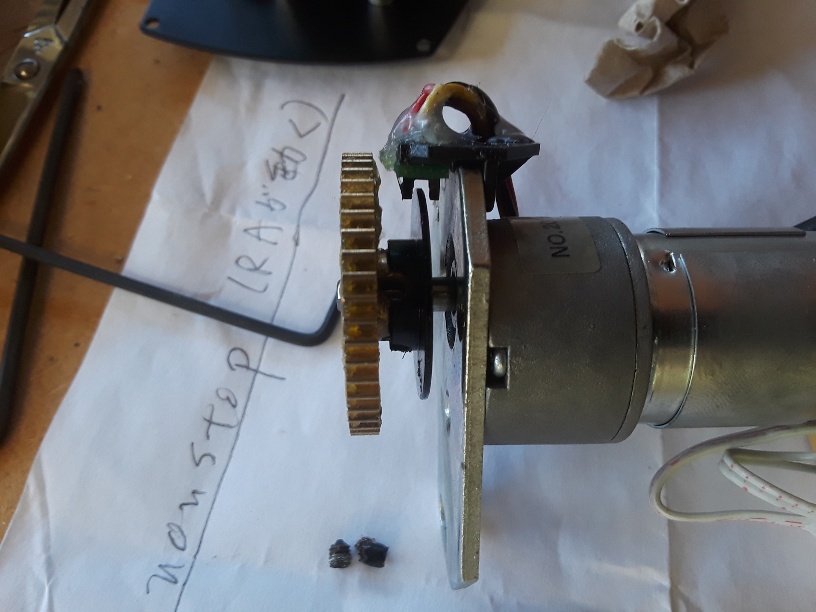
Celestron 社のCGEMのスイッチ入れて、ハンドコントローラーにデーターを入力してアラインメントを選択しようとボタンを押すとRAが暴走。Cloudynight等を検索して原因をさぐると、RAのモーター内のEncoder(エンコーダー)に問題がありそうだということでCGEMのメインパネルを開けて、RAモータを取り出した。やはりプラスチック製の刻みの入った円盤が割れてました。新品を購入して約2年半で、保証期間を半年オーバー
メインパネルを開けてモーターボードを取り出したあとのRAモーター
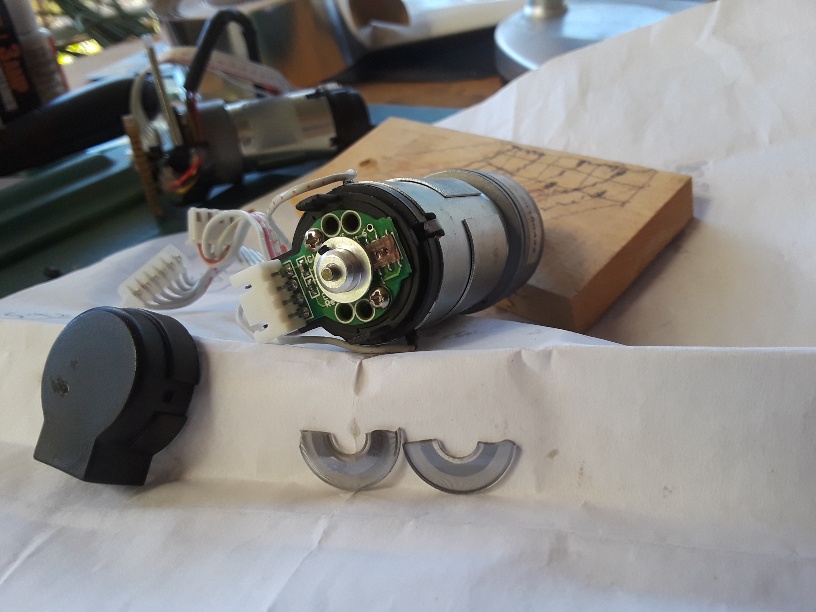
取り出したRAモーターの後端のプラスチックキャップをはずしてエンコーダーをチェック。円盤が真っ二つ。遠くに新品のRAモーターが写ってる。
メインパネルの裏側のモーターコントロールボード。左側の黒いプラスチックキャップはRA(下)、DEC(上) モーターにつながるエンコーダー
ギアーをはずす時 PEC用エンコーダーの円盤に注意。センサーが円盤を両側から挟んでて、PEC用センサーをはずさないとギアーは外れない。
The image, taken by Chuck Kimball.
See the source URL of Chuck
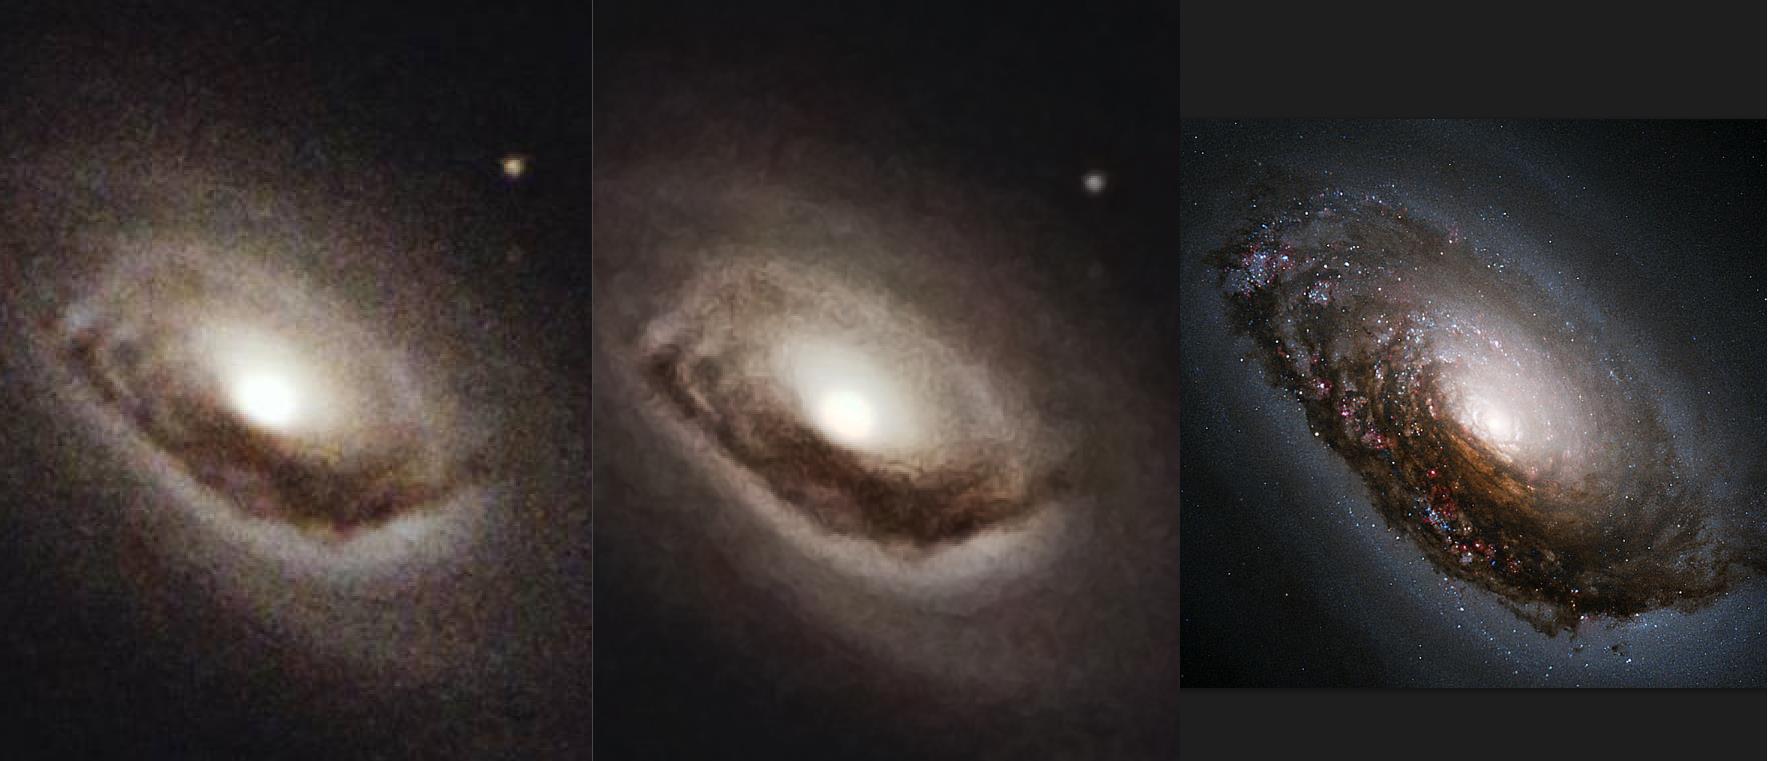
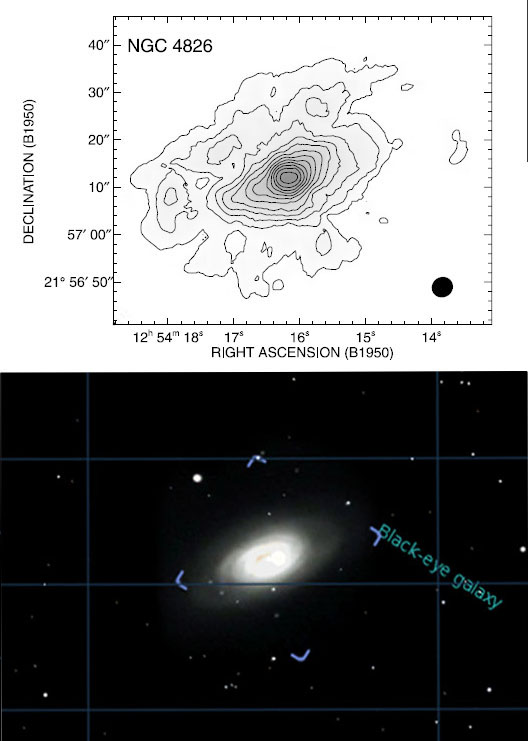
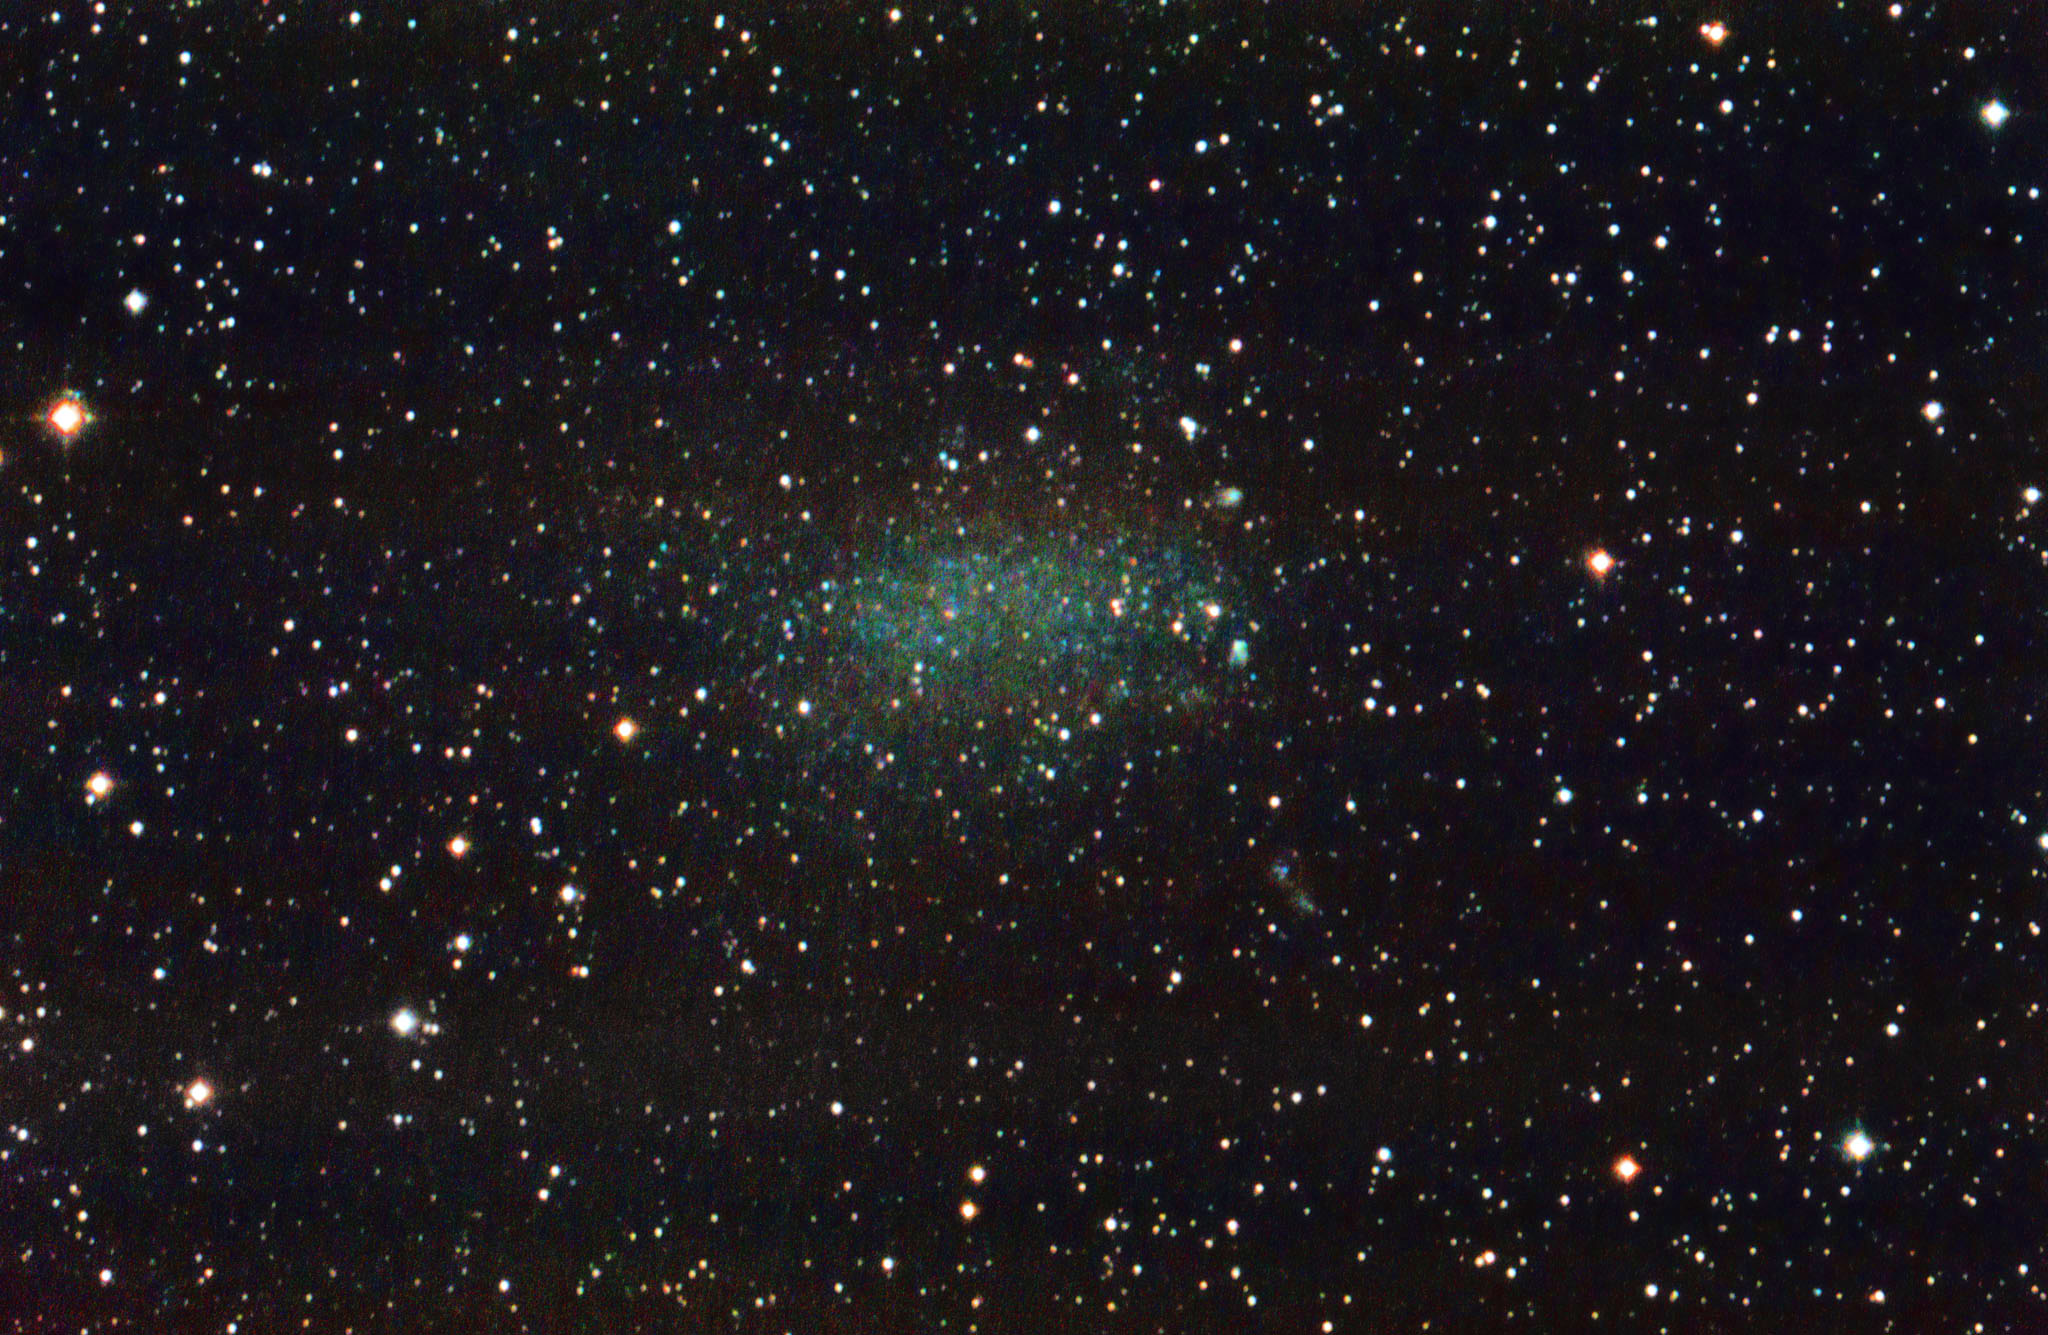
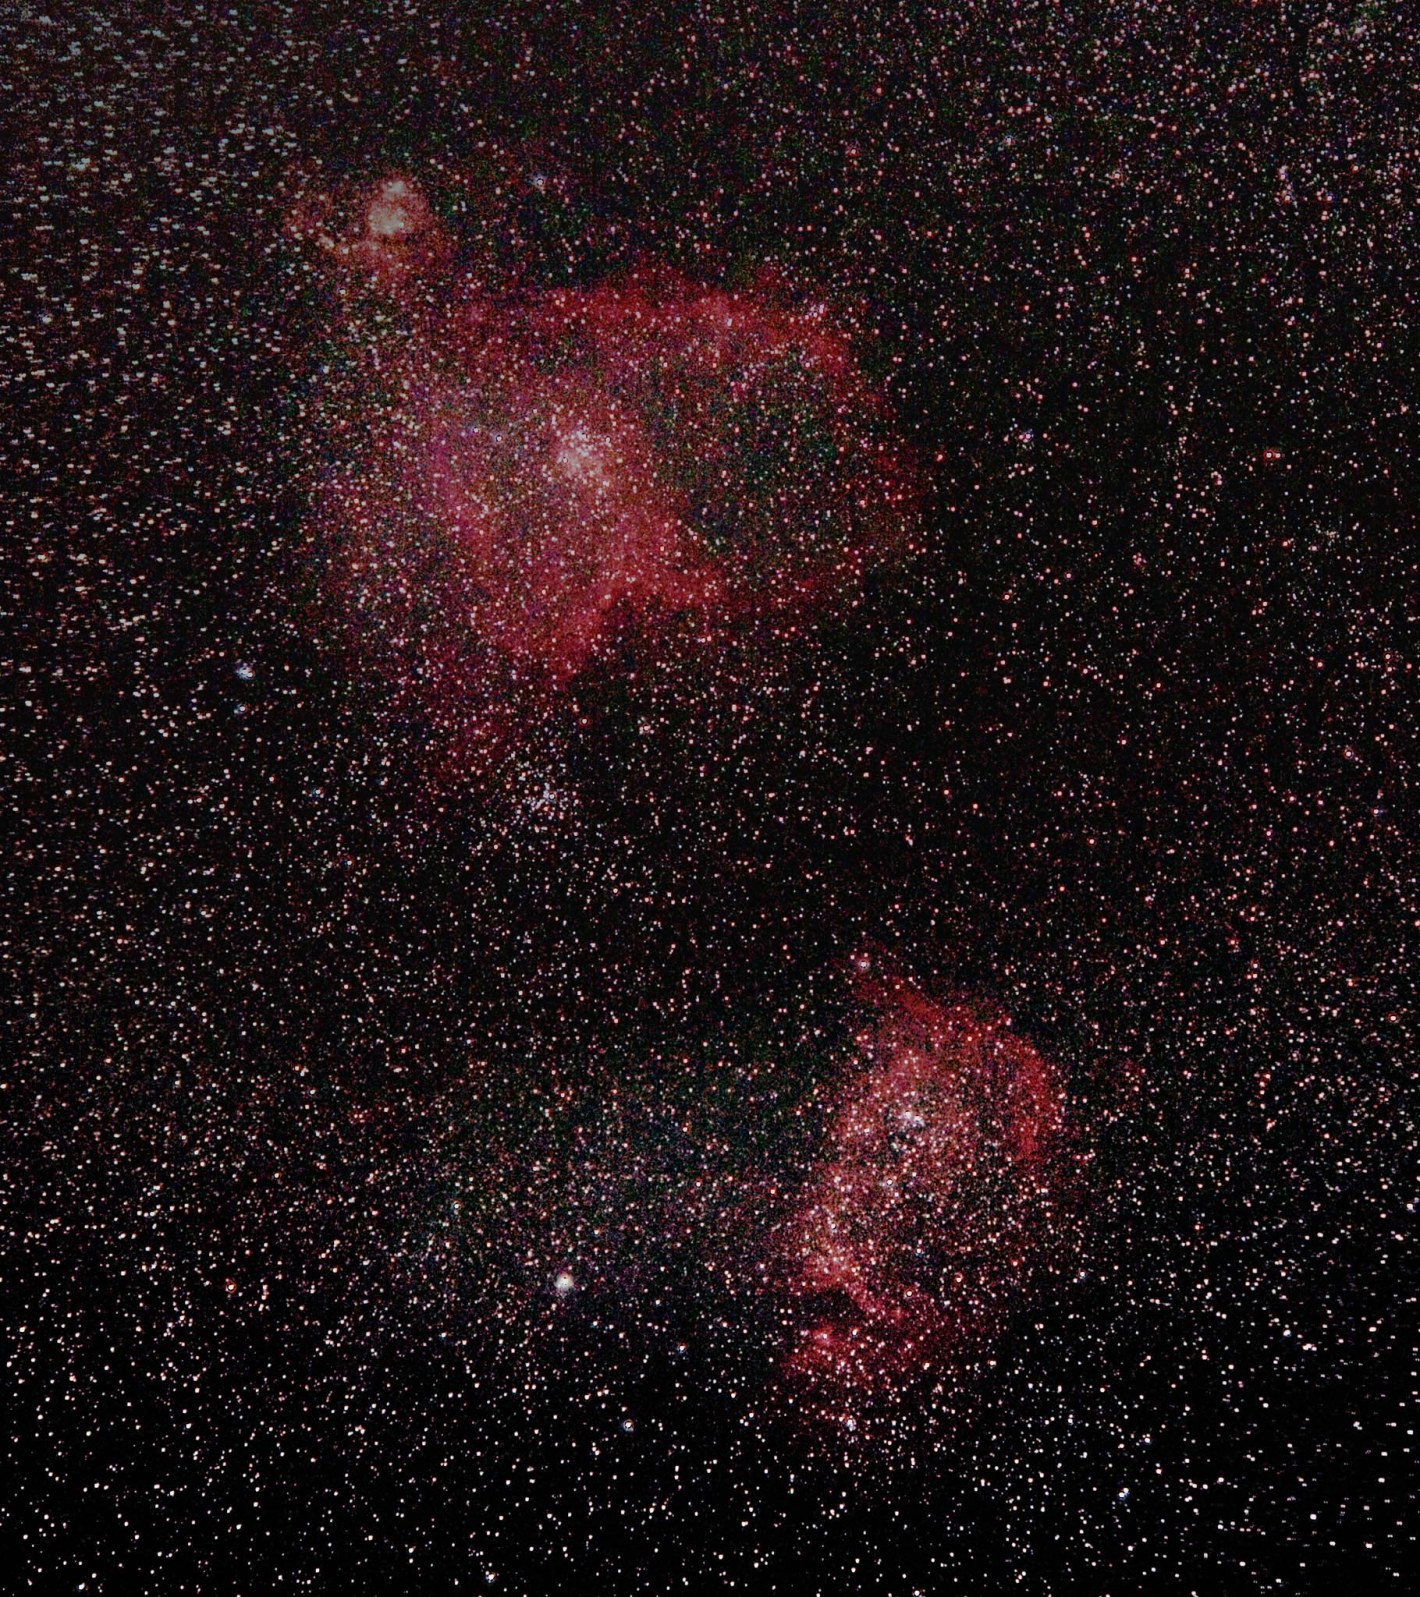
Nagaokaさん、暗黒帯と星生成の構造が見えてきて素晴らしいですね。腕と口径ですね。この星雲、過去の衝突で対称性が破壊され 暗黒部が活発な領域になってるようで、それが写真に捉えられてます。触発されて、どれくらいHubble画像に肉薄できるか処理をさせていただきました。左が元画像、真ん中がわたしの処理、右がHubble画像です。SIM(Screen Mask Invert)で周辺ノイズをならして、暗黒帯にHighPassをかけました。渡辺巨匠も追加処理の了解をお願いしてないようなので、事後了解期待での投稿です。ご不快であれば削除します。累積露光時間を上げて、クリップインフィルターでのHalphaを重ねると、Hubble画像に肉薄するでしょうね。
Urata’s photo.
May 23 at 10:32pm · Edited · Like · 7
Nagaoka ご無沙汰しております。削除どころかとてもおどろき、嬉しいです。自分ではここまで追い込めなかったのでむしろここまでいけるんだと驚きです。保存させていただきます^^
May 23 at 10:30pm · Edited · Like · 1
Urata 微細構造が見えてくると、実際どうなってるのだろうと、俄然興味がわいてきます。形の対称性はあまり崩れてないのに、どうしてこれほど活発な領域が出現できるのでしょう?Tatsuro Moritsugu 森次さんいかが?
May 23 at 11:03pm · Edited · Like · 4
Moritsugu sky-map.orgのIRAS赤外線衛星による像を見ると赤外線で観測できるダストの分布には可視光で見る様な非対称性は認められません。 ダストリッチな銀河で急速にスターバーストが発生発生しつつあるものの、黒目部分を構成しているダストがNGC2683の様に手前に分布していてバルジとディスクに被さっているのかもしれません。 (黒目の反対側のダストが星の背後にあるのだとすると、直感的には星の構成するディクスとダストの構成するディスクが長軸辺りで交差している姿なのかも知れません。 開口望遠鏡で各所の視線速度等を測定し分析した結果がどこかに転がっているのかも知れません。)
IRAS赤外線衛星による像
SKY-MAP.ORG
Interactive Sky Map - SKY-MAP.ORG
SKY-MAP.ORG
May 23 at 11:53pm · Unlike · 4
Urata 森次さん、コメントをありがとうございます。ダストが向こう側では裏にあるというのは、なるほどです。論文検索したんですが、愛好家向け雑誌かブログをヒットしただけでまだ良く分ってません。かなり詳細に調べられてて、視線速度から固有運動と違う動きも測定されてるみたいです。原論文に突き当たってないので全貌がわかりません。過去の衝突のせいであることは確かでしょう。
Yesterday at 12:12am · Like · 2
Moritsugu 恐らくそうだと思います。 現在の星の元になった銀河とダストの供給源となっている銀河の衝突の結果(ディスク平面がずれた)と考えると良いのかも知れません。 その内、文献を見つけたらお知らせします。
Yesterday at 12:14am · Unlike · 3
Urata
HST による赤外画像がありました。非対称ですね。

サイトはここです。
5 mins · Edited · Like · 1 · Remove Preview
Urata 野辺山の電波望遠鏡によるCO濃度測定(COの回転順位間の遷移)からの計算による分子雲密度です。やはり対称性が悪いですね。形成過程は矮小銀河の衝突とかの説もあるようですが、はっきり解明されてないようです。検索が不十分かもしれません。暗黒帯の外側の円盤は逆回転とのことです。
Urata’s photo.
9 mins · Edited · Like · 1
Nagaoka 昔から好きだったM64がますます興味深くなりました^ ^
29 mins · Like
Urata 口径が大きくなると。自分で撮ってるから本当に手に取る様に新しい世界が見えてきますね。
Taniguchi さんのテーマは野辺山でのCO測定だだったので そのうちFBで話をお願いしたいものです。
2 mins · Edited · Like
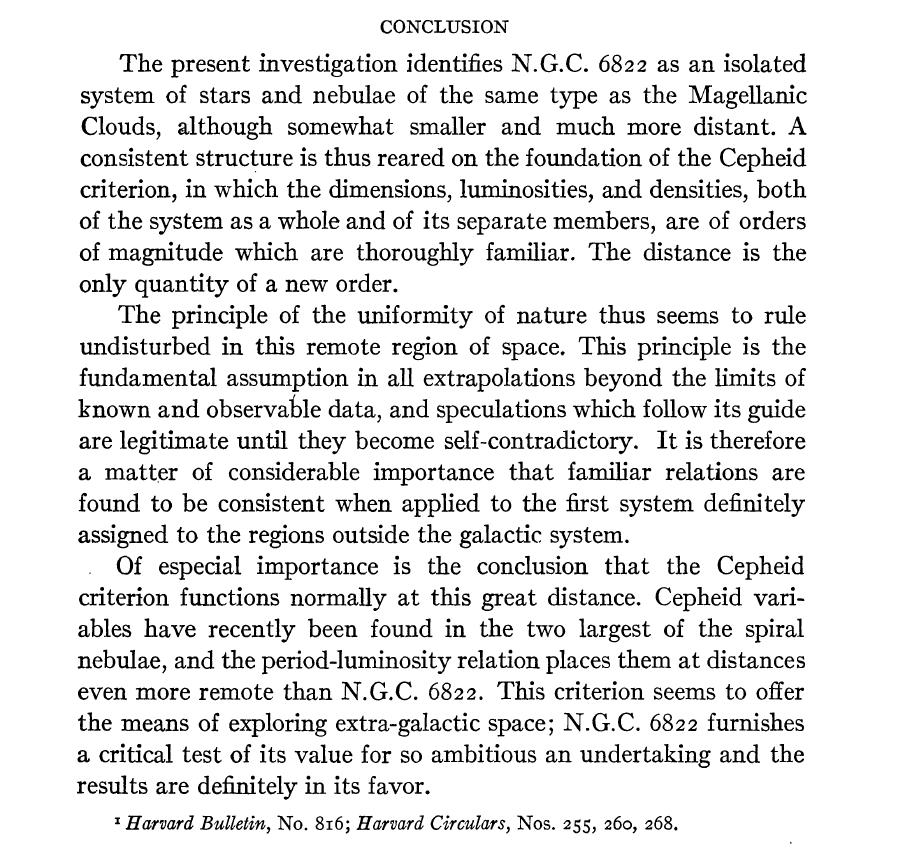
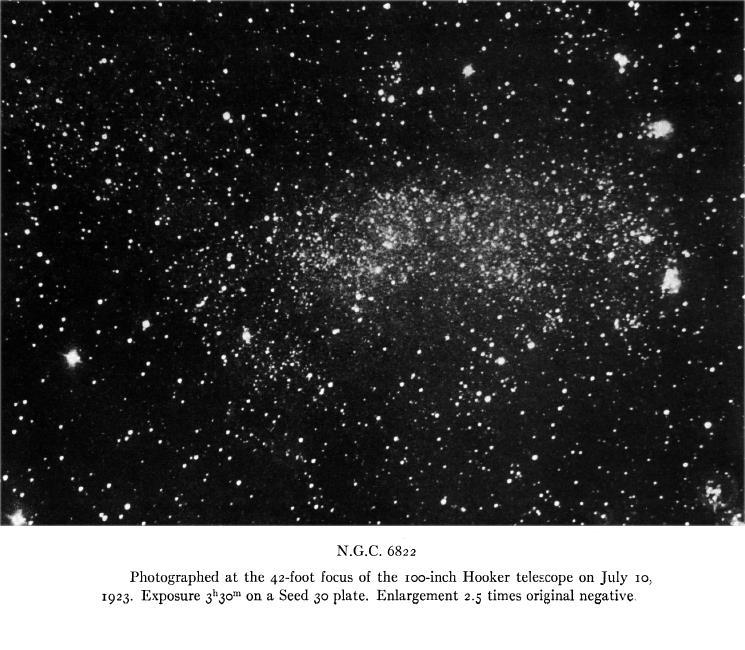
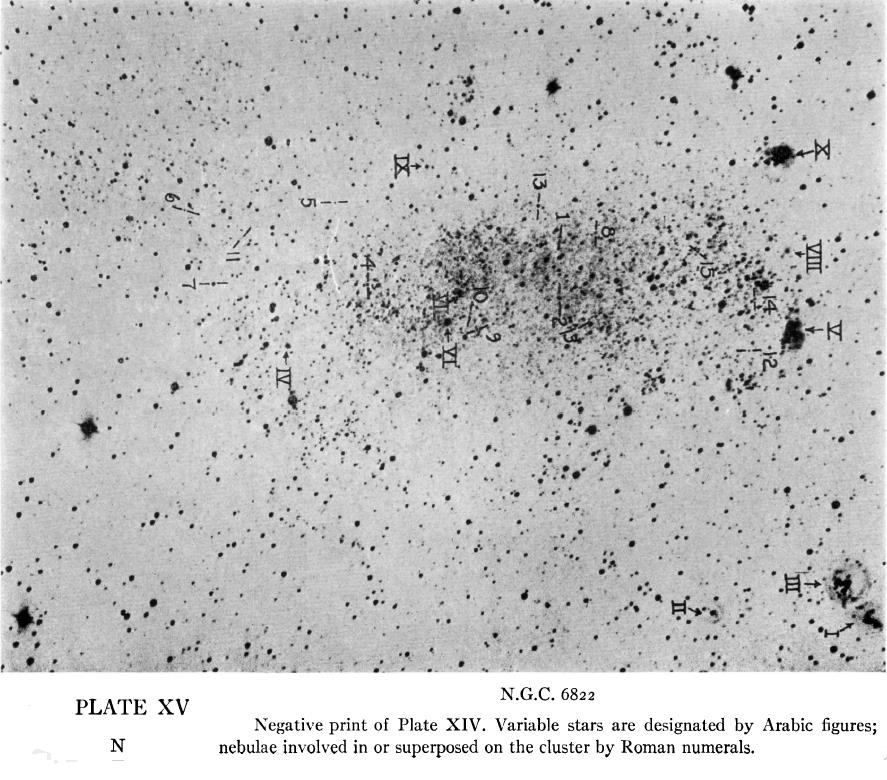
エドウイン・ハッブルの論文 ”N.G.C.6822 A REMOTE STELLAR SYSTEM” APJ 1925 PP.409
の結論と掲載の写真(Mount Wilson天文台、ロスの近く、100インチ 42フィート焦点の Hooker Telescopeによる)。
今回の撮影を比較(比較にはならないがご愛嬌)。セフェイド変光星の周期と輝度の関係が宇宙どこでも不変(Cepheid Criterion という)
のことから、天体までの距離を計算できることを示した歴史的論文。この流れが、太陽は天の川銀河の中心にはいないこと、天の川は宇宙の中心にはいないこと、等
宇宙の広がりが解明され、宇宙膨張説に展開していった。
この年、ハッブルは36歳、簡潔な文体から、天才物理学者の最盛期の輝きが放射してきます。
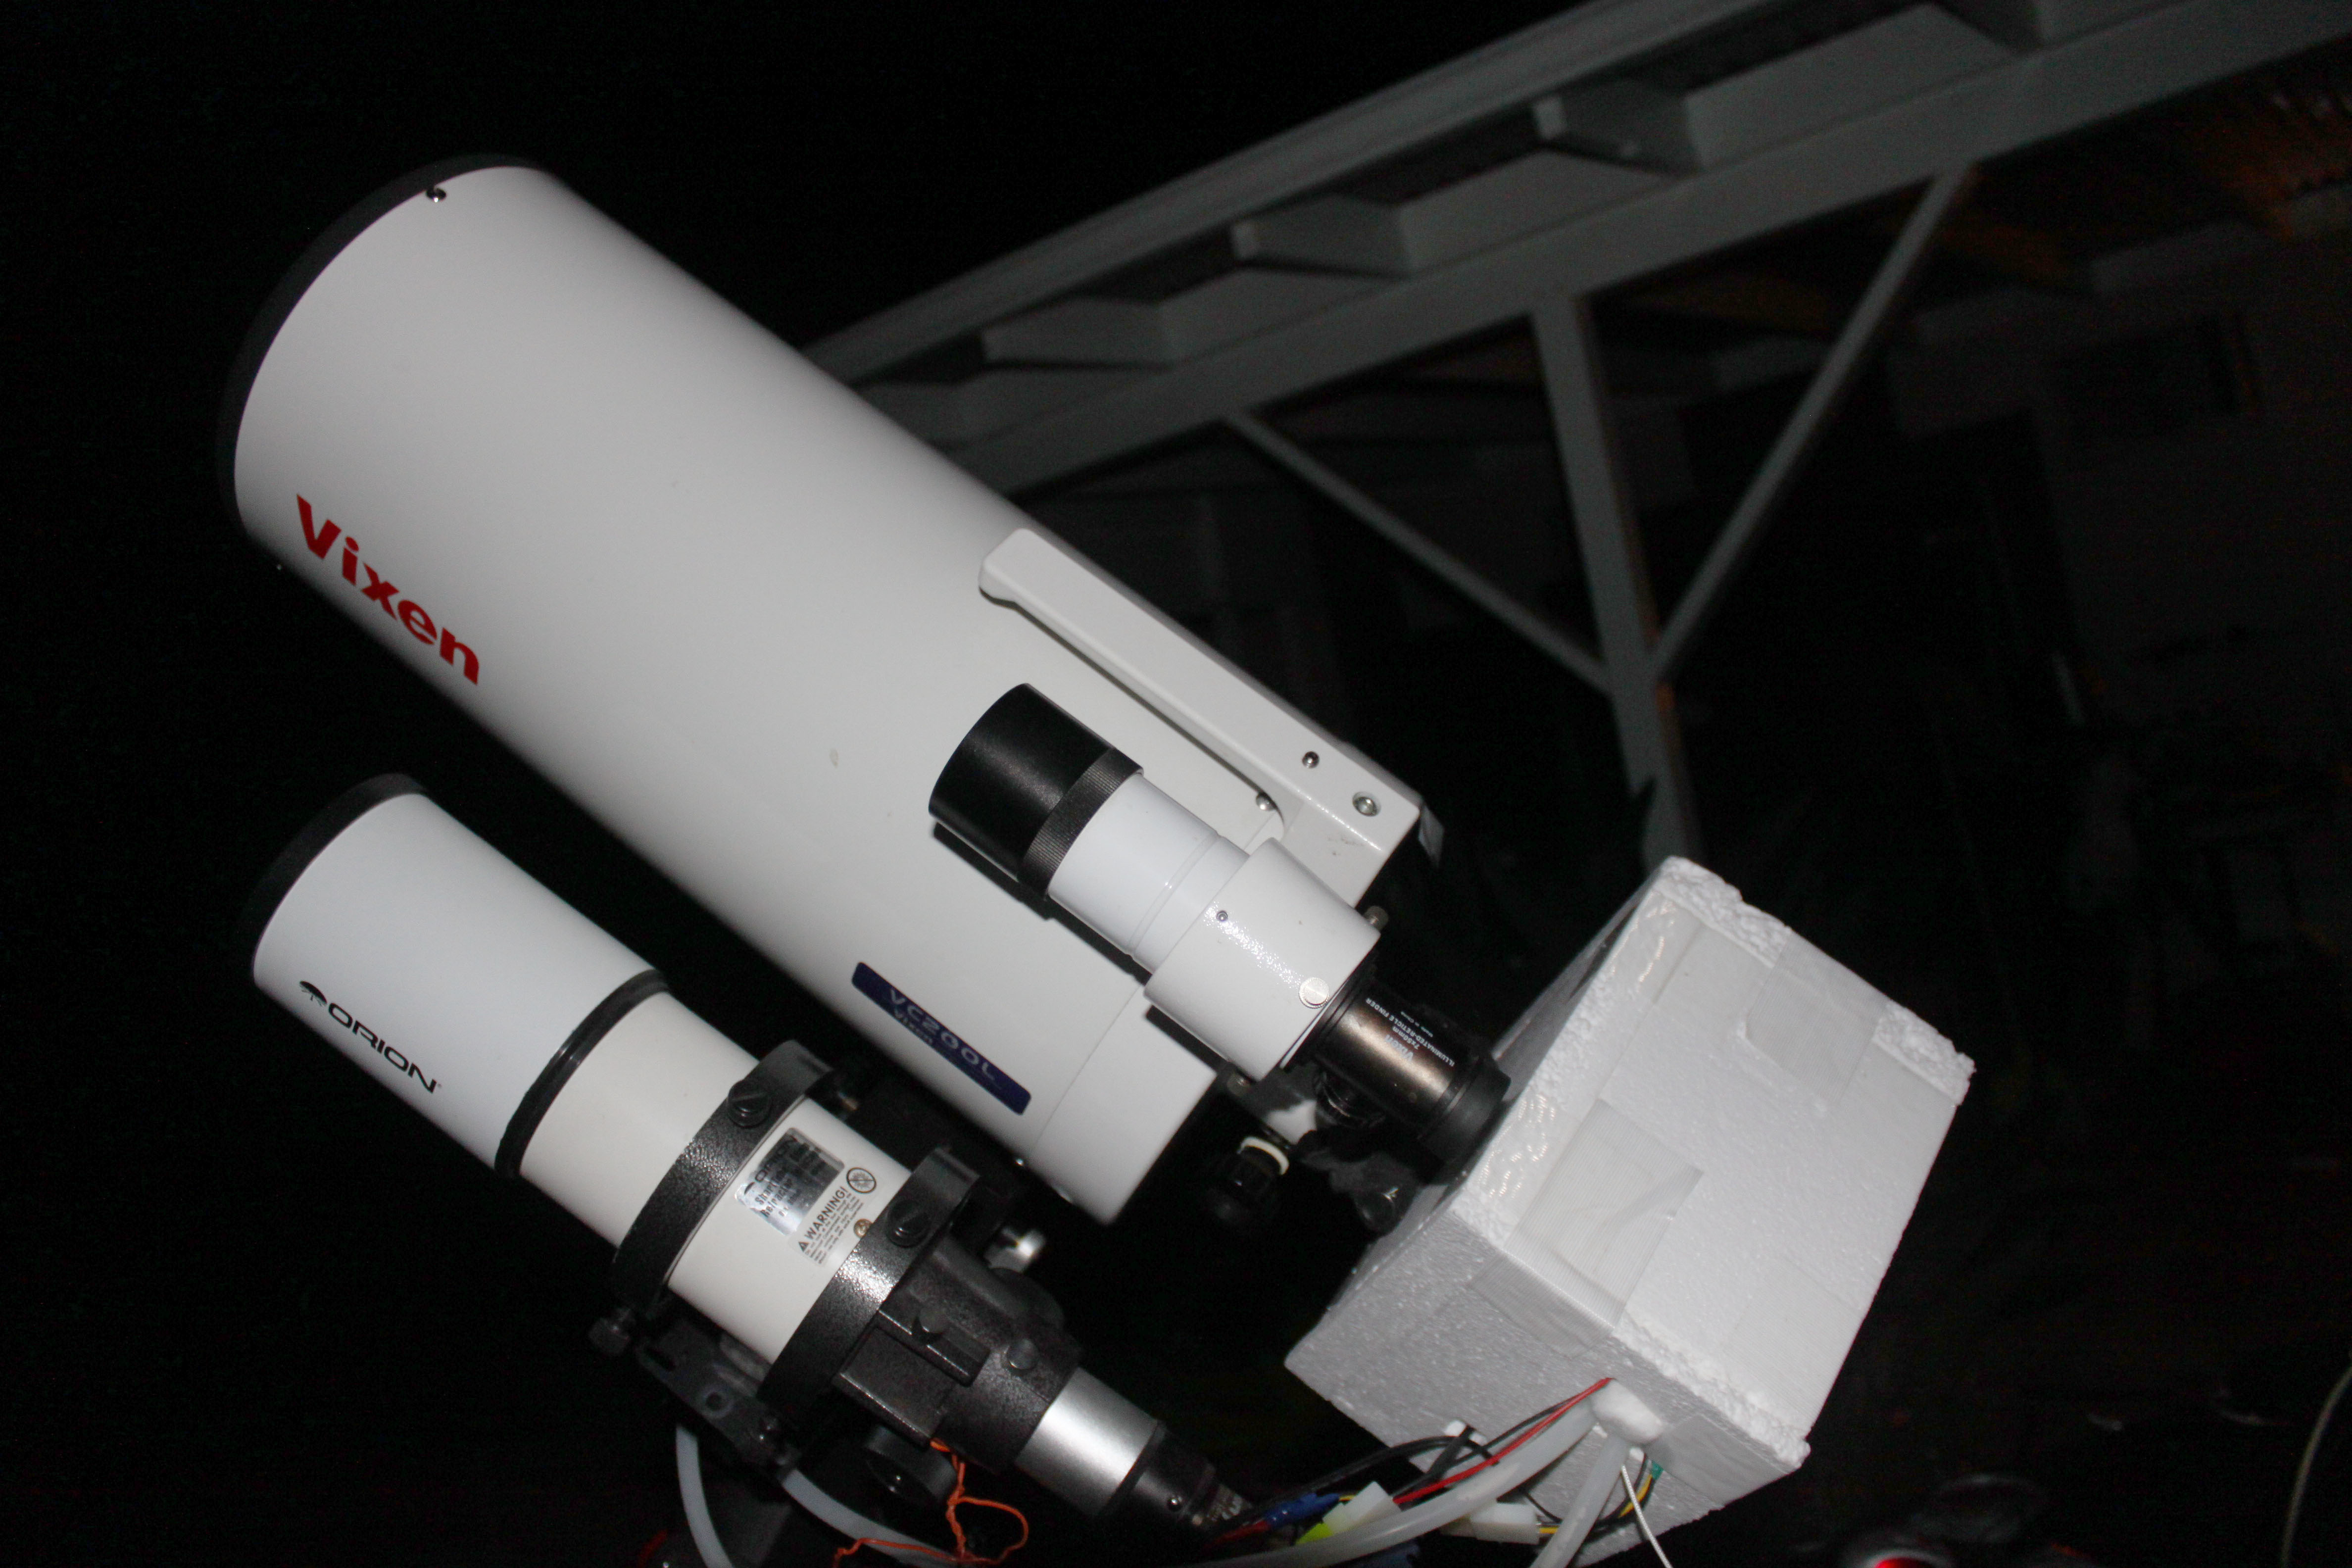
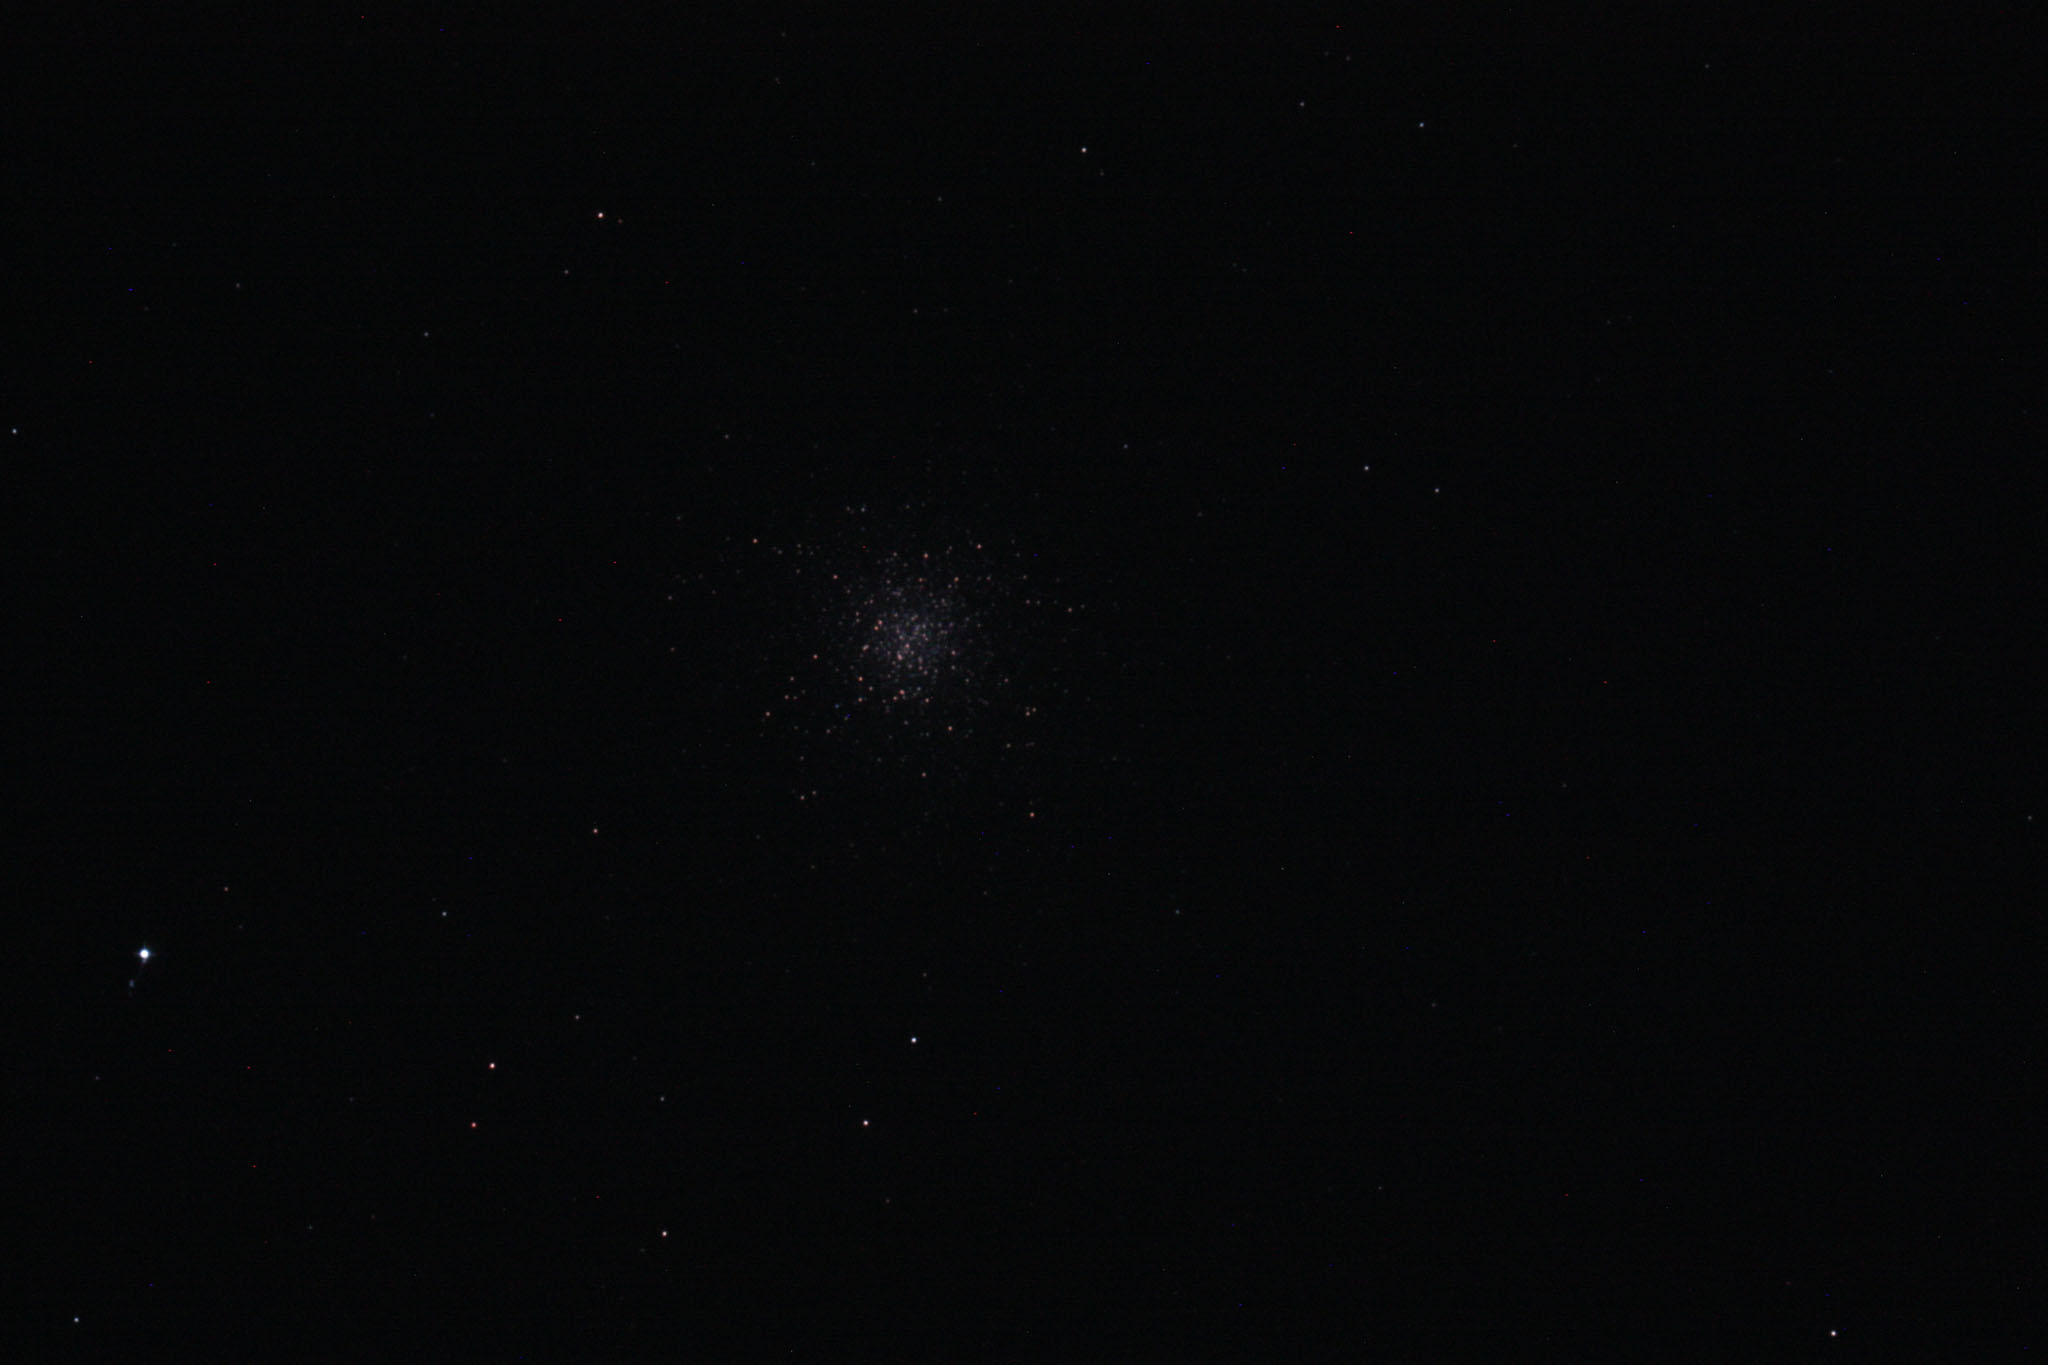
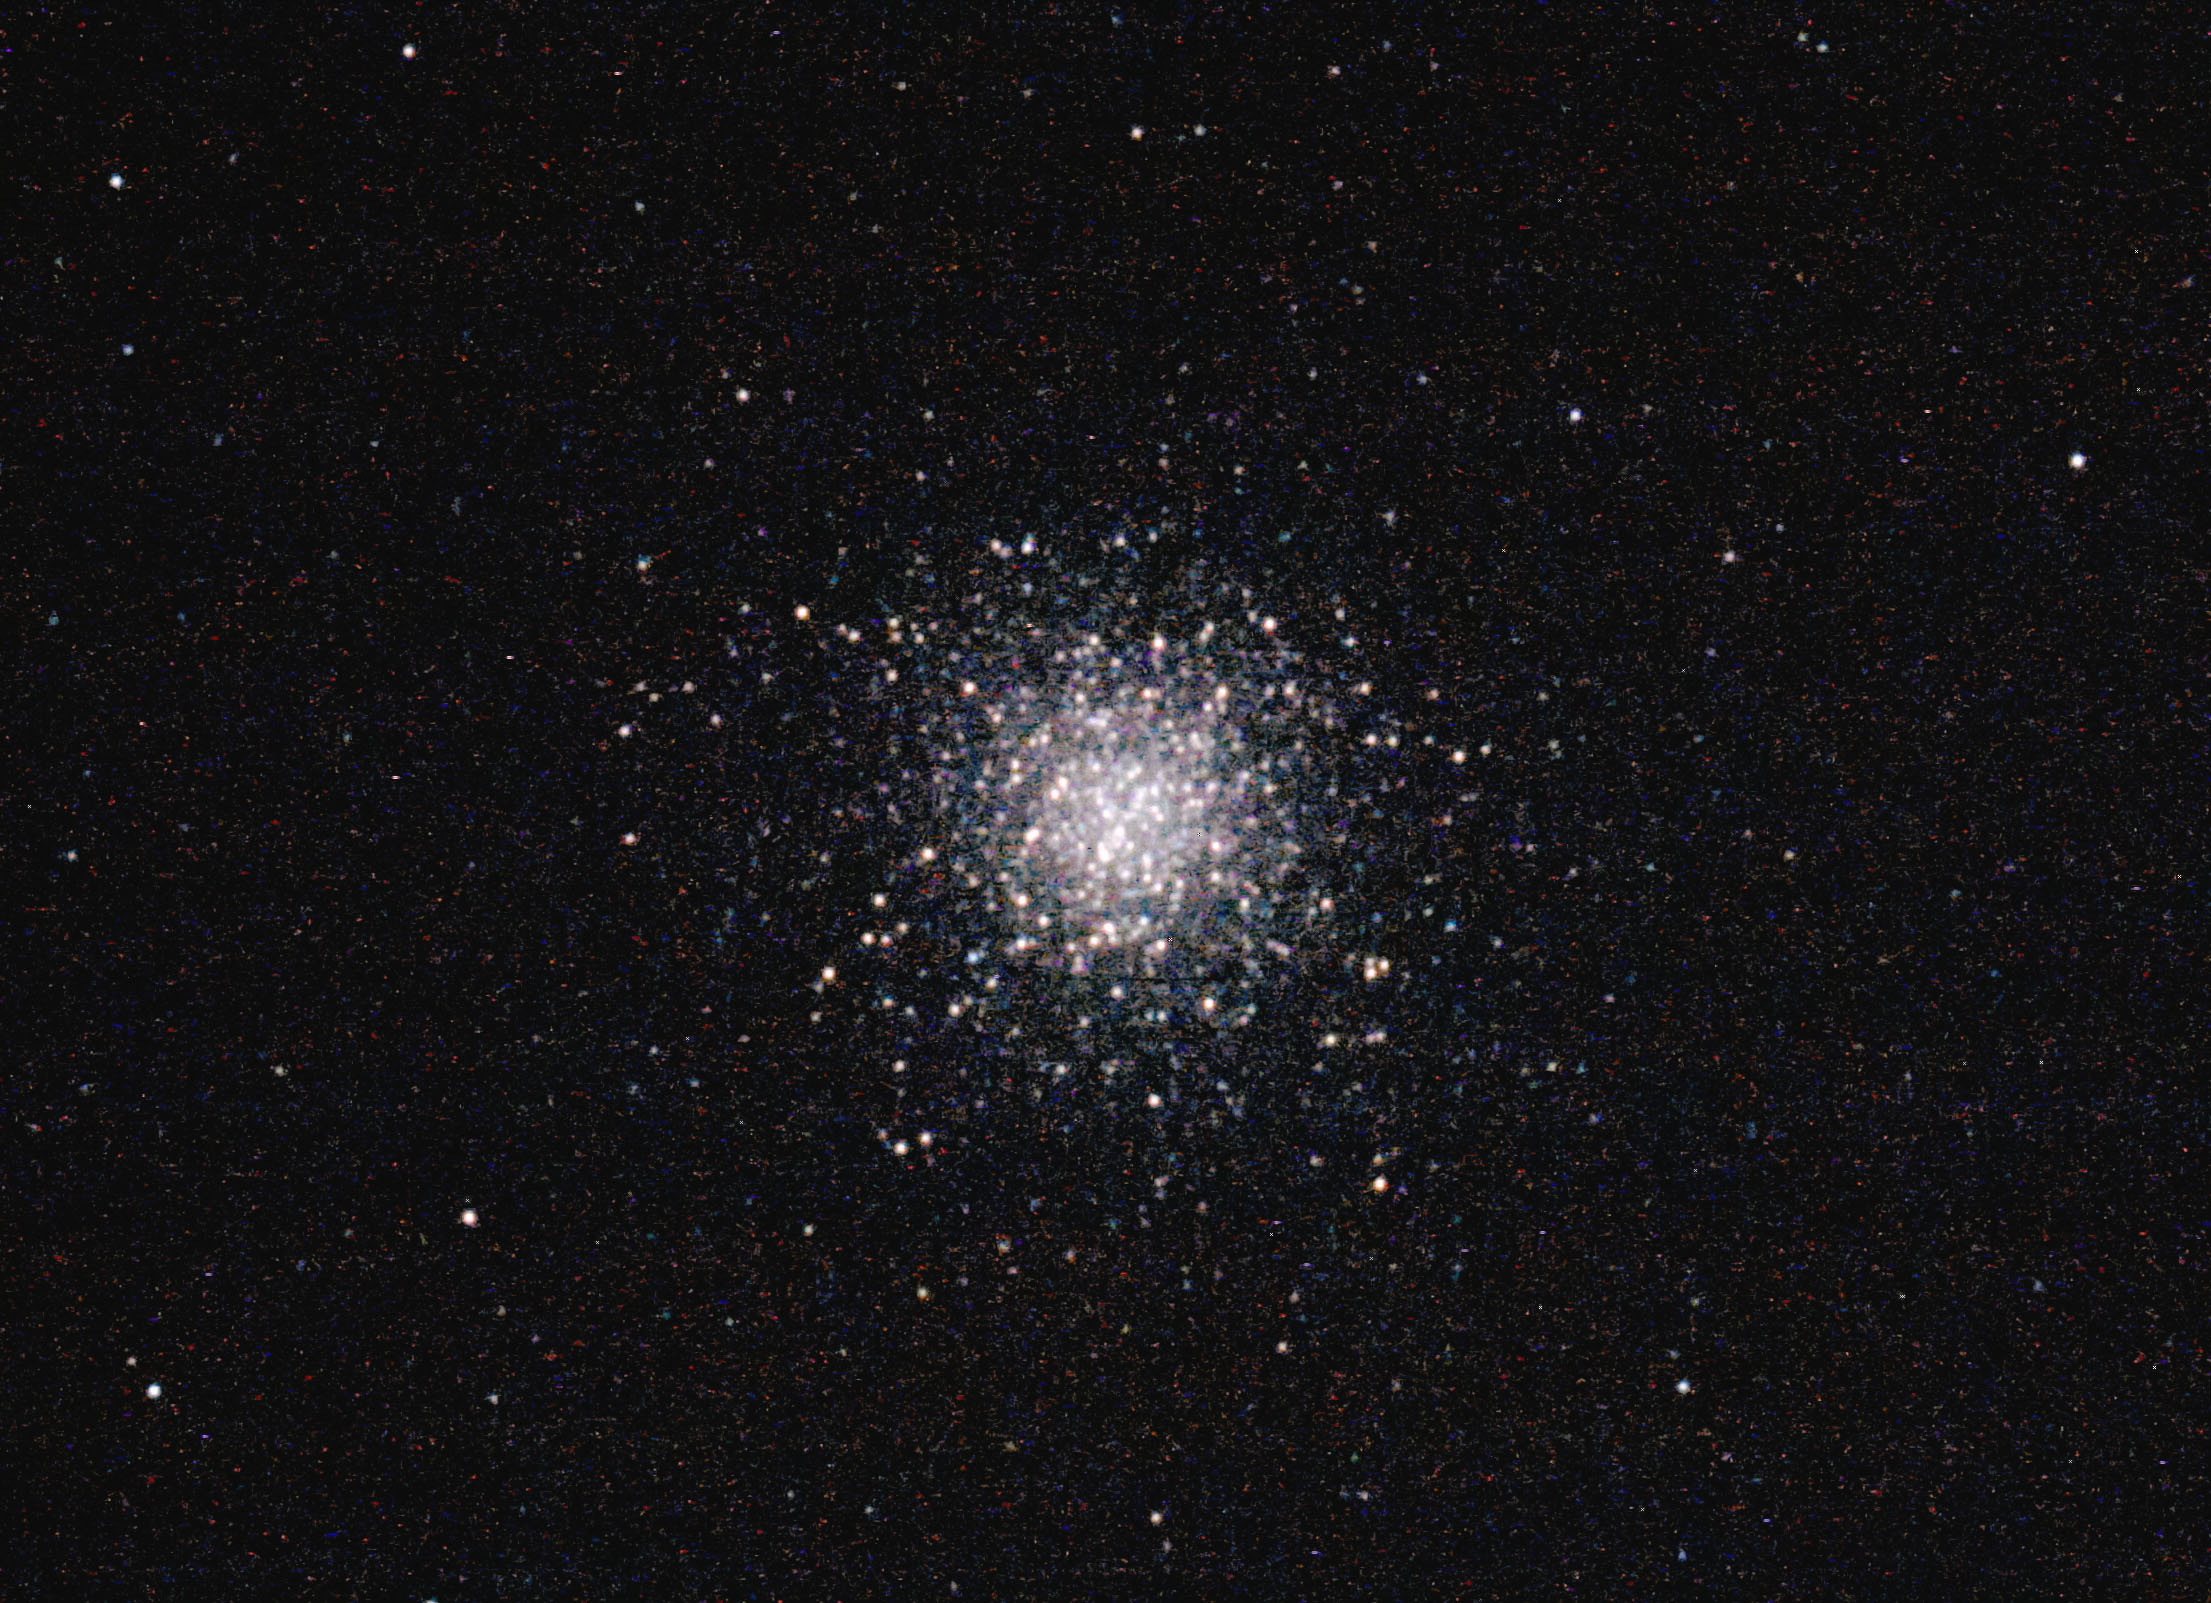
The box for the camera is modified. They were mounted on Vixen VC200L. M53, Globular Cluster and M95, Barred Spiral Galaxy were shot.
The sensor and the AL angle temperatures went down to 0C and -20C.
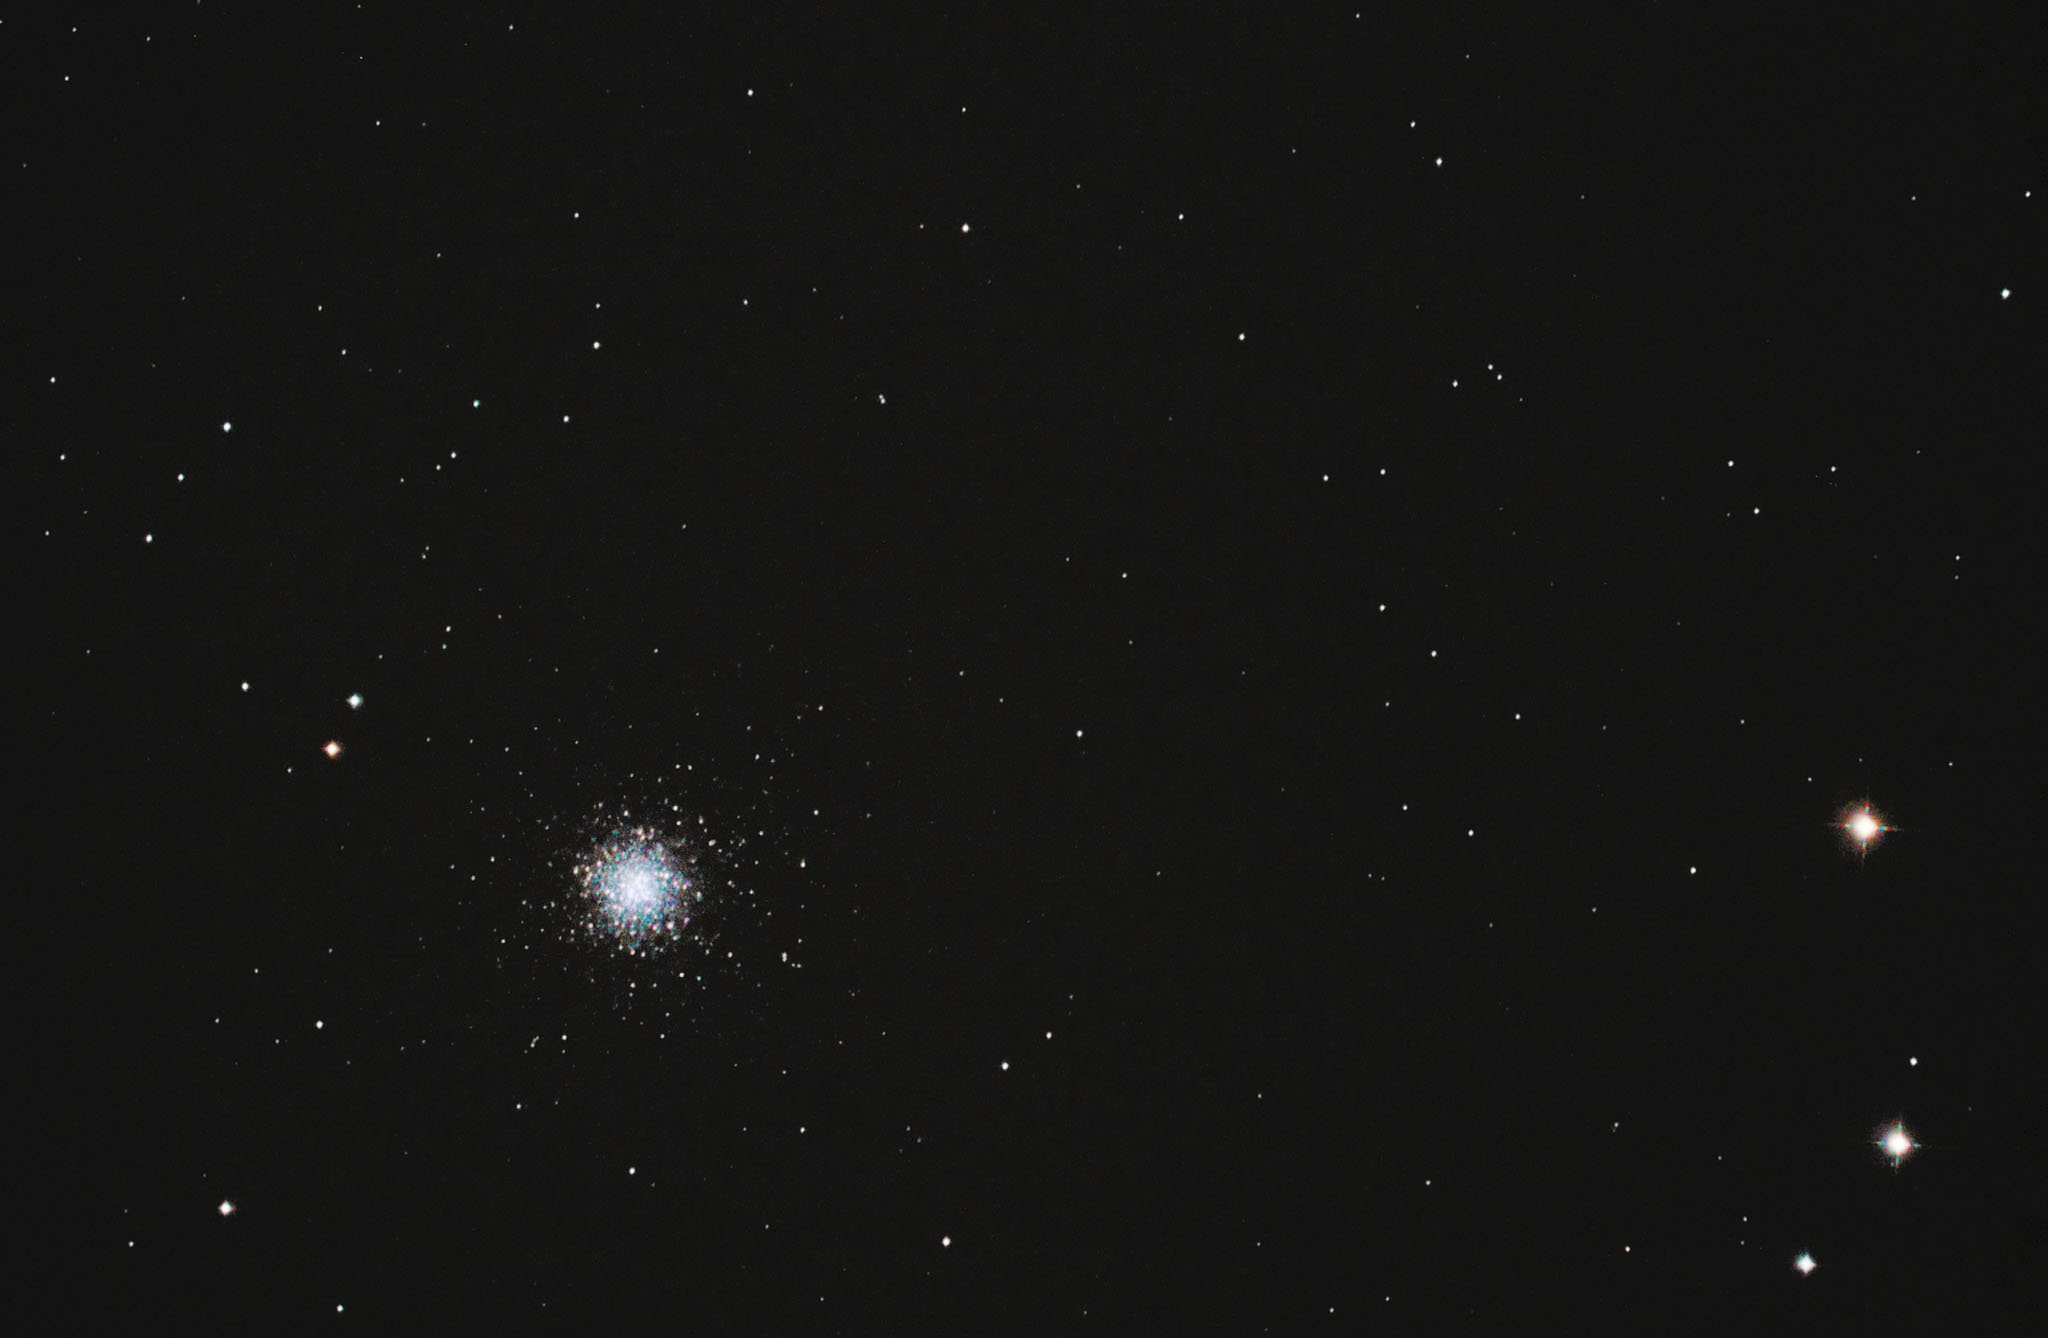
M53 Globular Cluster ISO3200 30 seconds Exposure, 5 lights, 20 darks and 20 flats
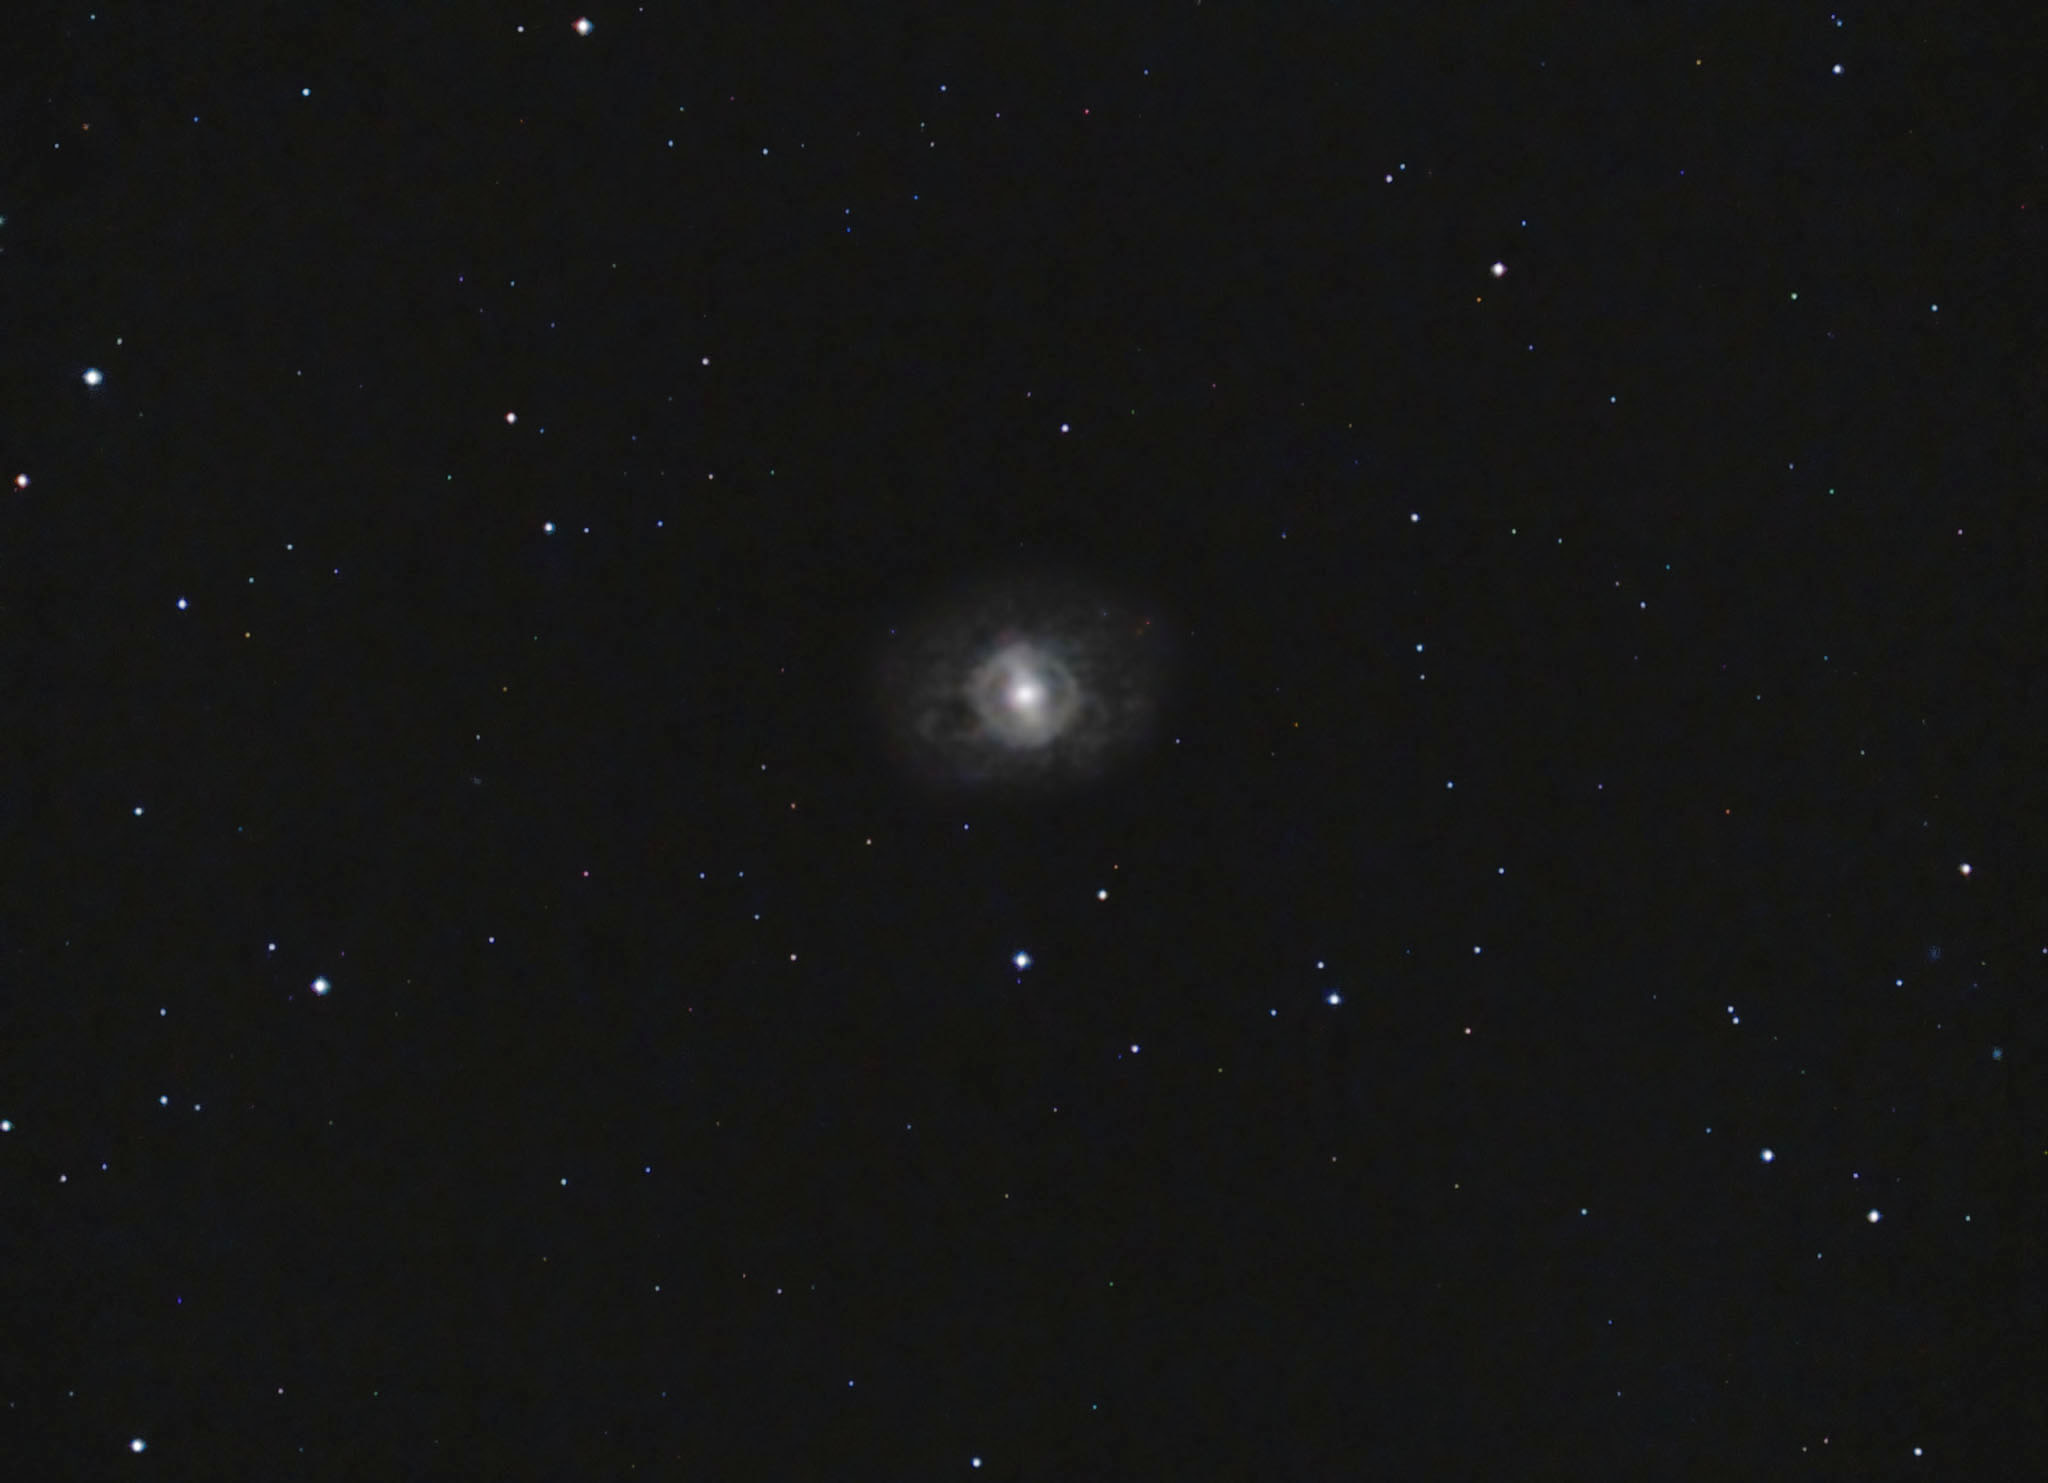
M95 Barred Spiral Galaxy with 30 lights, the other setting is same.
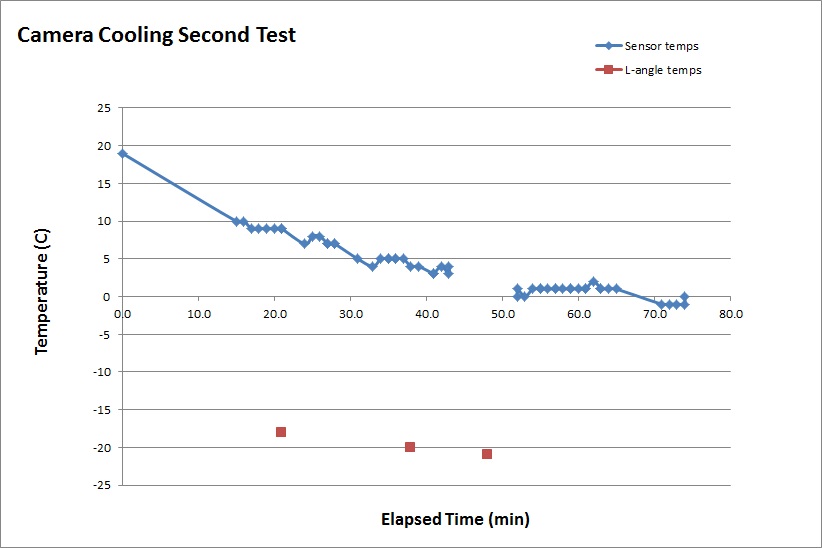
Sensr Temperature
TEC and water cooling for camera
Based on the suggestion by J. Kubera in Canada, an external cooling for DSLR is built.
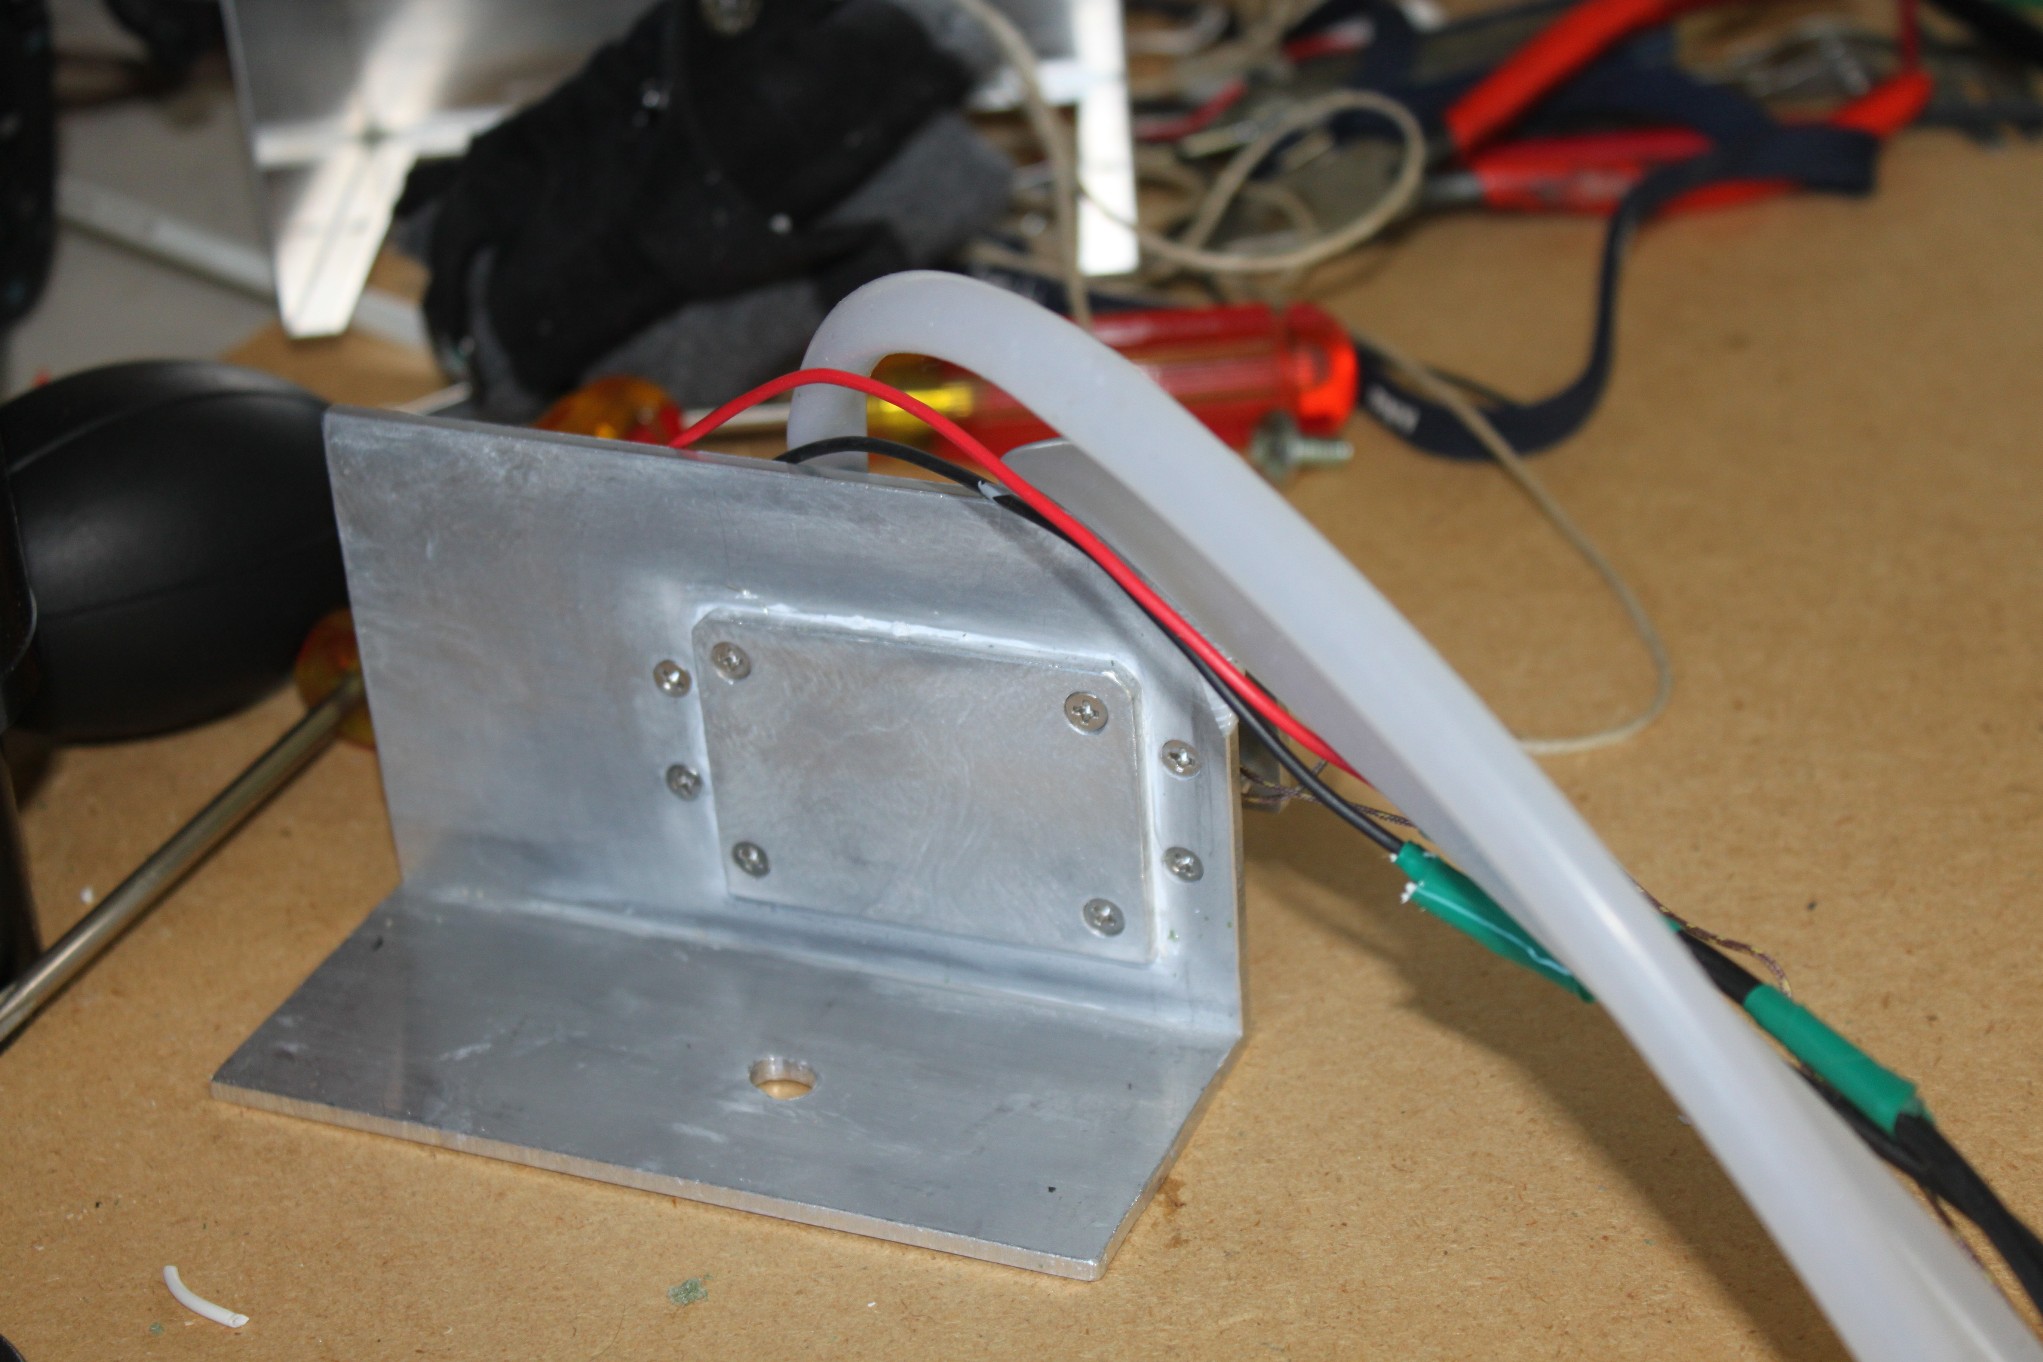
3″ x 2 ” aluminum angle (6063) is modified so that the verical face (3″ high) could have a good contact with the camera LCD screen and the bottom face (2″) with the camera bottom. See the extra plate tightened to the vertical face with 4 bolts. The CPU-Heat Sink paste is used to eliminate the air-gap.
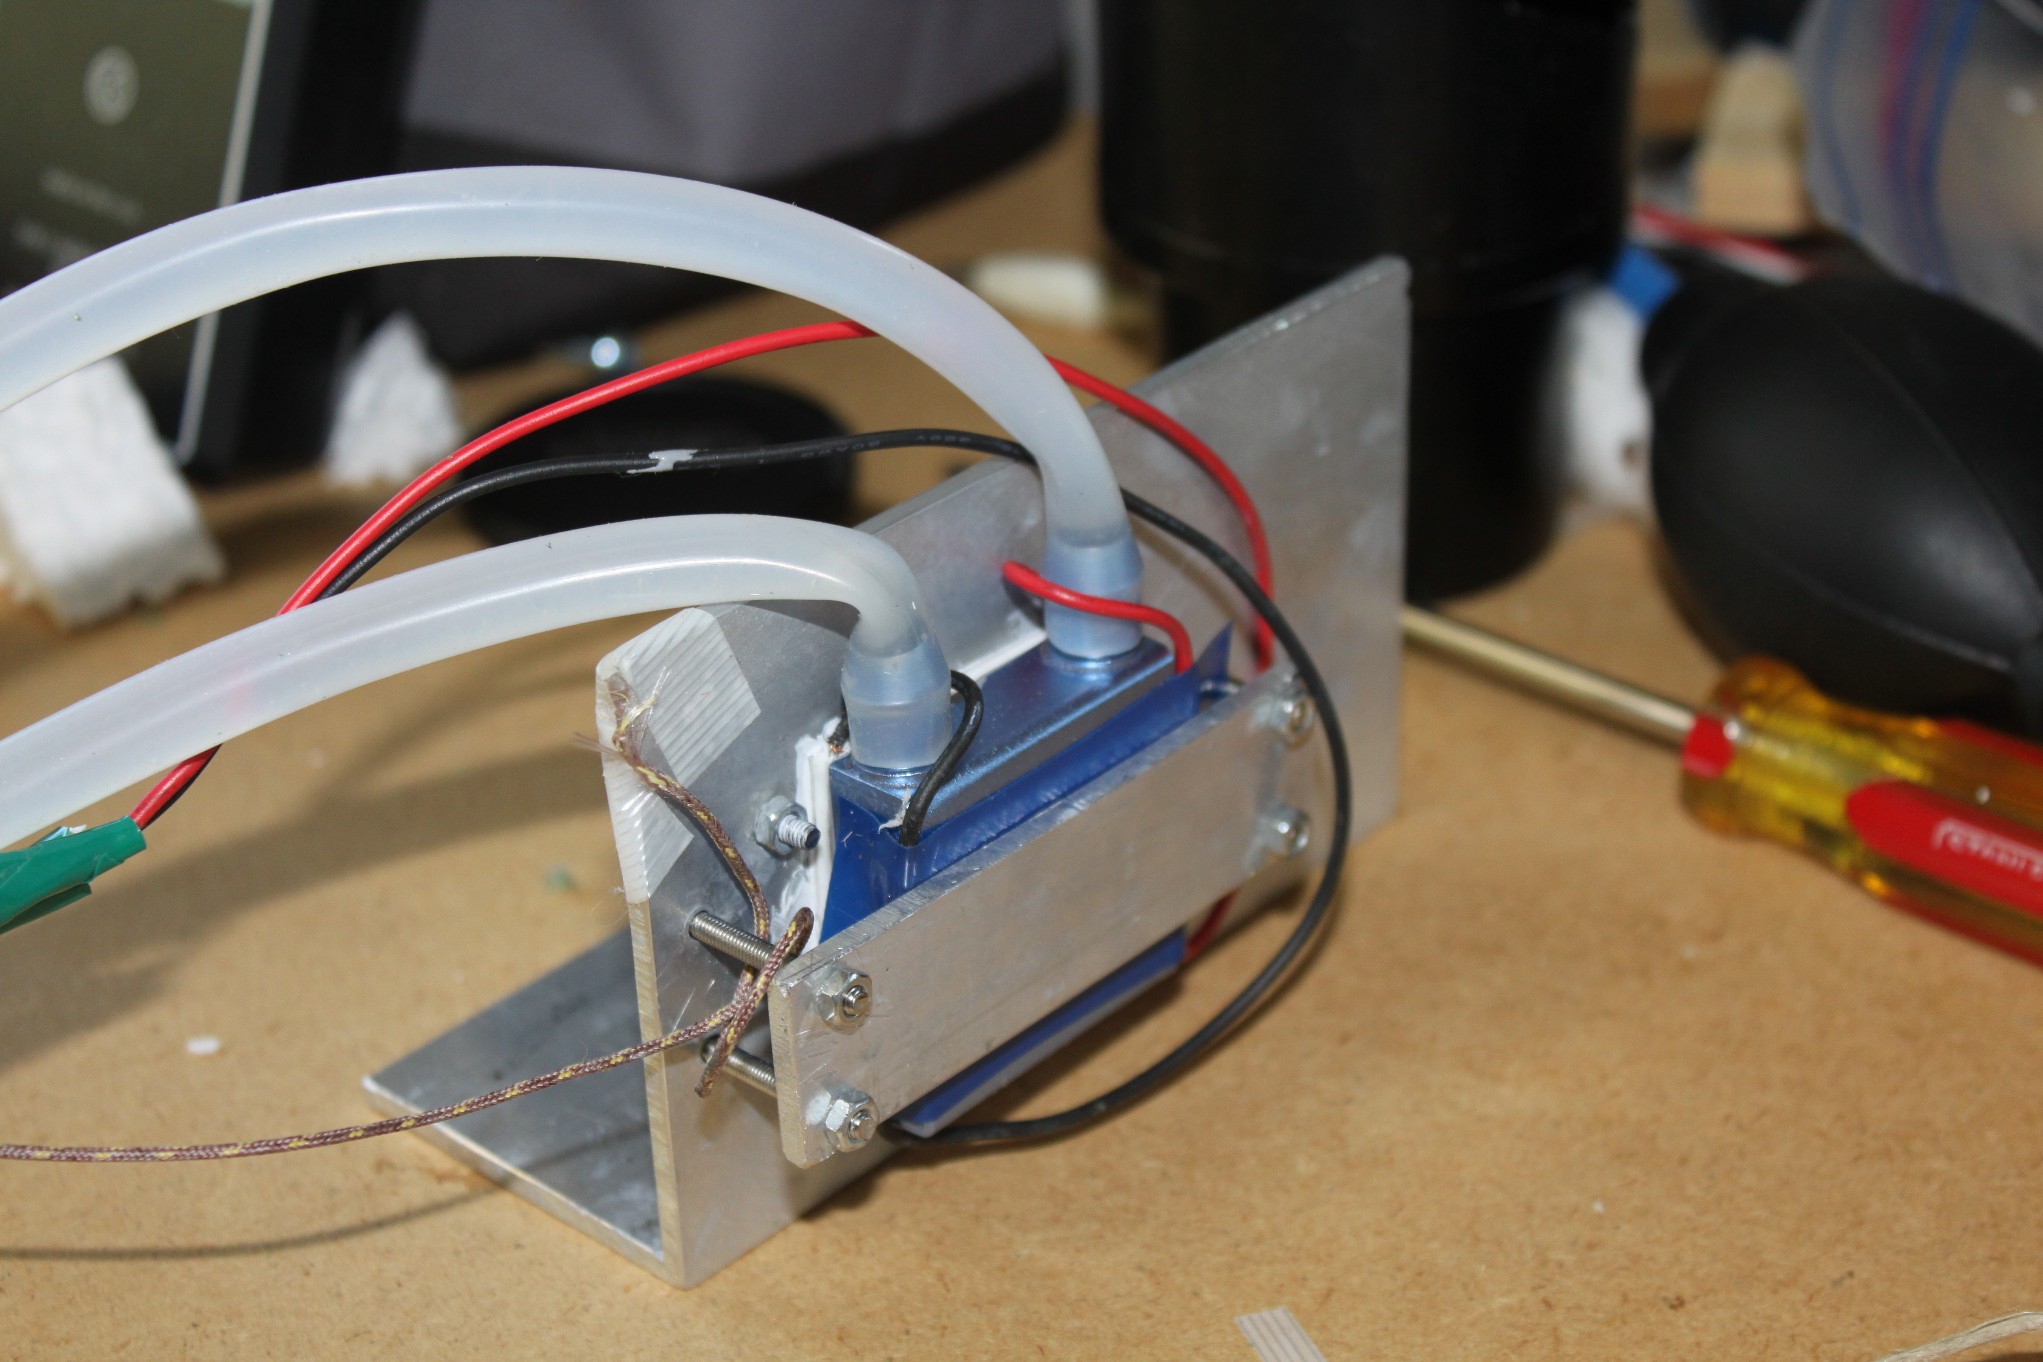
The TEC element and the water jacket, glued by the manufacturer, is also tightened with a plate and 4 bolts.

Front view
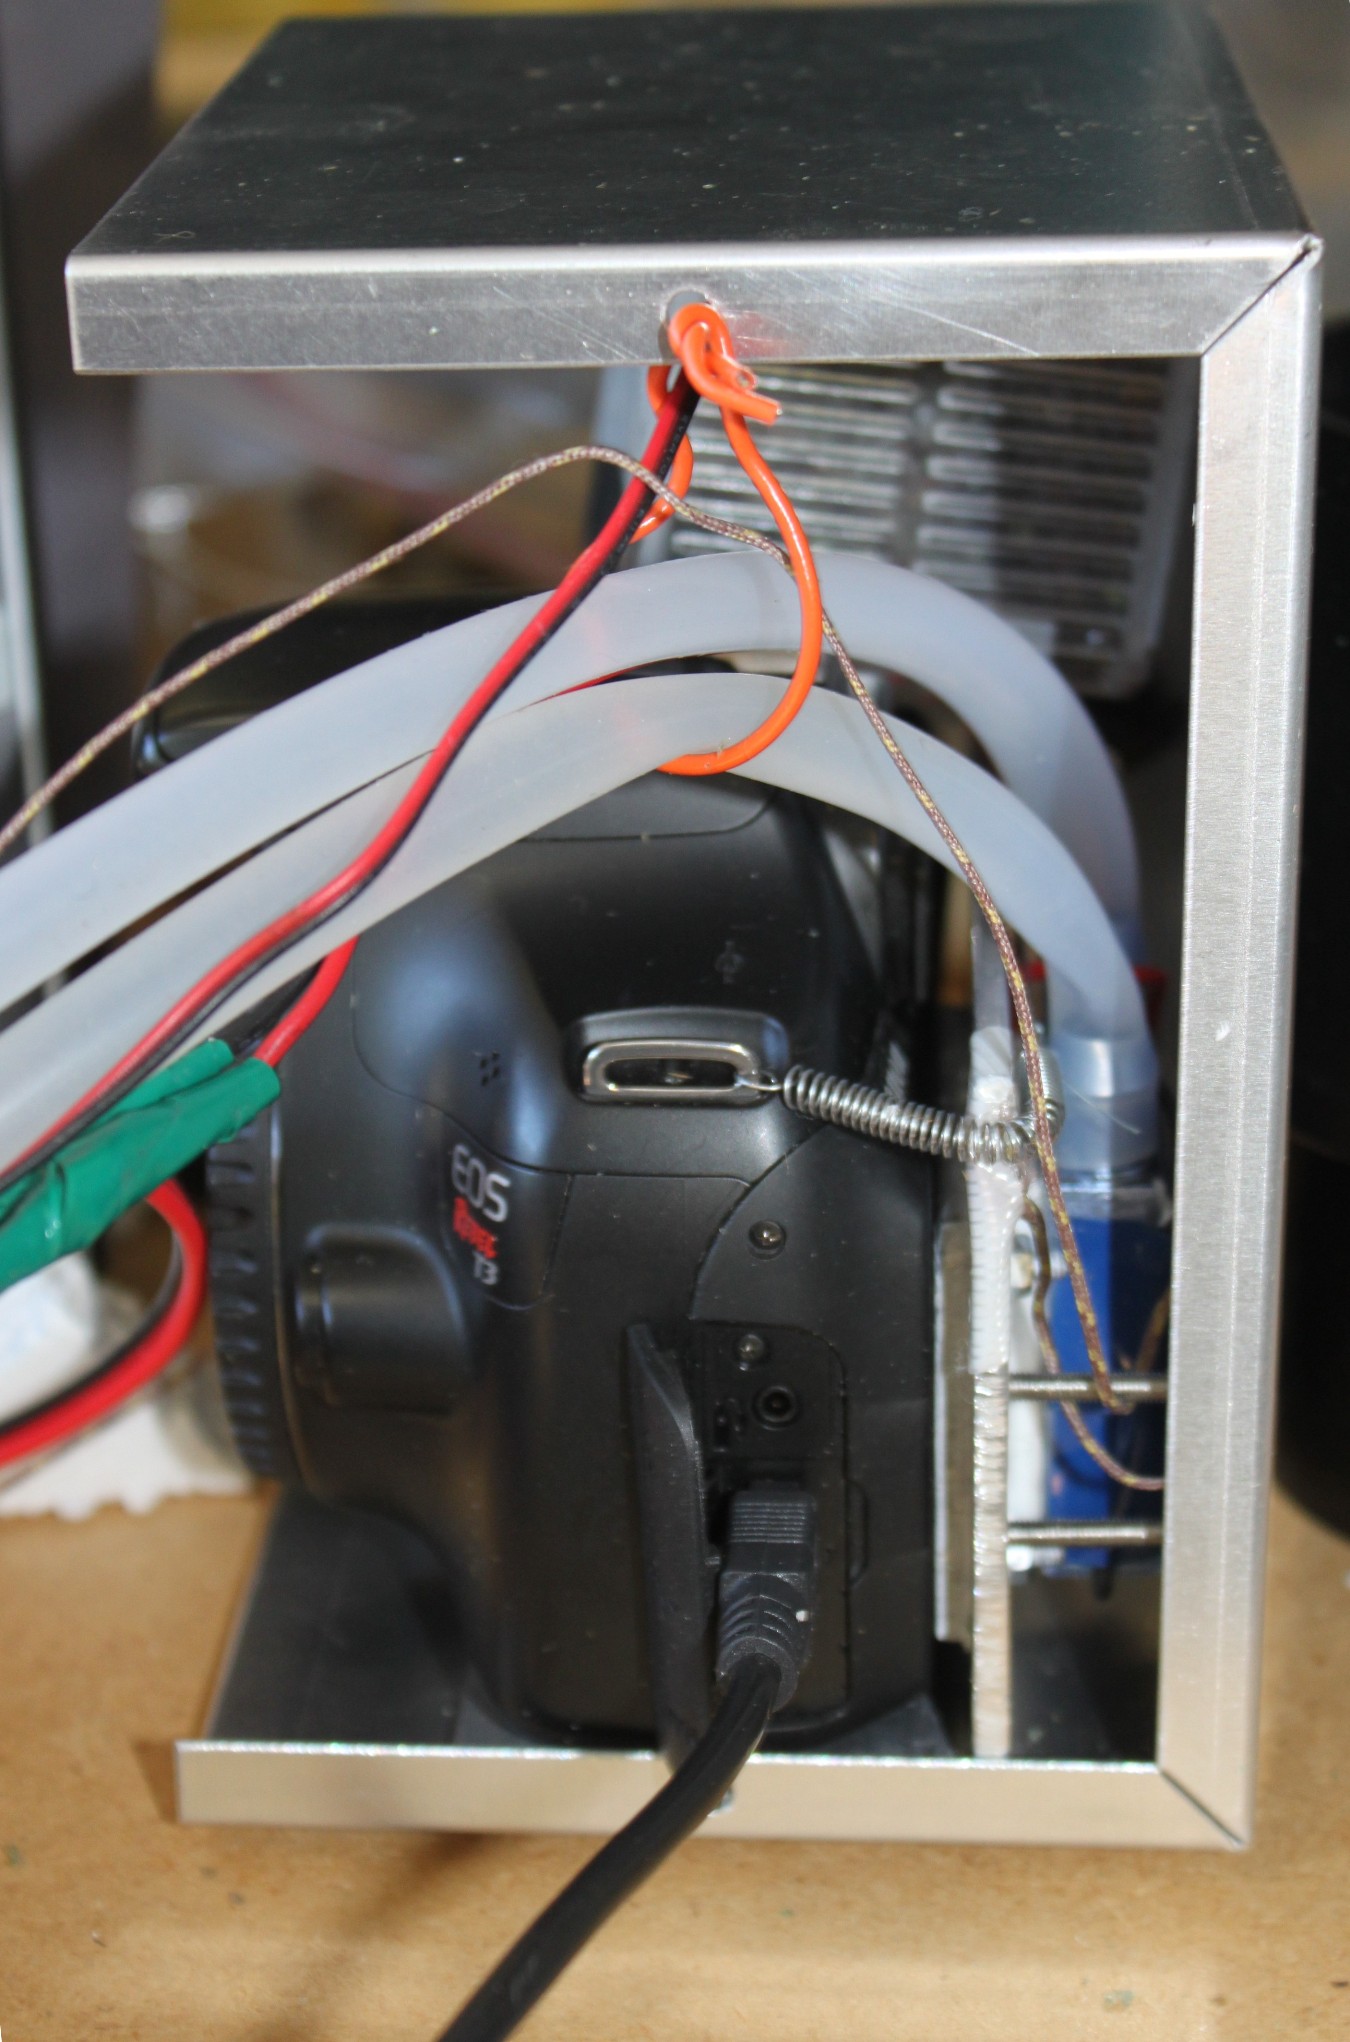
The camera is pushed against the extra plate with the bottom 1/4″ bolt and, at the top area, with fishing line with hook and a spring.
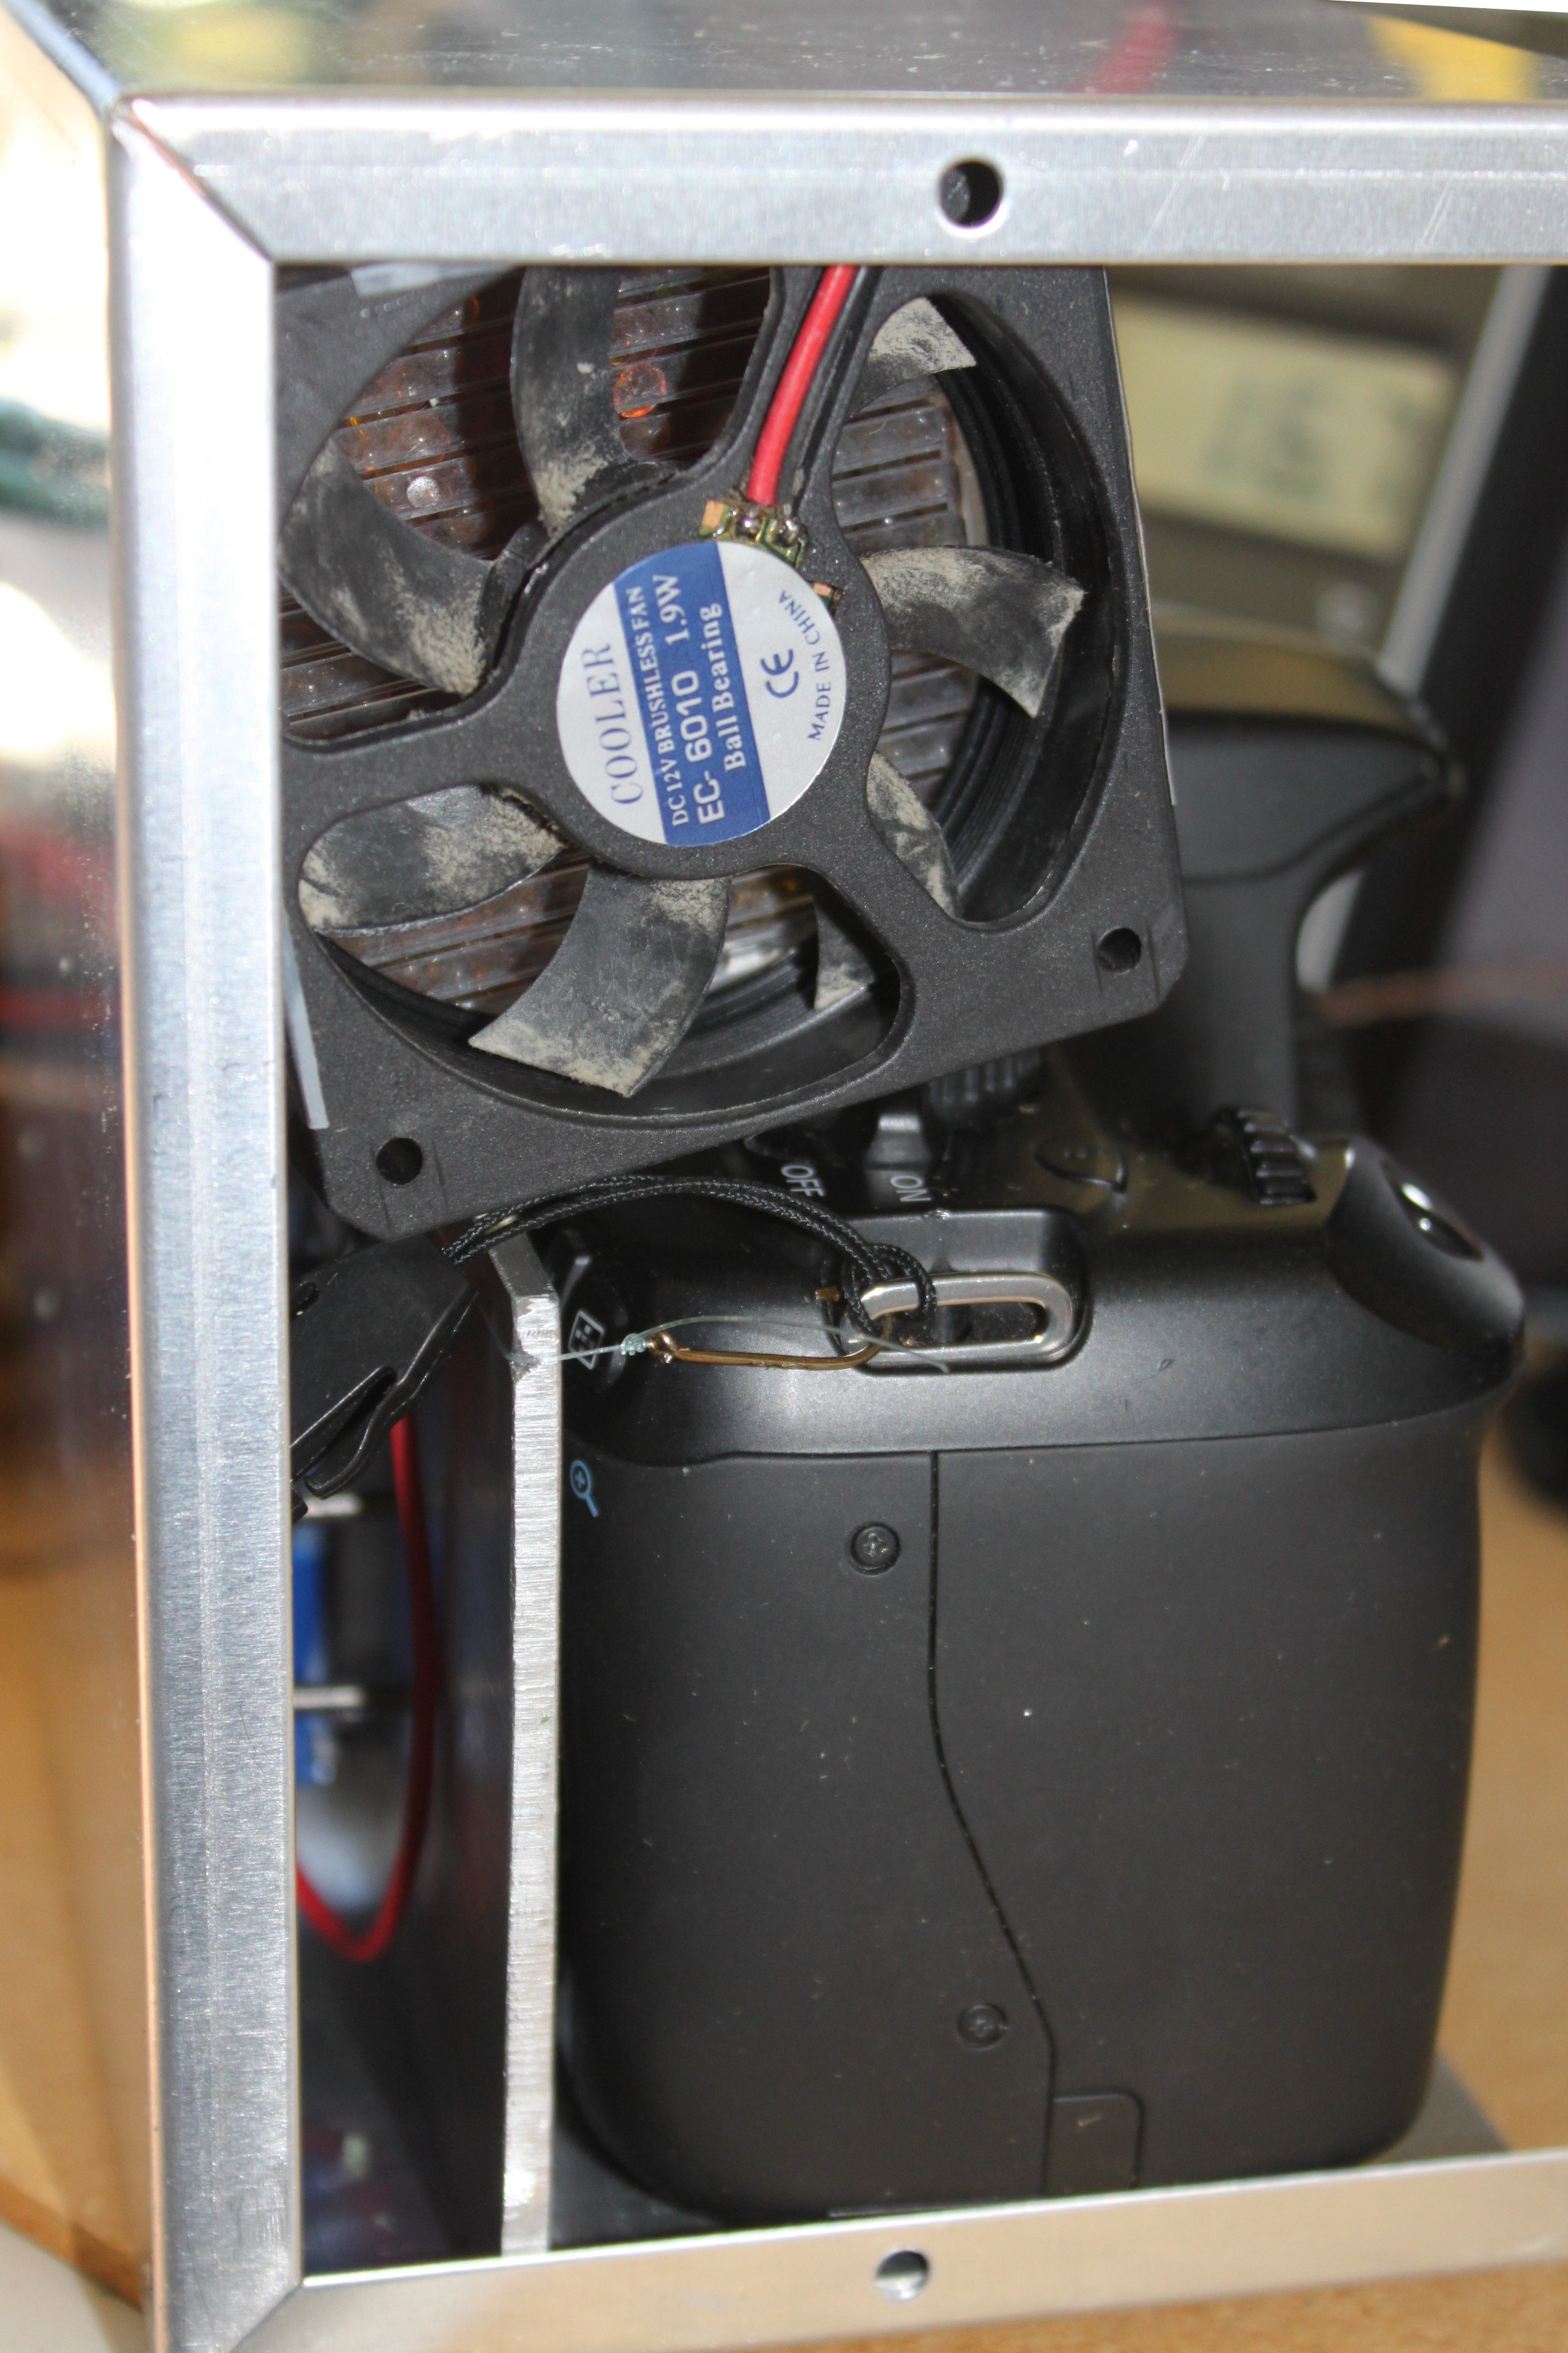
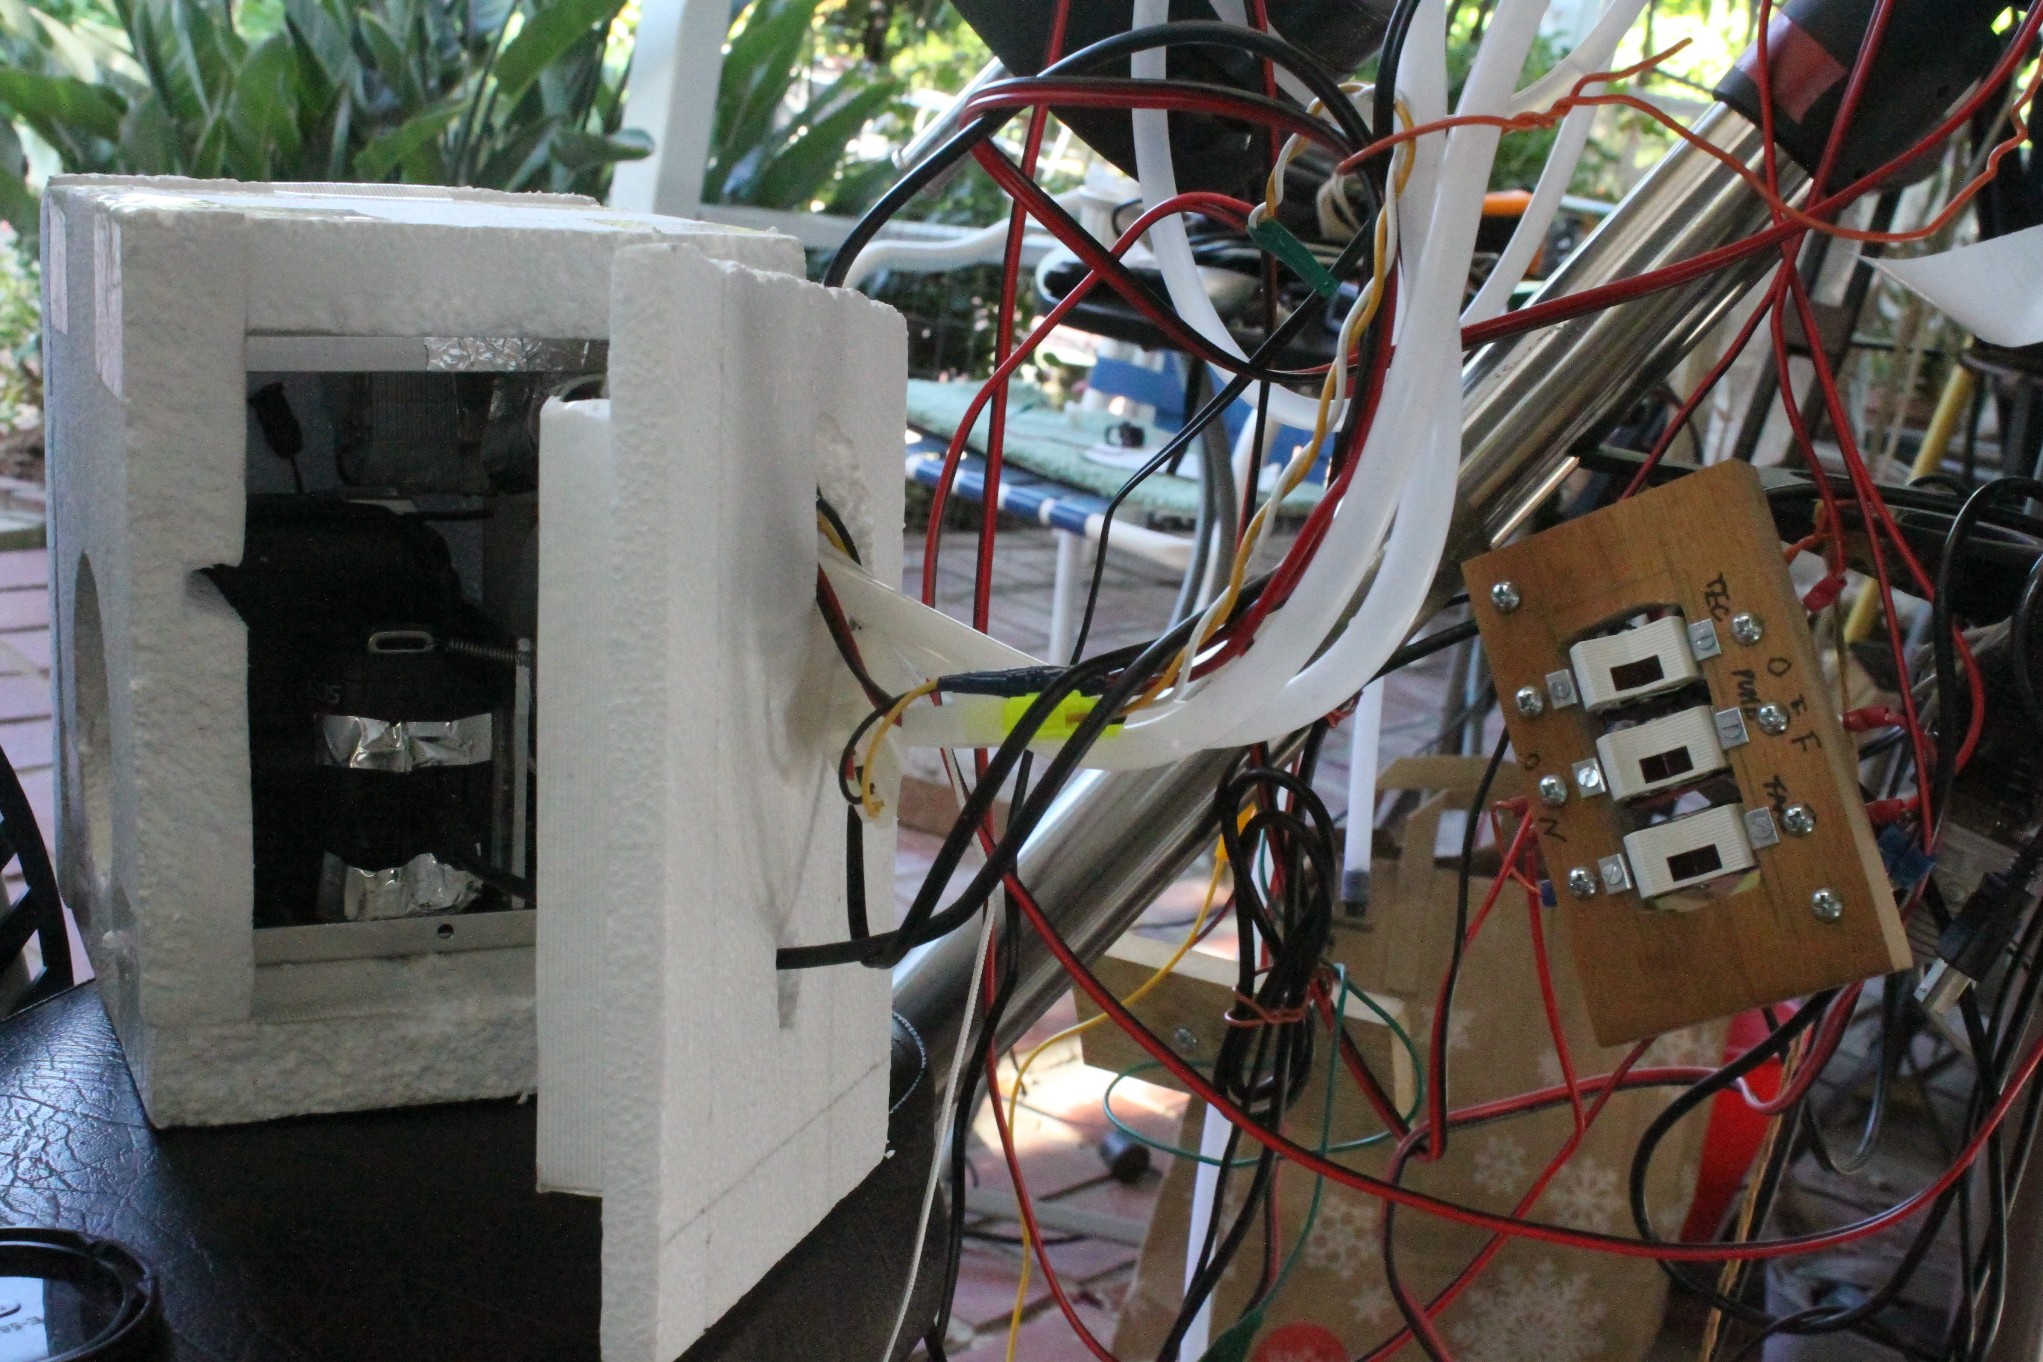
A CPU fan and Silica Gel beads in a plastic box is put on top of the camera.
A fishing hook and line, pulling the camera body toward the metal plate

The thermometer shows the temperature on the top corner of the aluminum angle (on the LCD screen side).
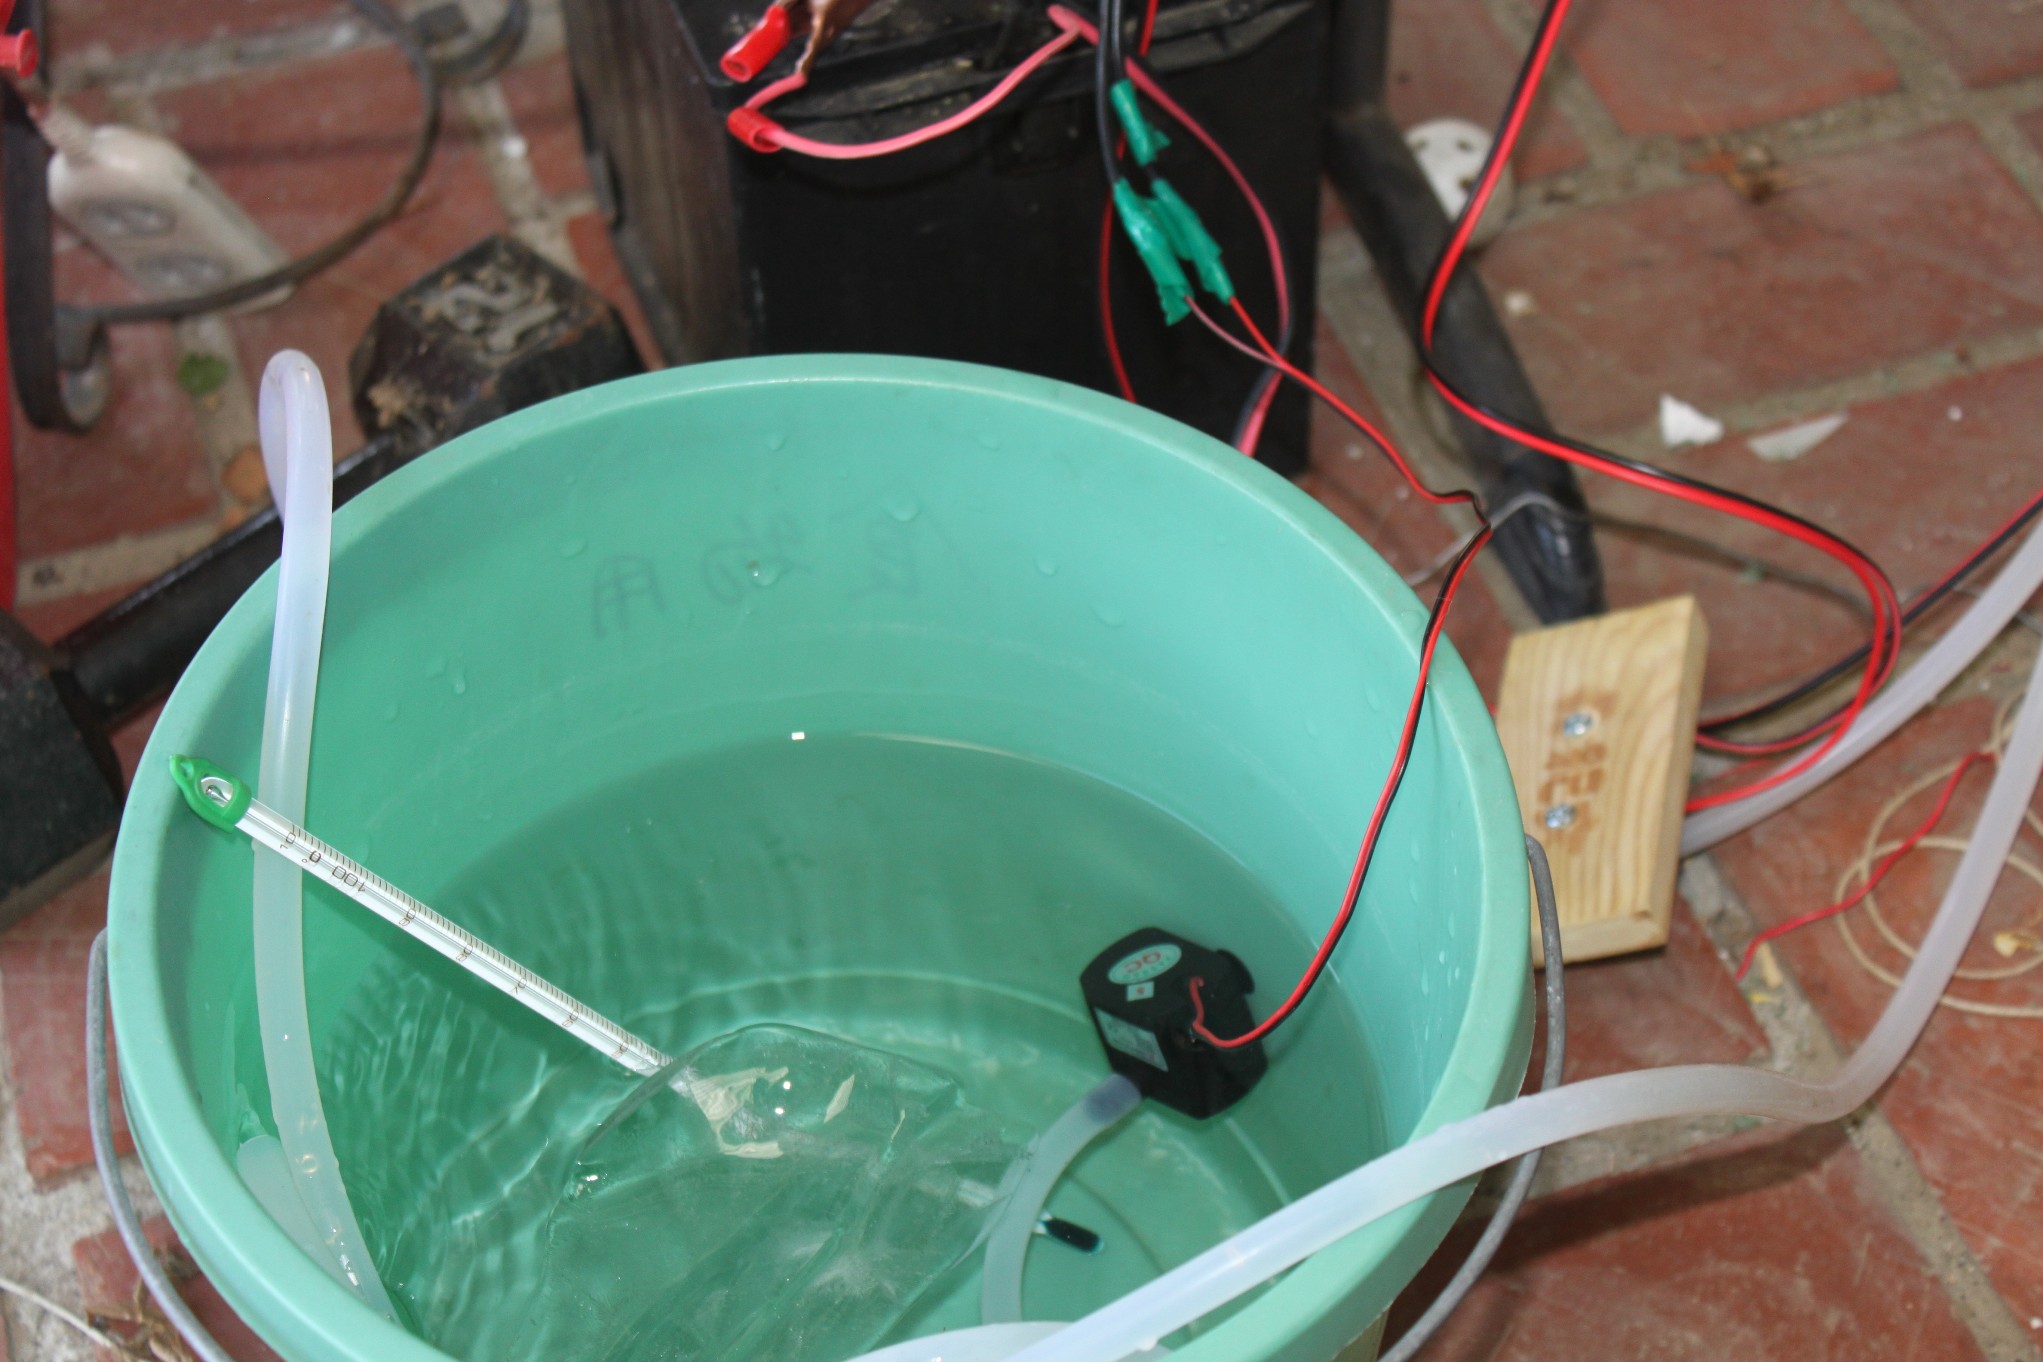
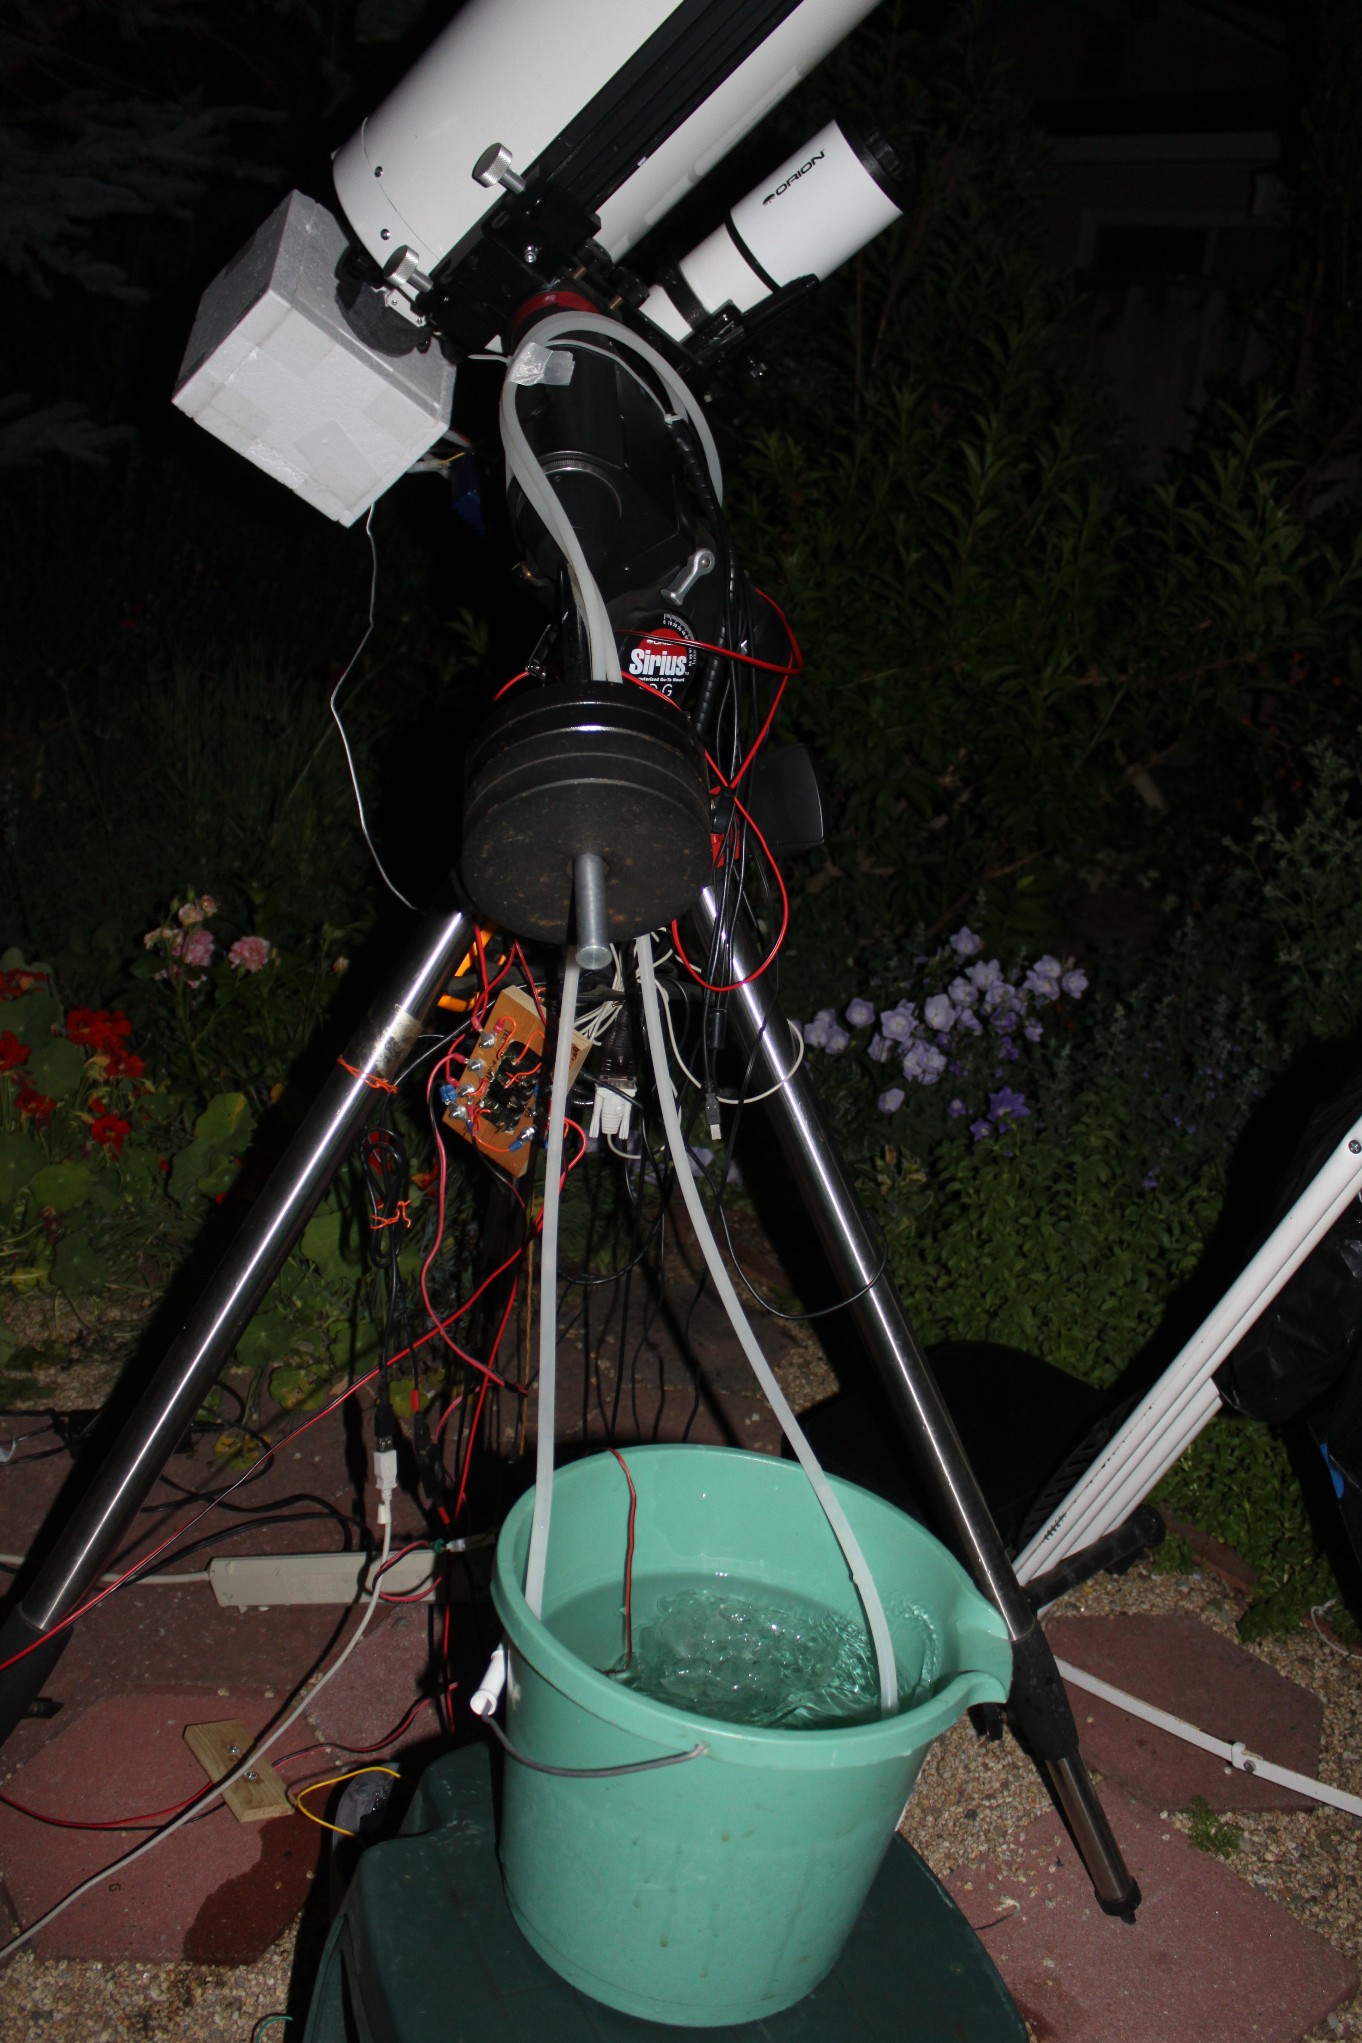
Immersion type water pump and a bucket with water and ice
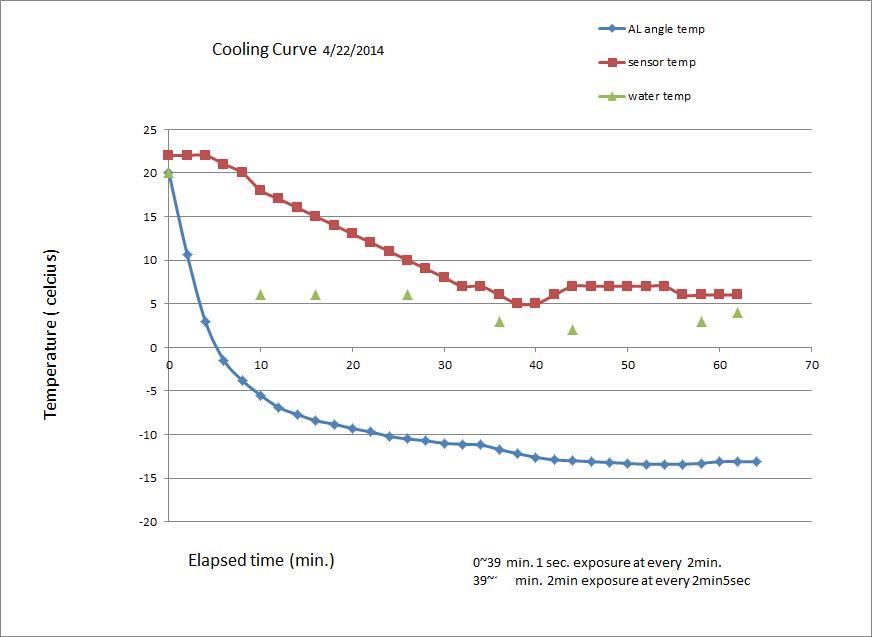
Test results, showing the temperature
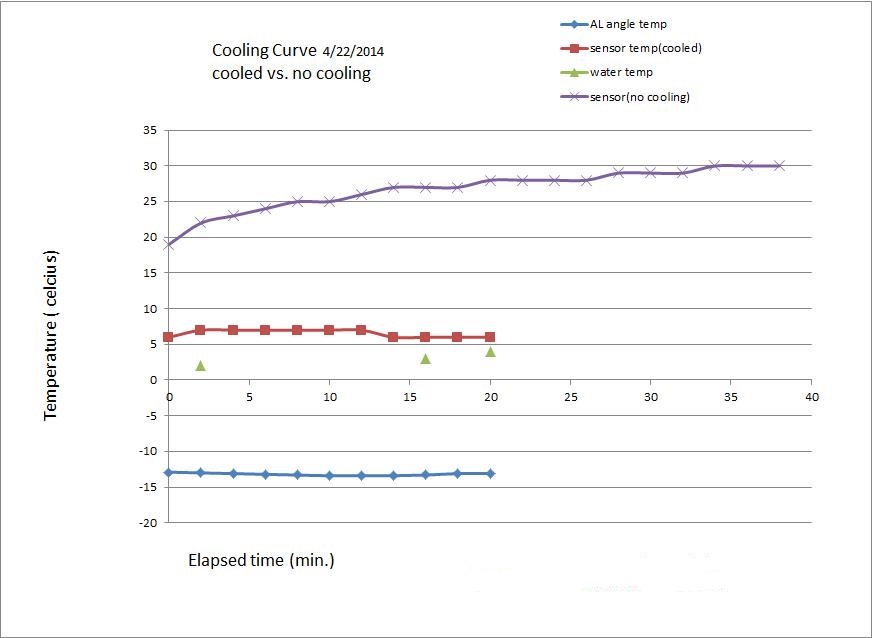
Test results, comparing the “not cooled” and “cooled” cases
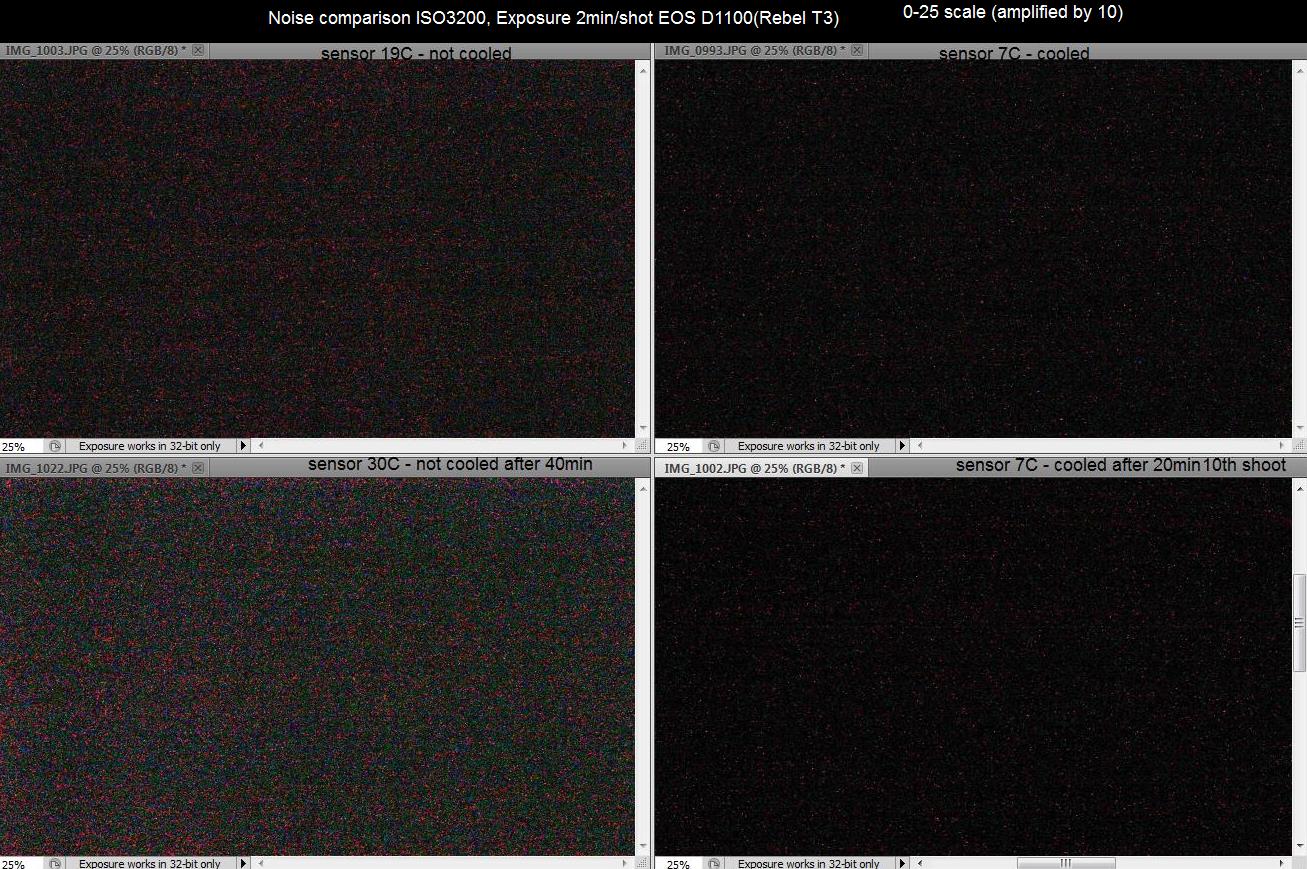
noise comparison (not cooled vs cooled)
|
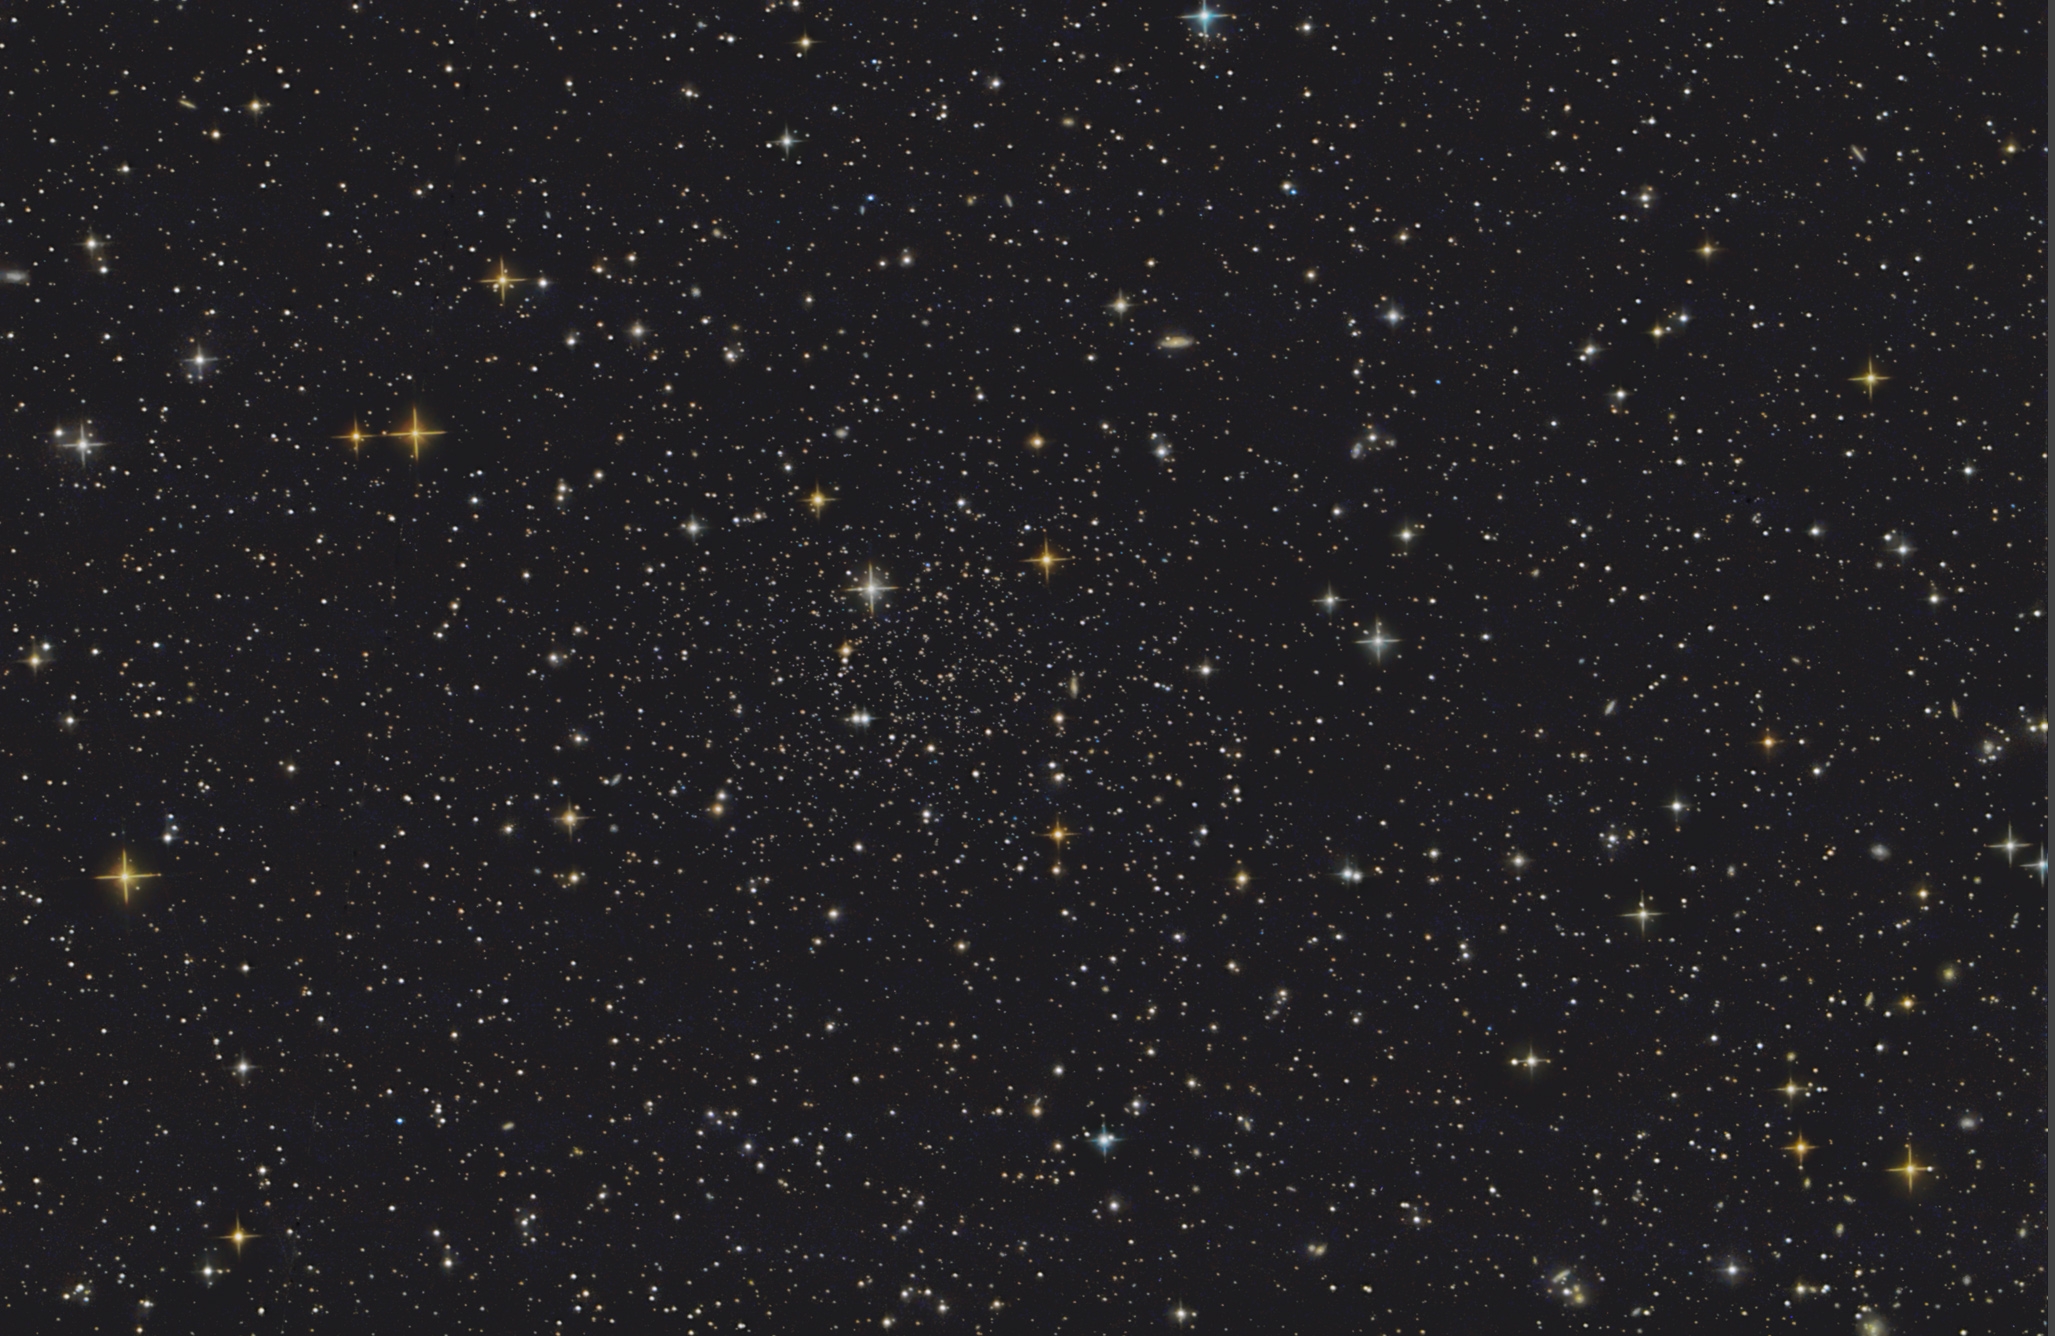
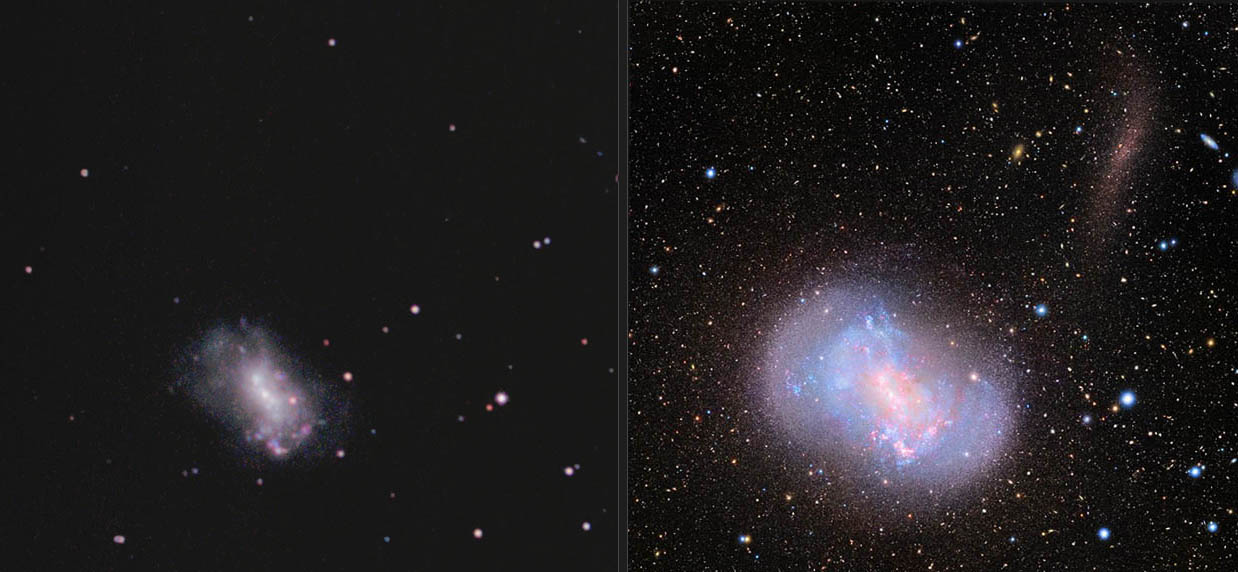
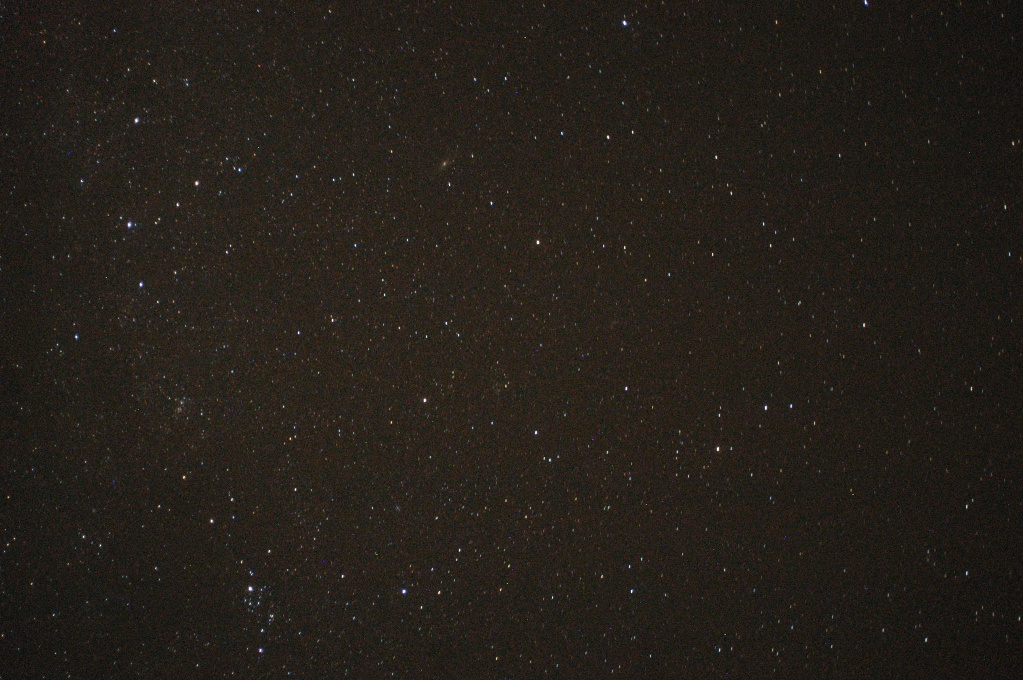
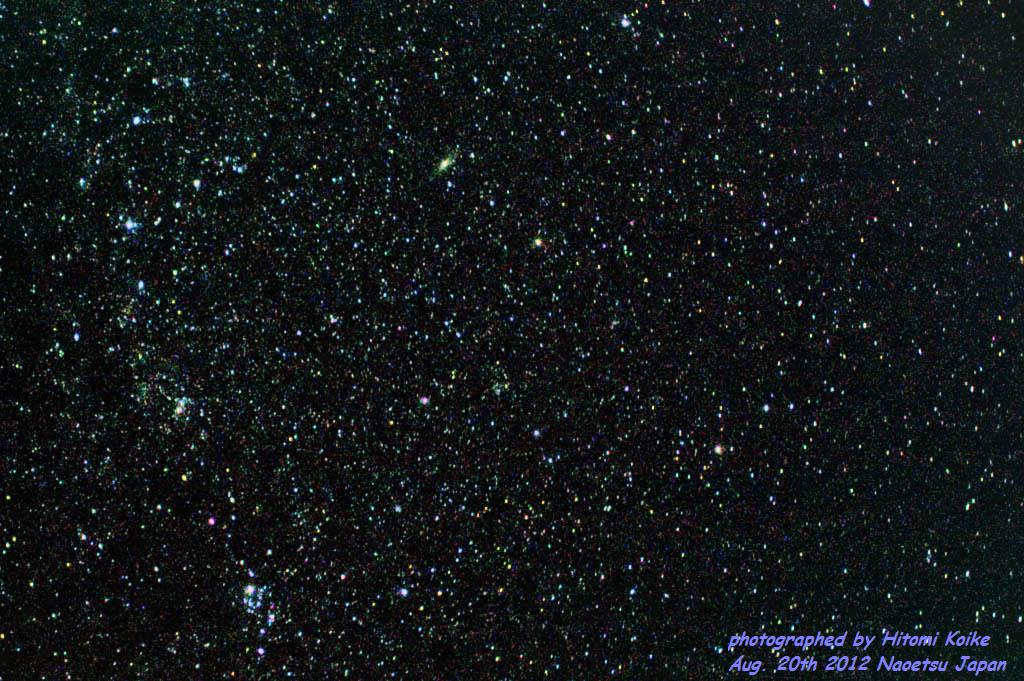
左のわたしの写真はVC200L望遠鏡で、右は研究グループがスバル望遠鏡で撮影。 わたしの写真でも17等星まで写ってるんです。スバルの写真は22等星以上ですごいですね。 もう渦巻き銀河はかなり撮影して、少しは様子がわかってきたのと、飽きもきたので、 |
http://www.naoj.org/Pressrelease/2012/02/08/j_index.html Courtesey of National Astronomical Observatory of Japan 右側の画像: すばる望遠鏡に搭載された Suprime-Cam が捉えた矮小銀河 NGC4449 (左下) と 飲み込まれつつあるさらに小さな銀河 (右上)。NGC4449 中心部の青い輝きは活発な星生成活動を、 外縁部や飲み込まれつつある銀河に見られる赤い光は年老いた赤色巨星の存在を示しています。 (画像合成:ジェイ・ガバニー氏) |

VC200L (Reducer) and self-modified EOS REBEL XSI(450D),
guided by 80mm tube with PHD guiding and Meade DSI PRO II, on Sirius EQ-G
40 lights at ISO1600 and 3 min. Exposure each, totaling 2 hours,
20 darks and 20 lights, stacked with DSS(DeepSkyStacker),
processed with PS CS5 + Carboni Tool, Noise Ninja and FlatAid (フラットエイド)


150mm Focal Length ISO800 0.6 second exposure
Click to expand.

The Trapezium is seen at the center of M42.
Gadgets:
Sigma Telephoto lens 150-500mm at 500mm FL,
with two EOSs, EOS Rebel XSI and T3, both modded,
0.5,2,4,8 minute exposures (4~8 frames each) at ISO1600 with XSI and Orion SkyGlow filter and,
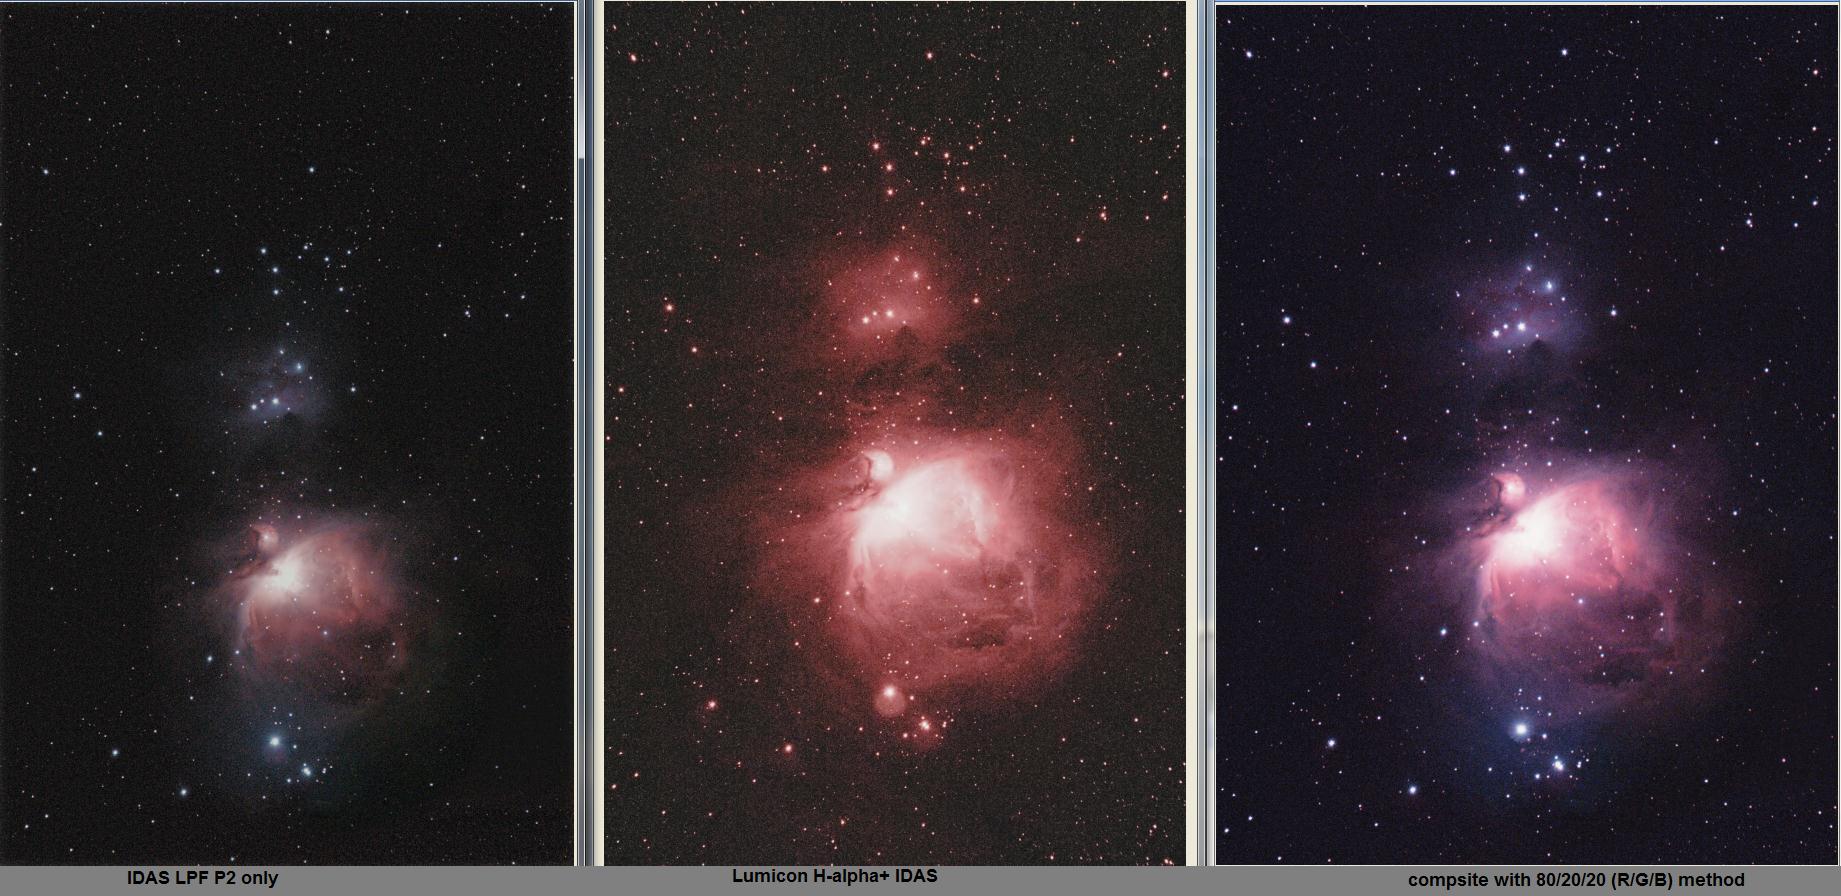
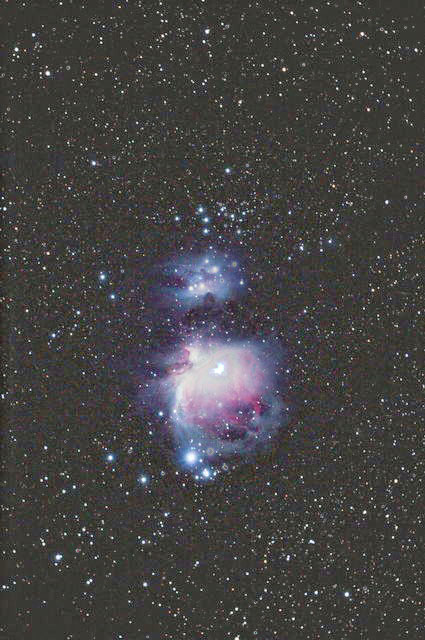
2 min. x 25 frames at ISO3200 with EOS Rebel T3 with IDAS LPF P2,
4~8 darks and 20 flats for XSI and 20 darks and flats for each for T3.
Note 8 minutes frames were discarded due to drift.
The processing was not easy due to the difference in the transmission spectra between the Orion and the IDAS filters.
Layer Mask method with Photoshop CS5 was used to composite the images.

same Sigma zoom lens (150-500mm) at 500mm FL.
Regardng the H-alpha and RGB composite, please refer to the URL below about the method of 80/20/20 by Neil Heacock:
http://tinyurl.com/7jqxzly
The Horsehead Nebula 馬頭星雲

M77 - NGC1055

Sigma Telephoto Zoom Lens of 150-500mm FL at 500mm
Canon EOS Rebel T3, self modded,
ISO3200, Exposure time 2 minutes,
27 lighs, and 20 darks and flats each,
Lumicon H-Alpha filter with IDAS IPS P2 filter, combined together, used as a semi-narrow band filter.
The transmission wave length is between 635 nm and 680nm , roughly 45nm band width at the half peak. Note the H-Alpha peak is 656 nm.
Please refer to
http://www.sciencecenter.net/hutech/idas/filtplt.htm
for LPS P2 and
http://www.astrosurf.com/buil/filters/curves.htm
for Lumicon H-Alpha pass filter (this filter is a low pass filter, not a band pass filter).
The star images were superimposed with the shots (45 seconds exposure frames) taken without the Lumicon filter


Processing of the M42 photos taken by LadeII
Photos: The exposure seconds are 30, 60, 120 and 240 seconds.
30 seconds exposure 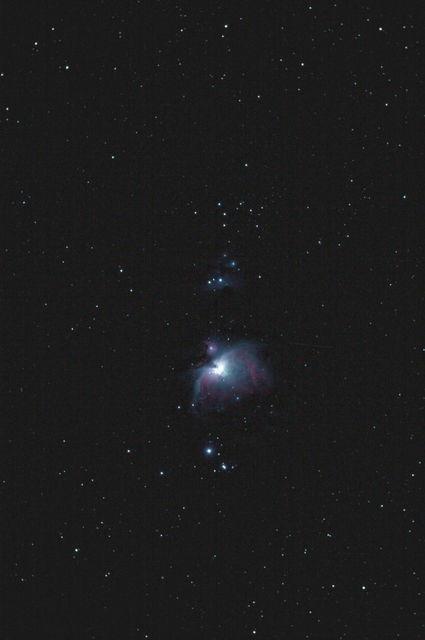
|
60 seconds exposure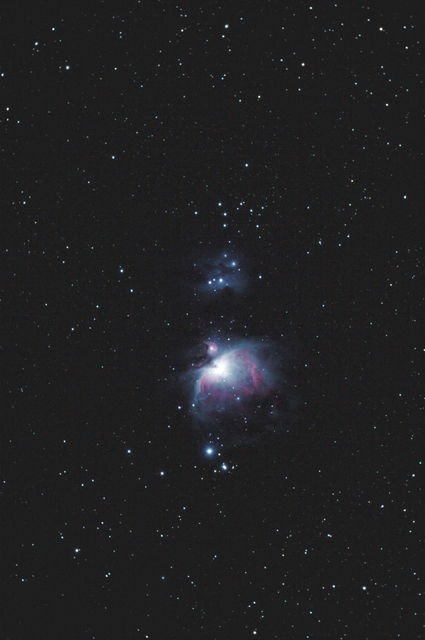
|
120 seconds exposure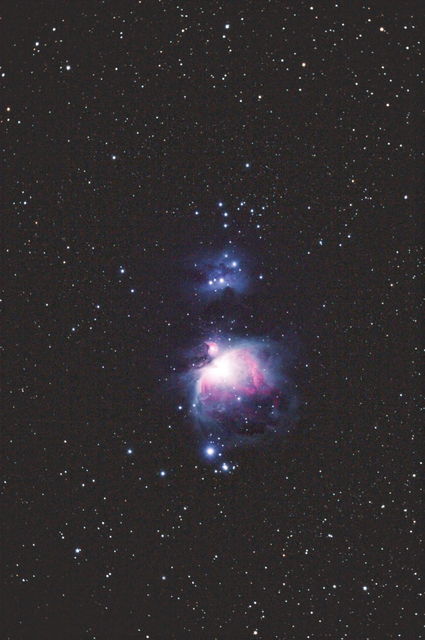
|
240 seconds exposure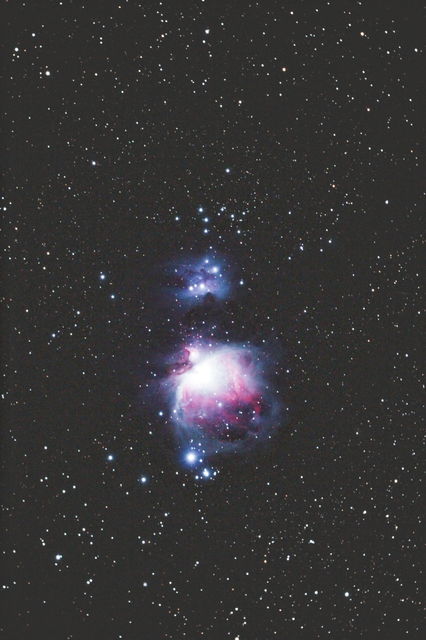
|
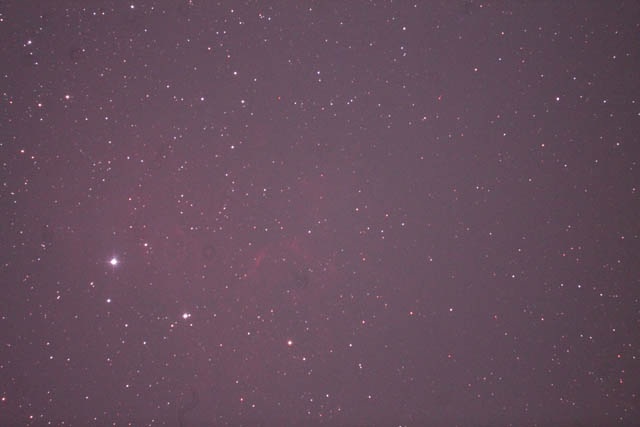
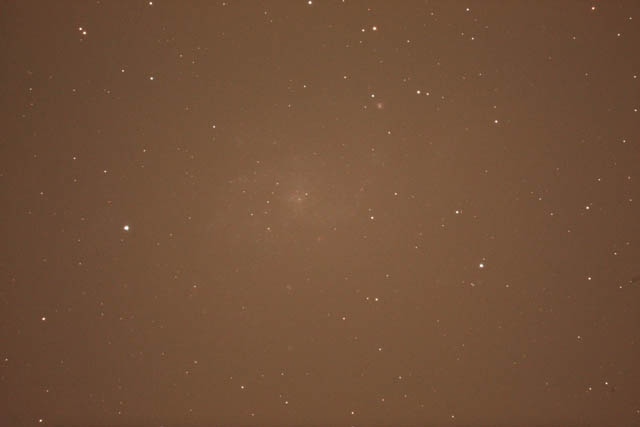
Left: raw processing and right: tiff processing
Compared are autosave01.tif, generated by stacking. Note that Luminance line in DSS is adjusted so that
the line is reasonably diagnal and starts climbing up at the left side of the skirt of the intensity peak.
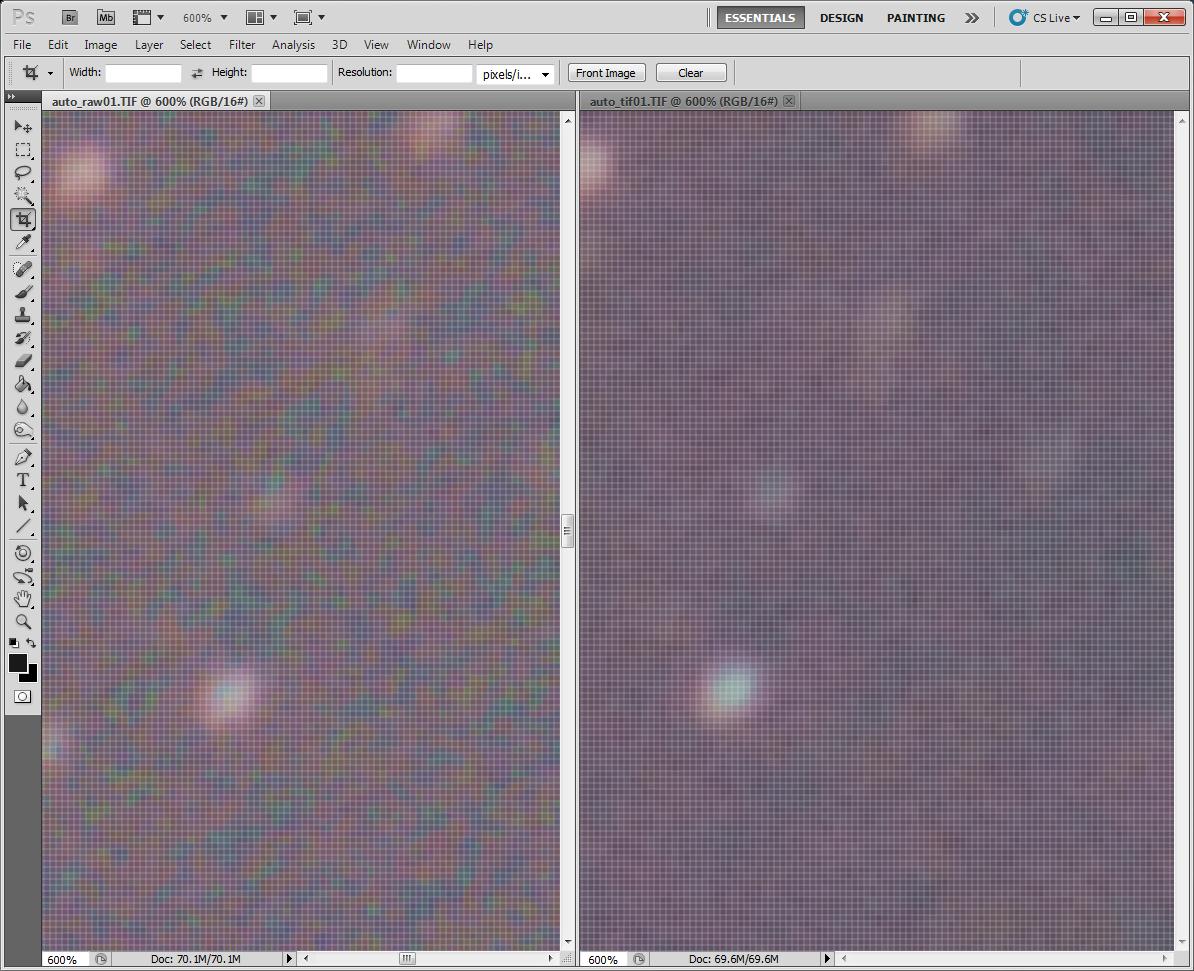
Top: raw processing, bottom: tiff processing
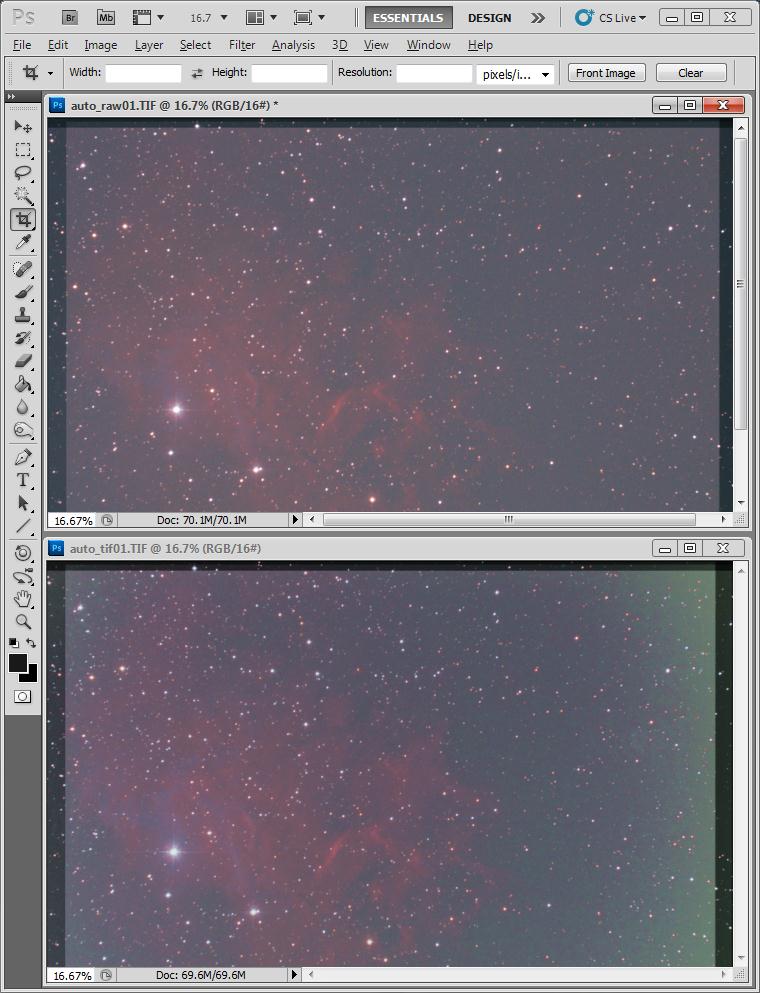
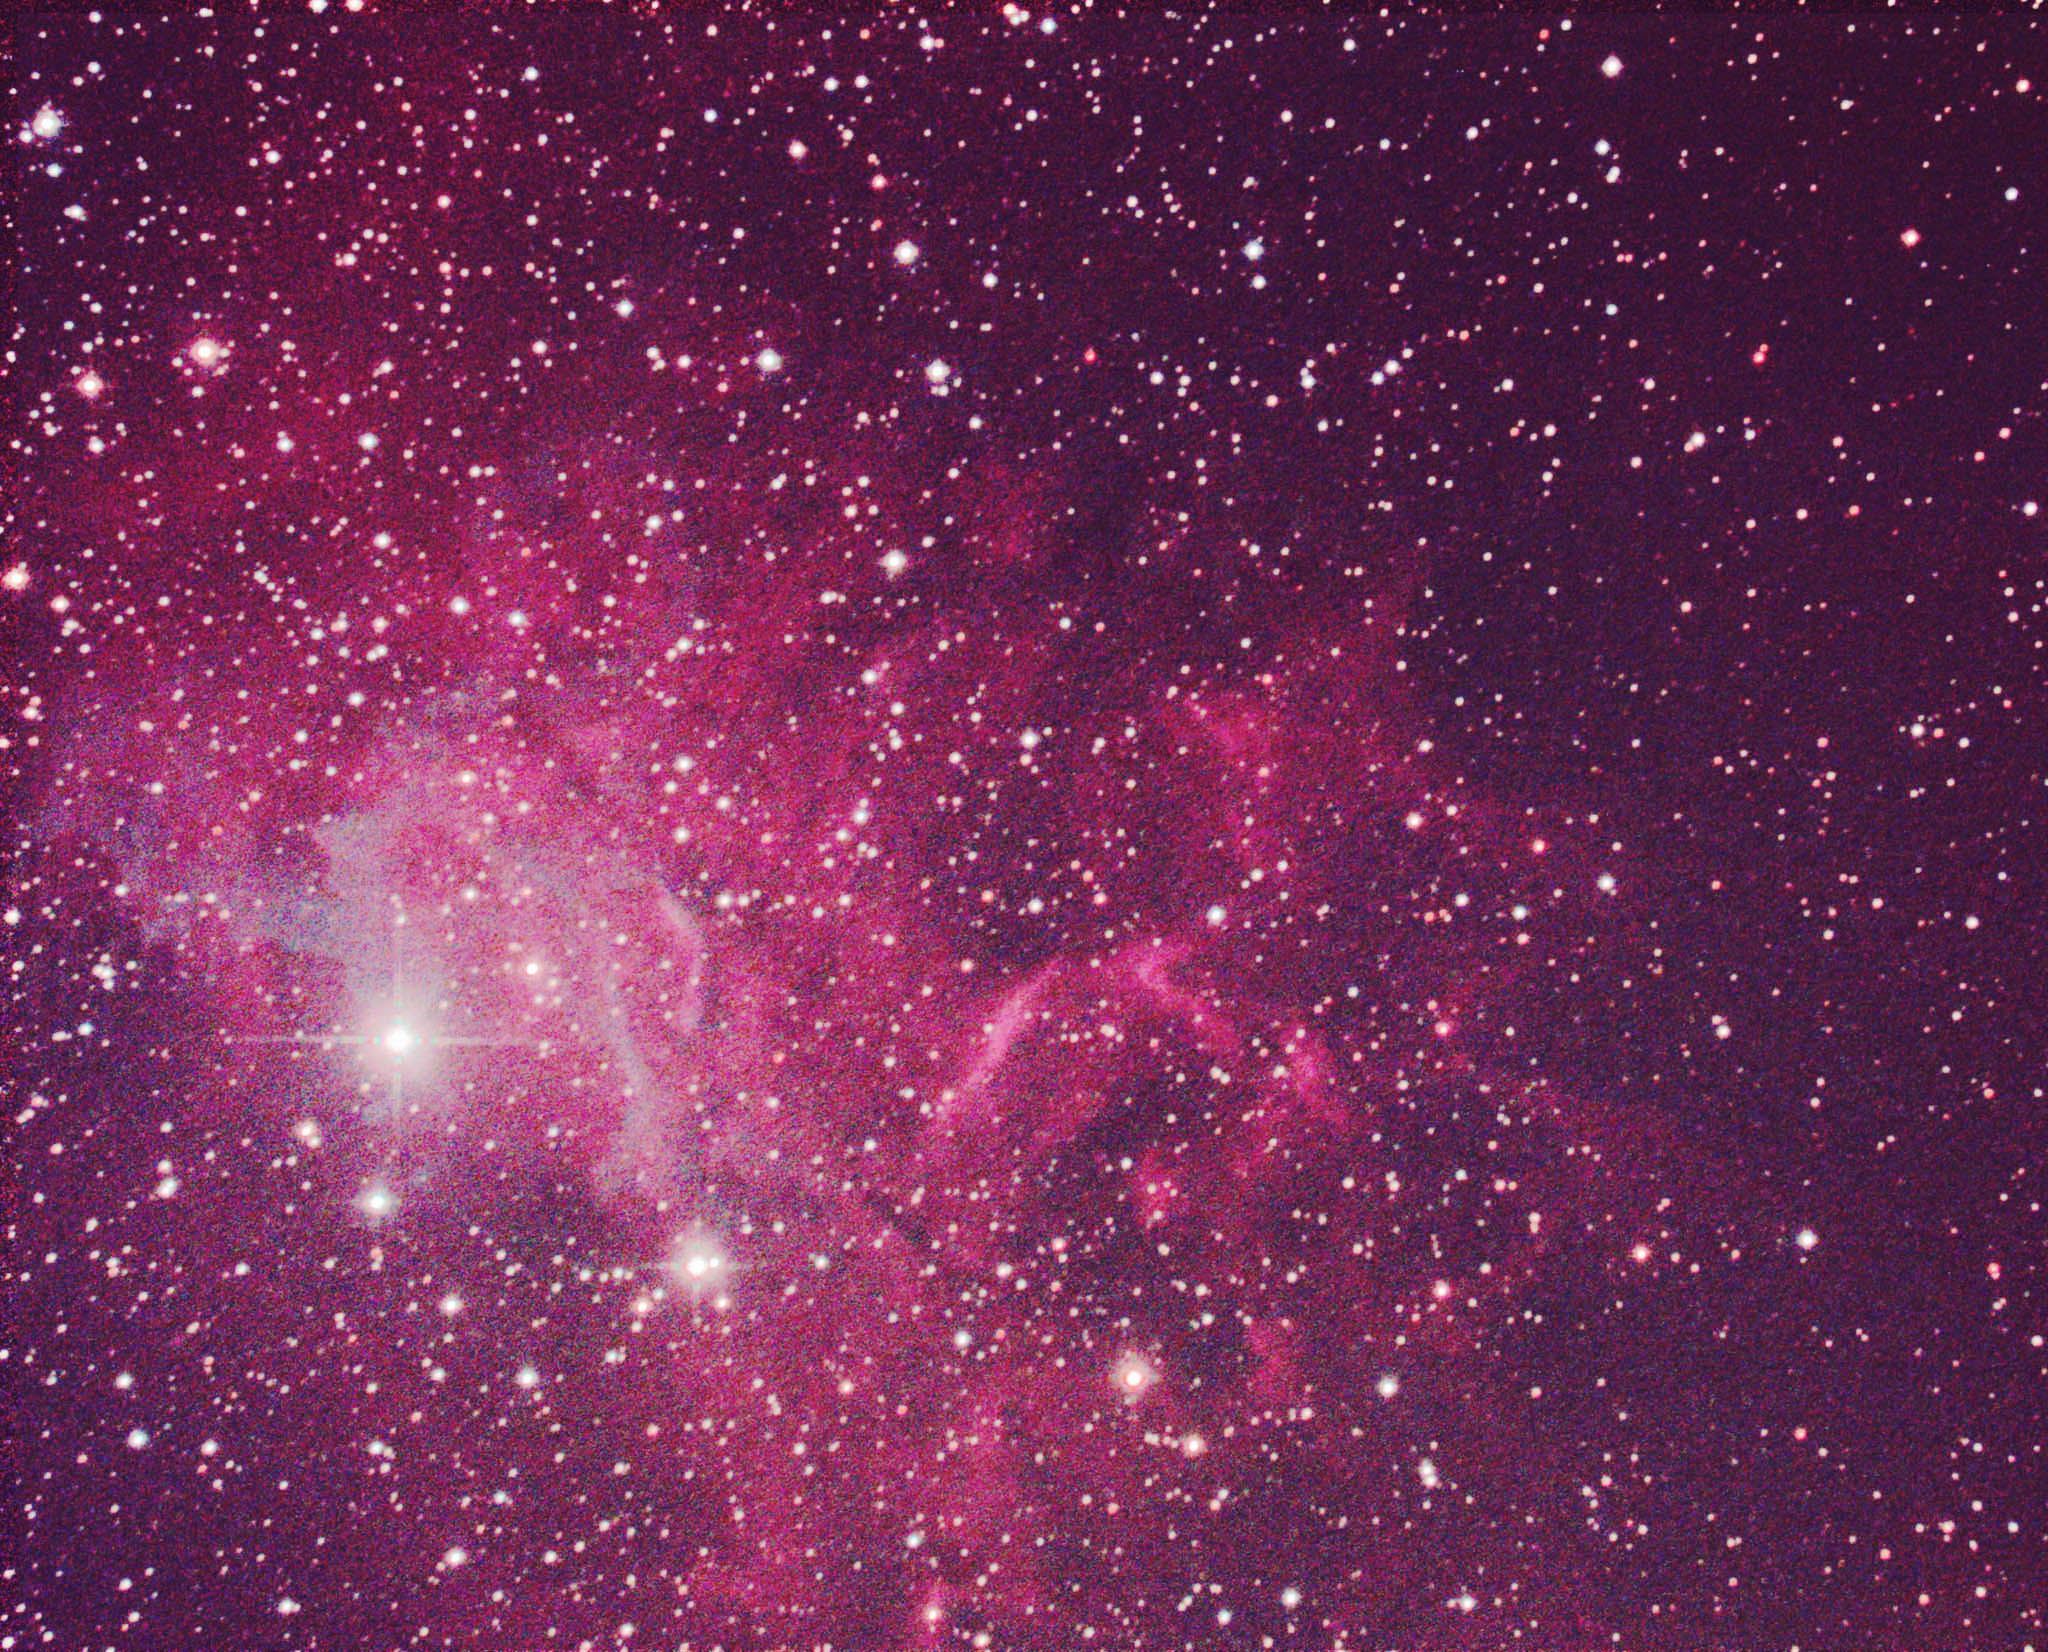
Raw processed photo of IC405
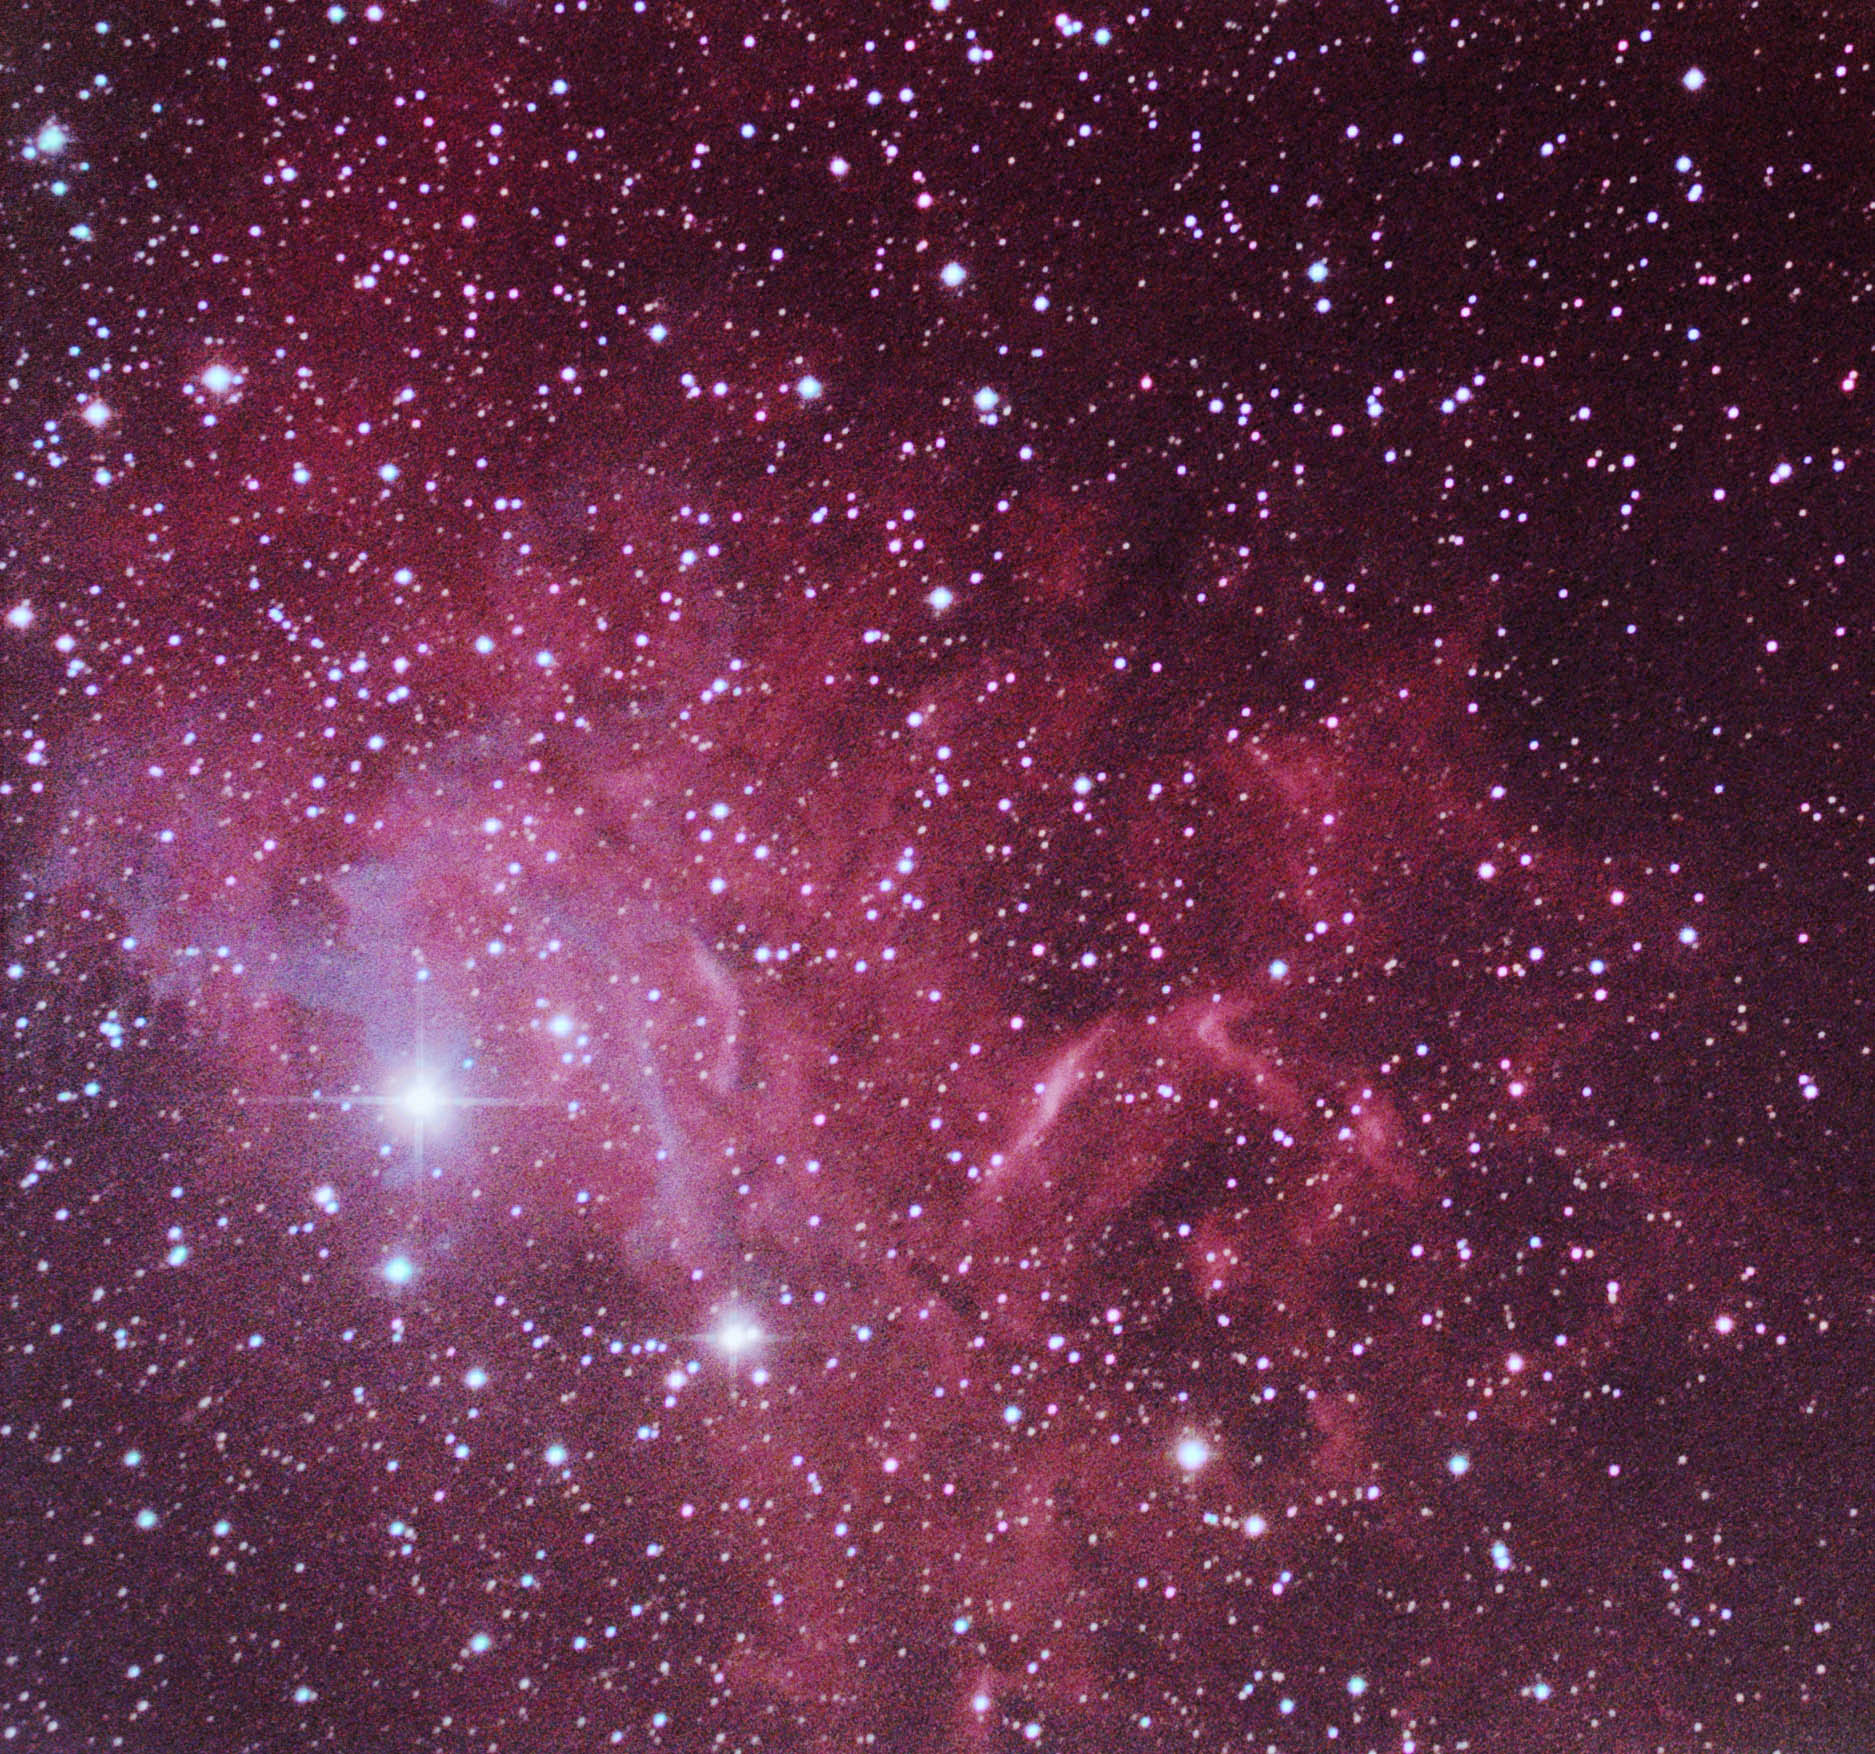
DPP-tiff processed
click to expand クリックして拡大

Note: Why do we increase the color saturation? どうして 色の飽和を上げて色を出そうとするのか?
The increase of color saturation is attempted because the real color saturation was reduced due to the tone curve manipulation. In our case, we have two problems. First, when the RGB peaks are made close to each other, the saturation is altered. For example, if the night sky has a strong red component, reducing this component results in reducing the red color of the objects; stars and nebulae. Note the color of the stars is not altered by the red glow of the night sky. In addition, the effect of the background light is negated by moving the left most point of the tone curve. This is equivalent to reducing the intensity by proportionally lowering the intensity. A proper processing needs to eliminate the intensity by subtraction while maintaining the degree of color saturation.

Emission/Reflection Nebula, being bombarded by the UV light by AE Aurigae, the brightest star in this photo. AE Aurigae was originated near or at the Orion M42 and is passing now through IC405. Refer to:
Wikipedia IC405
for detail.
1/14 and 15th 2013 from Sunnyvale, CA USA
Same Vixen VC200L scope and EOS Rebel T3 (1100D or Kiss X50)
33 light frames at ISO 3200 and 90 seconds Exposure, 20 flats and 20 dark.
The dark noise (red noise) of T3 is less than half of the noises of XSI(Kiss X2) and T1i(Kiss X3).
This is very impressive improvement. It appears Canon had a mini break-through in reducing the defects mainly on the interface of oxides and Silicon of their CMOS.
The following is one of the original unprocessed frames. Note that in EOS T3, two filters, one for low pass and another for IR/UV cutoff, are in a single frame. When the IR/UV filter is cut out, a great care needs to be taken not to contaminate the surface of the low pass filter or it needs to be cleaned. Currently the back surface of the low pass filter is very dusty, needing multiple shifts in the framing while shooting.
1/2 and 1/3/2013 from Sunnyvale CA USA

Subframes
1st day: 5 min. x 9 frames and 3 min. x 5 frames
2nd day: 3min. x 25 frames
One of original frames 現画像の例

Subframes
3min. x 20 frames and 5min. x 5 frames, totaling 1 hour and 25 minutes
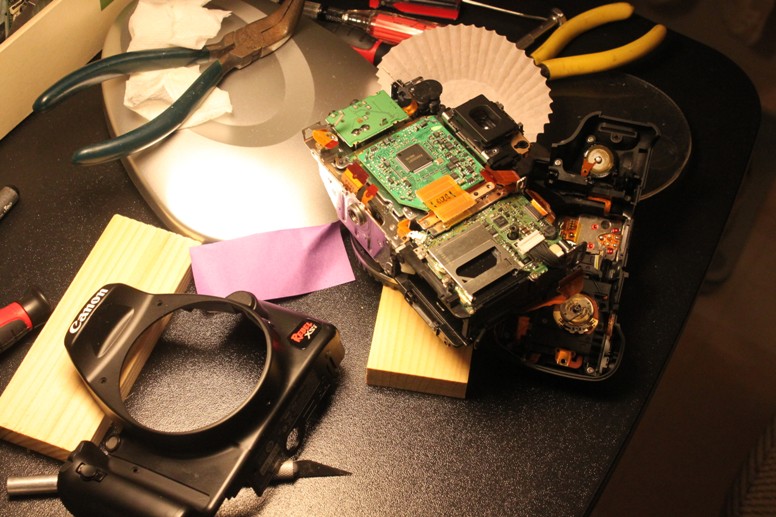
IR/UV filter removal for the EOS Rebel XSI (450D or KISS X2)
Disassembly and Regreasing of the German Equaitorial Mount Sirius EQ-G


1
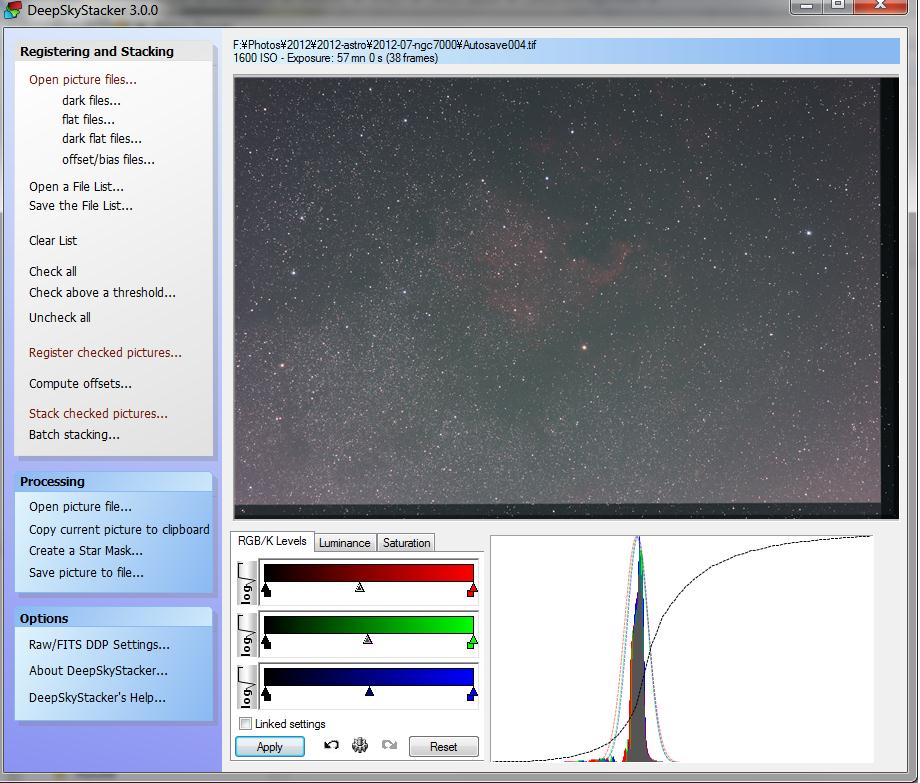
DeepSkyStacker
Stacking result and setting for the post-processing (Levels and Luminance)
スタックの結果をレベル補正、カーブ(ルミナンス)補正する。
サチュレーションを10〜20%くらいに上げるのがよい。
2
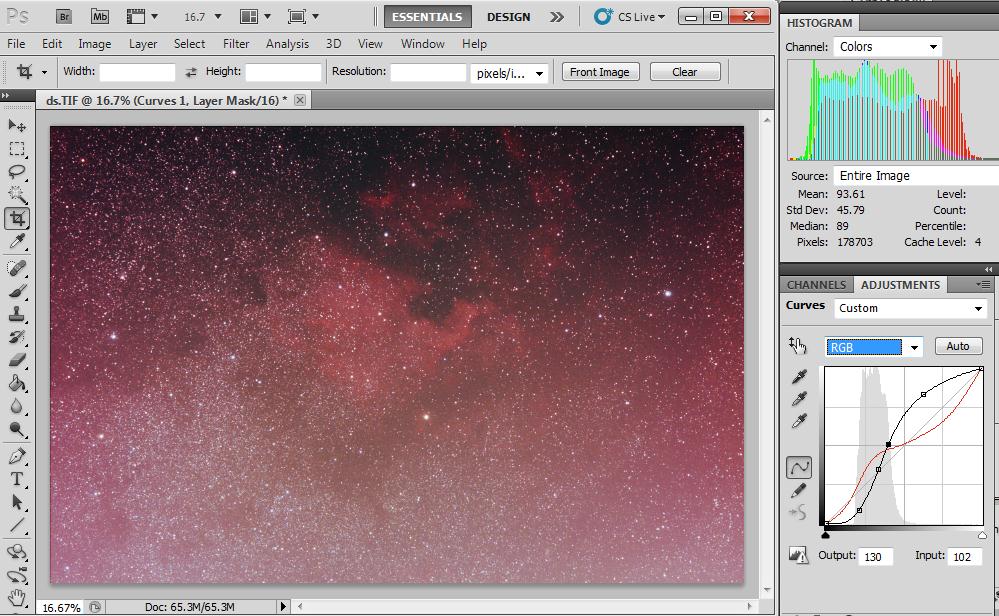
Photoshop CS5 (Digital Photo Processing - Canon, or Photoshop Elements or GIMP, would be fine)
Using tone curves for both RGB and Red, the contrast is adjusted (see the curves for RGB and Red)
CS5 でRGB と赤のトーンカーブでコントラストを補正する(右側のトーンカーブ参照)。
DeepSkyStackerは ここからダウンロードできる。
現在最新バージョンは DeepSkyStacker-beta47で、
Yahoogroups の DeepSkyStacker@yahoogroups.comに入るとフランスの開発グループの
メンバーが難しい問題には直接答えてくれる。すばらしい!
初心者はすべのRAWを縦、横とも半分のサイズのTIFFにDPPのBatch処理で
変換して処理することをおすすめ。
コンピューターが遅くても何とかなる、グリッチも少ない、間違いも発見しやすい。
3
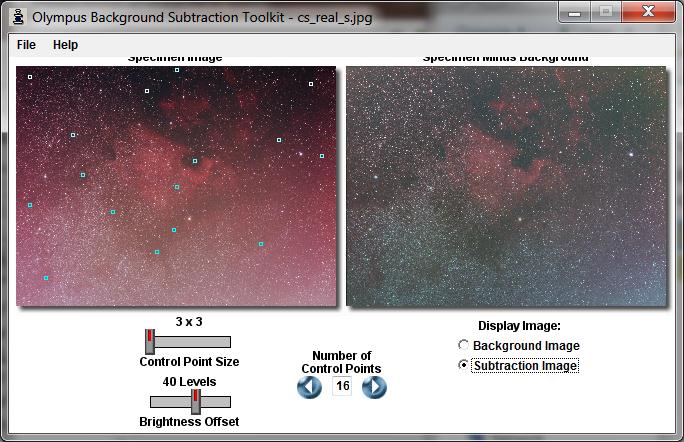
Eliminate the gradient by using Olympus Background Subtraction Tool Kit
かぶり補正をオリンパス背景抽出ツールキットで行う。Denebの高度は ALT 65 度で周りは一見暗いのにひどいカブリだ。
ダウンロード
このプログラムは一見おもちゃのようで、巨大画像は取り扱えないし,
UIもお粗末だが、背景抽出のアルゴリズムは大変な優れもの。
4
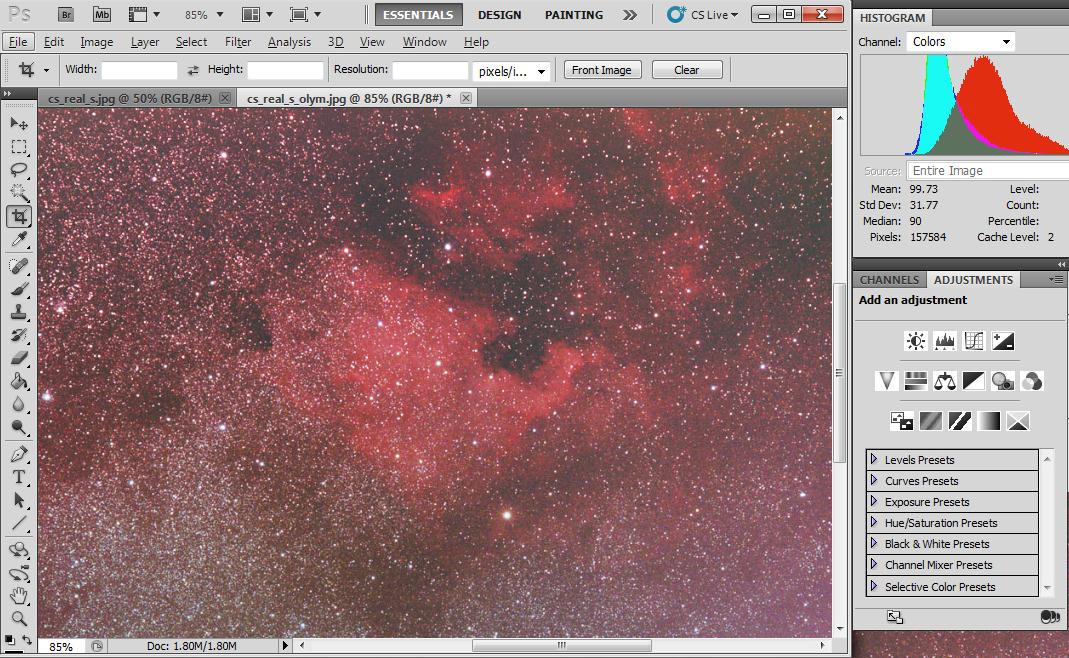
もう一度CS5で輝度、コントラスト調整する。NGC7000の場合はペリカン星雲に気を配る。
After the second processing is done, the noise is processed with Noise Ninja
5
撮影条件
Sigma Zoom Lens at 150mm(150mm-500) with Canon EOS T3 in US (KISS X50 in Japan),
self-modded.
The photos were shot at ISO1600 and 90 second exposure for the individual frame.
40 light, 40 dark and 40 flat frames were taken.
The scope was guided by Meade DSI Pro with Modified Tasco scope (@480mm FL)
and PHD on Orion Sirius EQ-G. This mount was controlled by EQMOD.
6 IDAS LPS-P2 フィルター
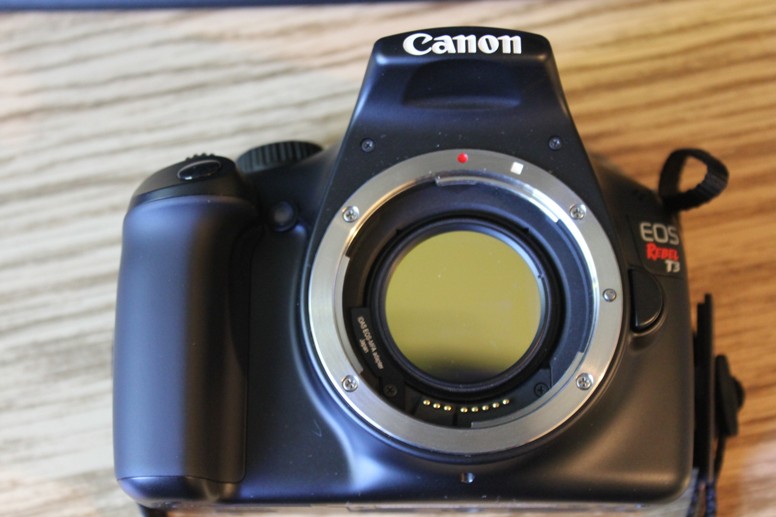
カメラの赤外改造は センサー前面の2つのフィルター、ローパスとUV/IRカットオフ、のうち
UV/IRカットオフ・フィルター(t=約0.5mm)の除去だけで済ませることが出来る。
幸い IDAS LPS-P2フィルター(t=約0.5mm)がカメラにねじ込み式でこれが
UV/IRカットをしてくれるし、このフィルターはレンズの後ろにはいるので、
合焦もさせられる。IDASさんありがとー!
ファインダーでのフォーカスと自動フォーカスはジャスピンにならないが人物写真はあまり問題ない。
もちろん天文応用の場合はLCDでのフォーカスとなる。ホワイトバランスはカスタムでおこなっているが、
カスタムホワイトバランスは素人の目をごまかせる程度の補正のようだ。 がっかり!
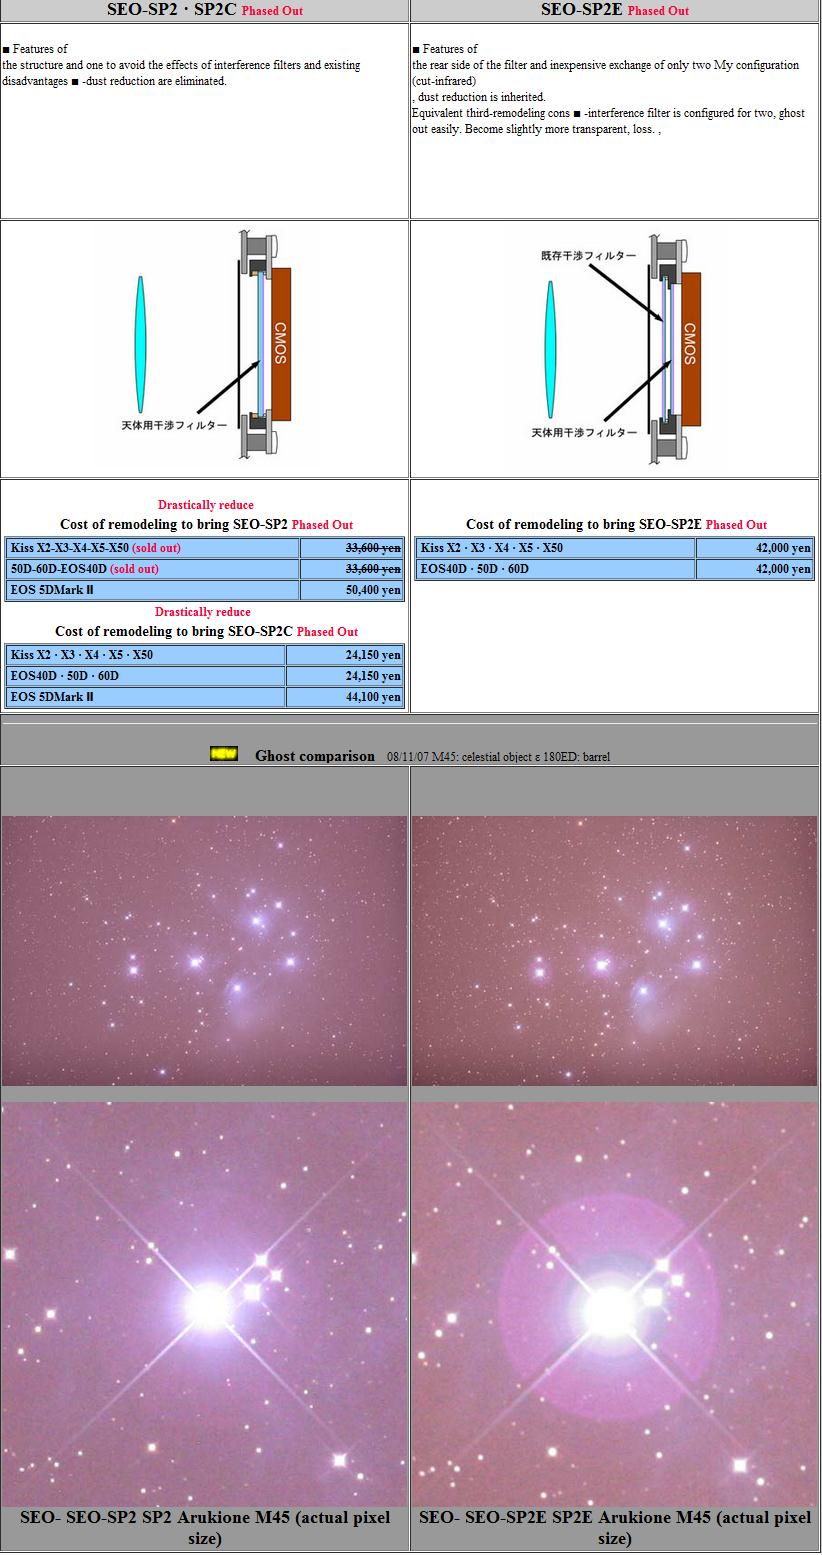
これは http://www.seo-e.co.jp/hobby/EOS300D/Price/Price.htm のGoogle Translationで、
英語圏のアマチュア天文家で自動翻訳がうまく行かない人たちのためのページです。
Page 1

Page 2
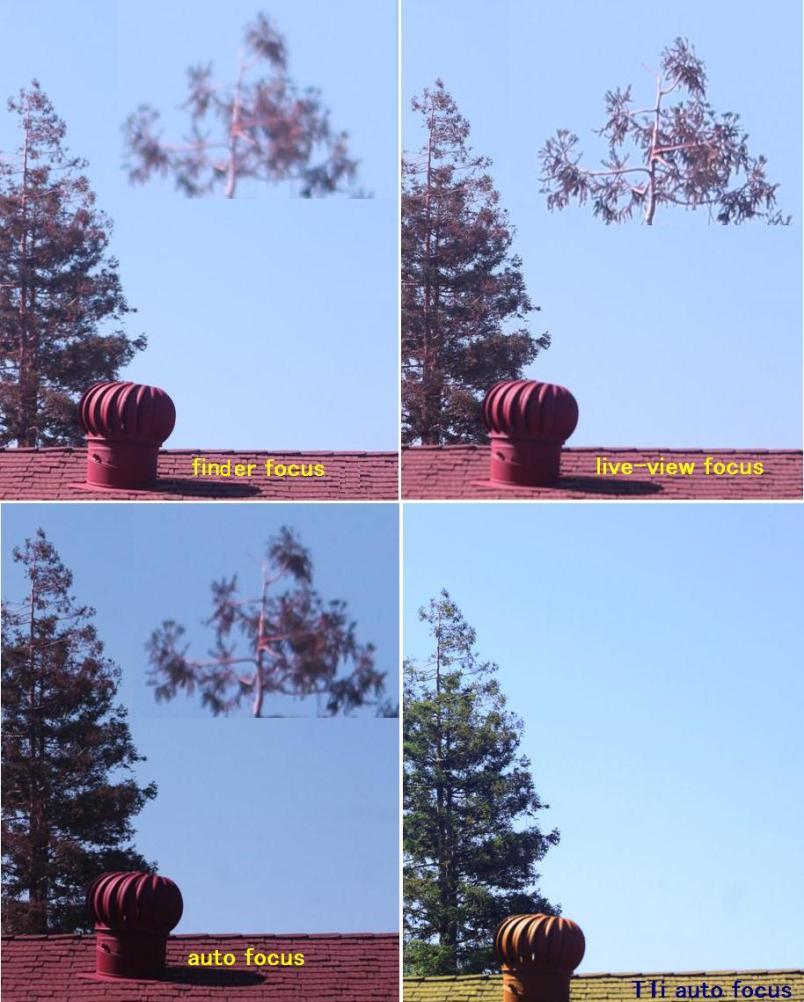
改造X50の合焦、ファインダー、ライブビュー、オートフォーカスの比較をしました。
The following photo compares the focusing among finder; live-view; auto focusing. Note that
the Canon original UV/IR filter and IDAS LPS-P2-FF (in-camera filter) are 0.0223″ (0.57mm) and 0.0216″(0.55mm) thick, very close to each other, enabling the focus of all the zoom lenses I have.
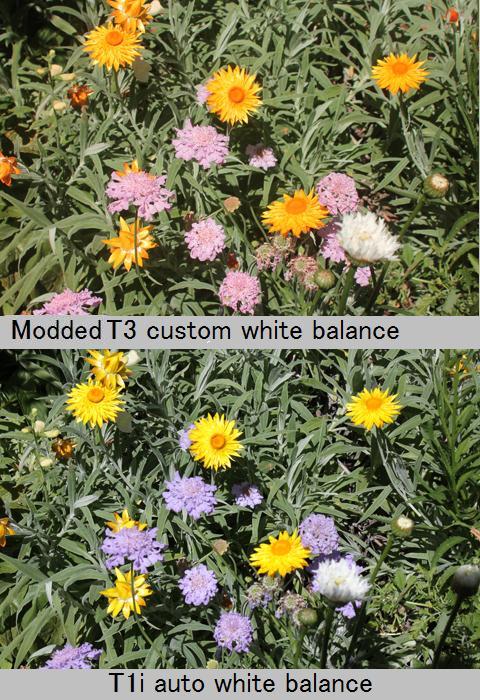
2つのフィルター厚みはほとんど同じなので手持ちのすべてのズームレンズが合焦しました(18−55mm、75−300mm、150−500mm)。しかしファインダーでのフォーカス、オートフォーカスでの合焦ミスの程度は気になるところです。比較は以下とうりで、観望会の写真とか家族のスナップ写真にはわたしの場合オートフォーカスでもよさそうです。あとでsharpening を少しかけるかもしれません。 右下4枚目の写真は EOS T1i(KISS X3)によるものです。
一方、ホワイトバランスをカスタムにして赤を抑えた通常写真をとる場合は以下のようになりました。カスタムホワイトバランスで赤みがとれ色が戻ります(次の写真参照)。
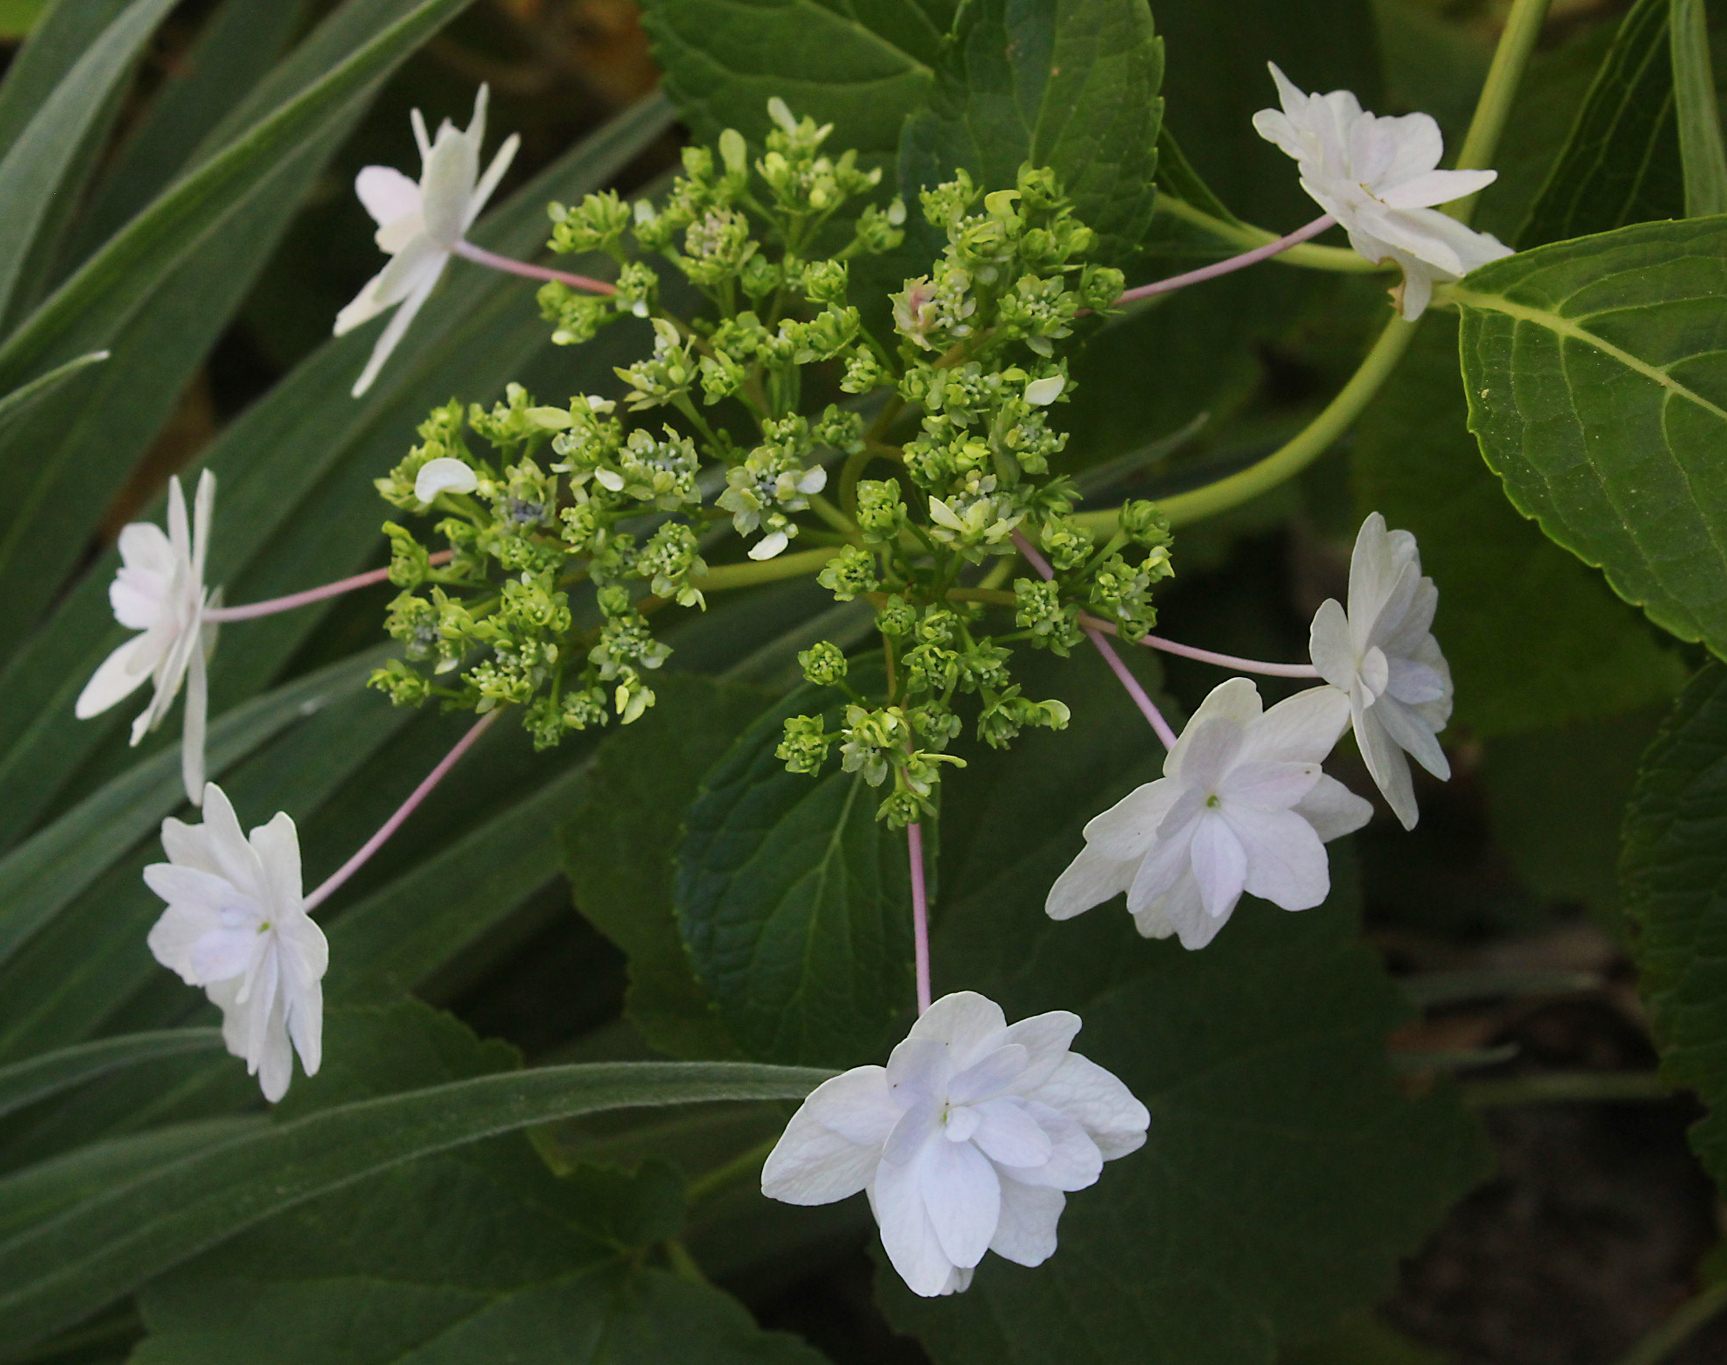
しかしながら(最後の写真参照)、改造以前の色と比べると淡い薄紫は桜餅色に変わり、純黄色はオレンジがかった黄色になってしまいました。当方家内はフラワーデザイナーでわたしもお付き合いしてますから、これではまったく話になりません。
結論は合焦ミスによるボケは我慢ができるがカスタムホワイトバランスはお話にならないようです。これは当方の主観的な判断で、逆の結論、ないしすべてだめとの結論もあるわけです。
カスタムホワイトバランスと補正なしの比較
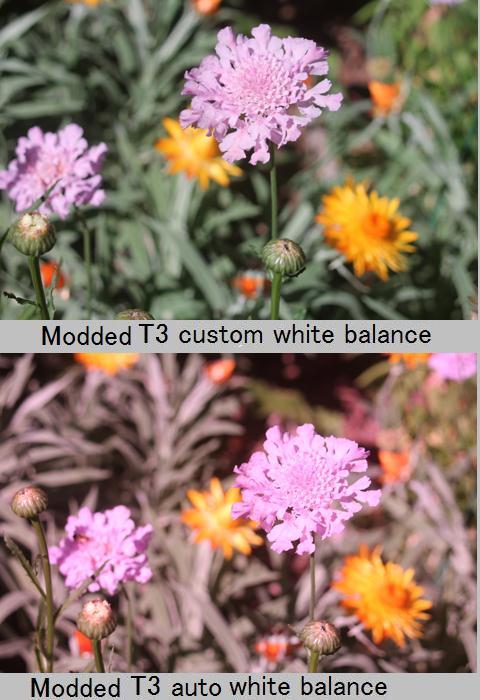
カスタムホワイトバランスとキャノンオリジナル写真の比較
Comparison of the result of the custom WB and the image taken by no-modded EOS.
Please note that the light purple colored petals turned into light pink (sakura color) and pure-genuine yellow turned into orange yellow. This sort of color shifts are totally unacceptable!

EOS T3 (1100D) で前面のローパスフィルターを残して、次のUV/IR フィルターを取り除き、
手持ちのカメラ内の光害カットフィルター(IDAS LPS-P2)でUV/IR カットをしてます。
40 lights, 40 darks and 40 flats at 90 second exposure each and at ISO3200.
VC200L with Vixen focal reducer and the IR Modified Canon EOS T3 (EOS KISS X50 in Japan)
on Sirius EQ-G, guided by a Meade DSI PRO II, a modified Tasco refractor and a guiding software: PHD guiding,
controlled by EQMOD, stacked with DeepSkyStacker,
retouched with Photoshop CS5 and Olympus Background Subtraction.

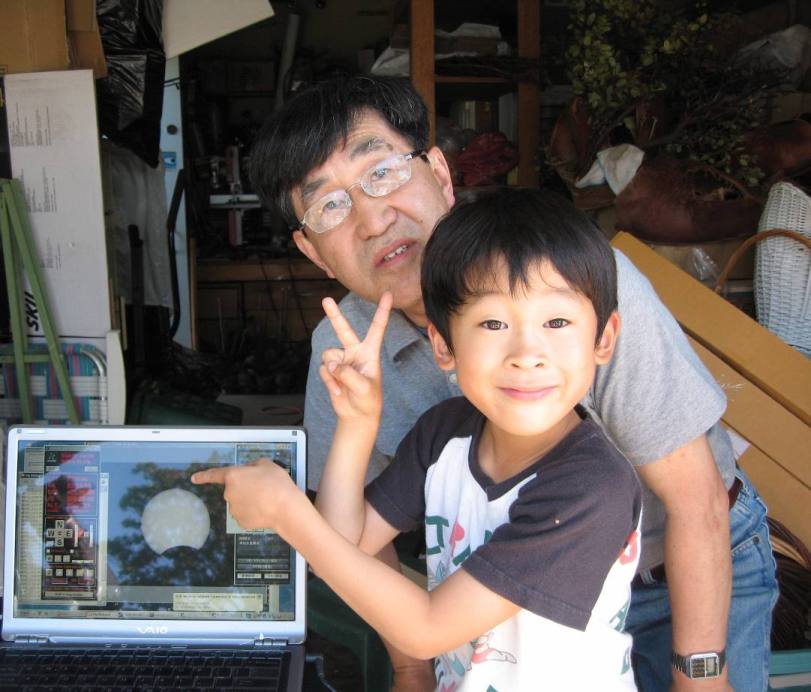
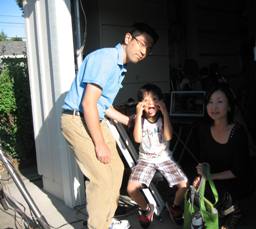
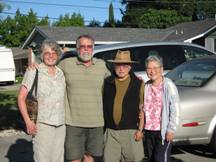
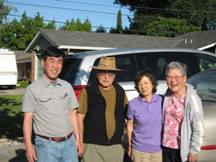
Kids, parents and amteur astronomers

Setup 1 - My VC200L is seen!

Setup 2 - Heidi’s 10 inch dob, refractor and Mead 9.25 inch(?)

Setup 3 - Orange tube (Original Celetron Schmidt Cassegrain) and Alan’s airflow controlled 8 inch Newtonian

Youtube video of the solar eclipse (click here)
Post to [digital_astro]
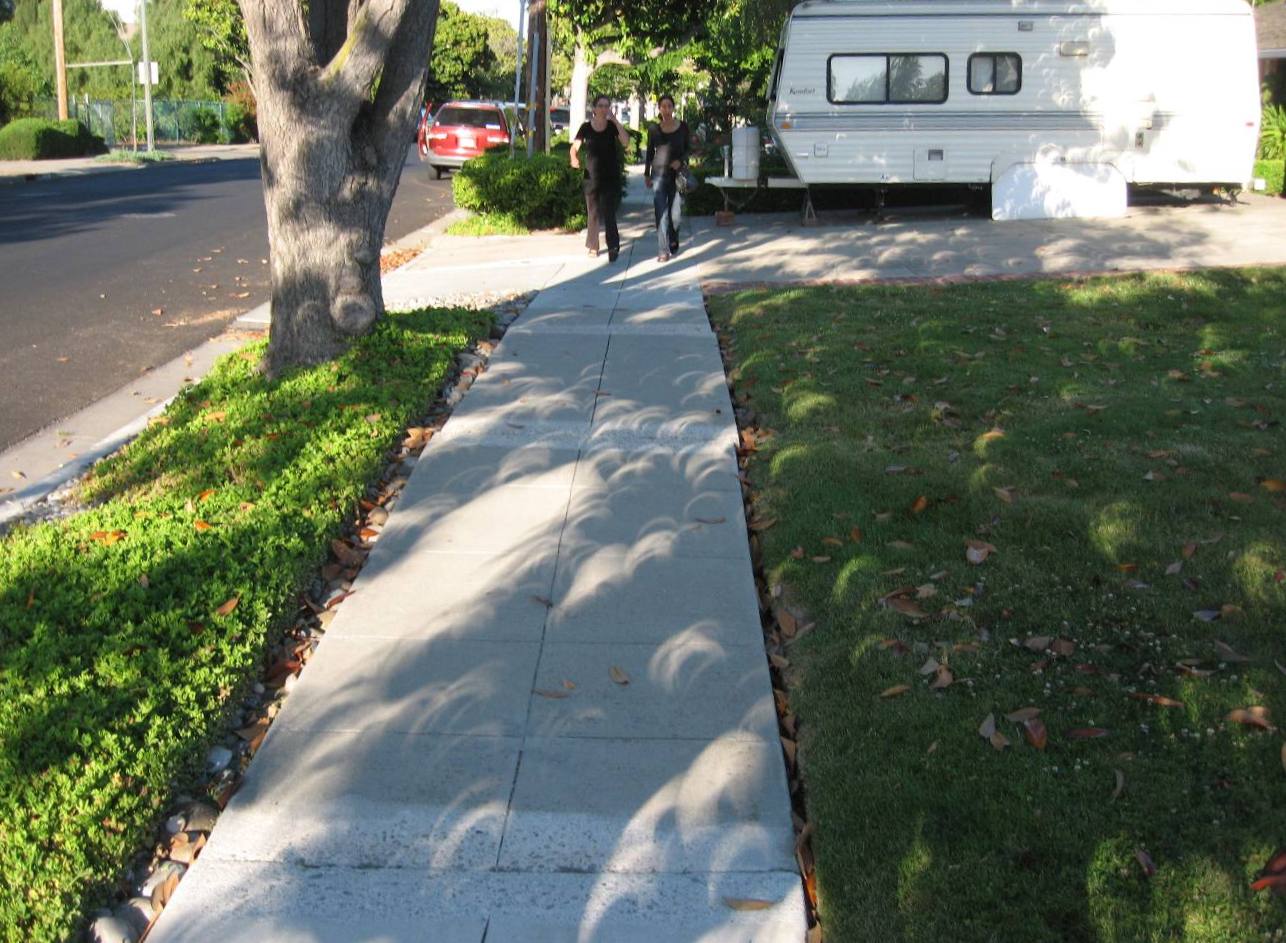
I live in the San Francisco Bay Area and was too lazy to go to North for watching the true annular eclipse. Well, I tried to do something unique. This Youtube video shows what I did. In this eclipse, a rather rare occurrence in our area is that the end of the eclipse turns into an Earth event, Sunset. I tried to come up with a video that shows two events continuously. 1~2 degree view angle is fine with the eclipse and probably at least 10~20 degree is preferable for the Sunset. I tried to make the transition. So, this video covers two events, the peak of the eclipse and the Sunset with the landscape.
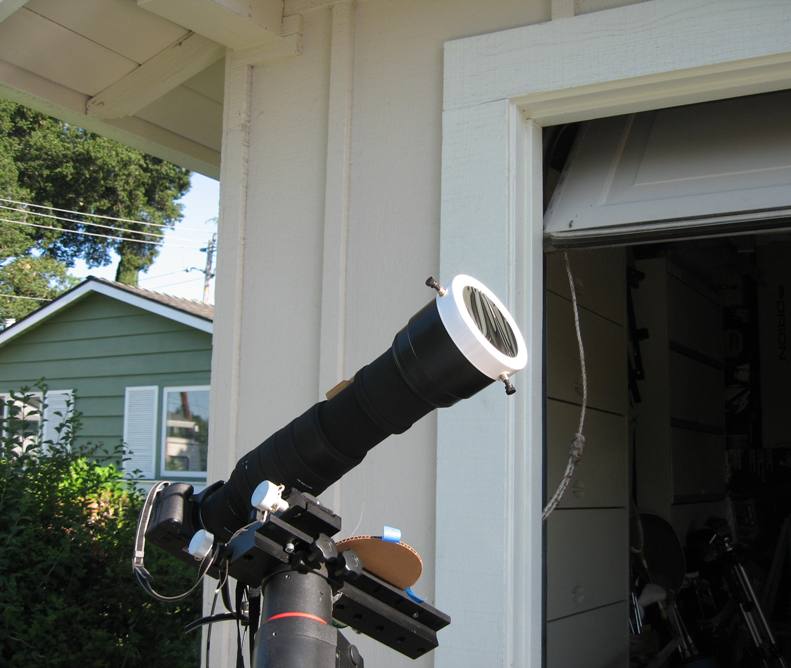
My telephoto camera lens is Sigma zoom of 150-500mm. At 1000mm FL with 2x extender, the eclipse was photographed (ISO100 and 1/200 second exposure). When the trees started shadowing the Sun, the solar filter (Astrozap) was removed, FL was gradually reduced, shutter speed was adjusted. The extender was removed at some point and the F-value was increased too. Note I cannot adjust F-value with the 2X extender. I wish I had a pro’s TV camera, probably costing more than 100 k dollars.
Camera: Canon EOS T1i used at 10 second interval, creating nearly thousand jpg files.
Mount: Sirius EQ-G
Nobi

———————————————————————-
Post to Mixi
日食当日は、サンフランシスコ近郊のこの辺り、全天雲ひとつないカリフォルニアの空となった。
日食とサンセットを1つのストーリーにまとめようと構想。以下のYoutubeビデオの最後の3秒がそれ。
シグマズームと2Xエクステンダーで300mm−1000mmの可変焦点、カメラはEOS KISS X3を使用、Baader Solar Filter装着で、ISOー100、1/200秒から、サンセット直後にFilterを取り、露出を1/4000秒から1/40秒に連続的に上げ、焦点距離を 1000mmから150mmまで連続下降(写真参照)。写真2と3はお隣の芝生に写った日食の影と車のドアーに写したピンホール写真。人間の目がすばらしのを実感。
|
|
|
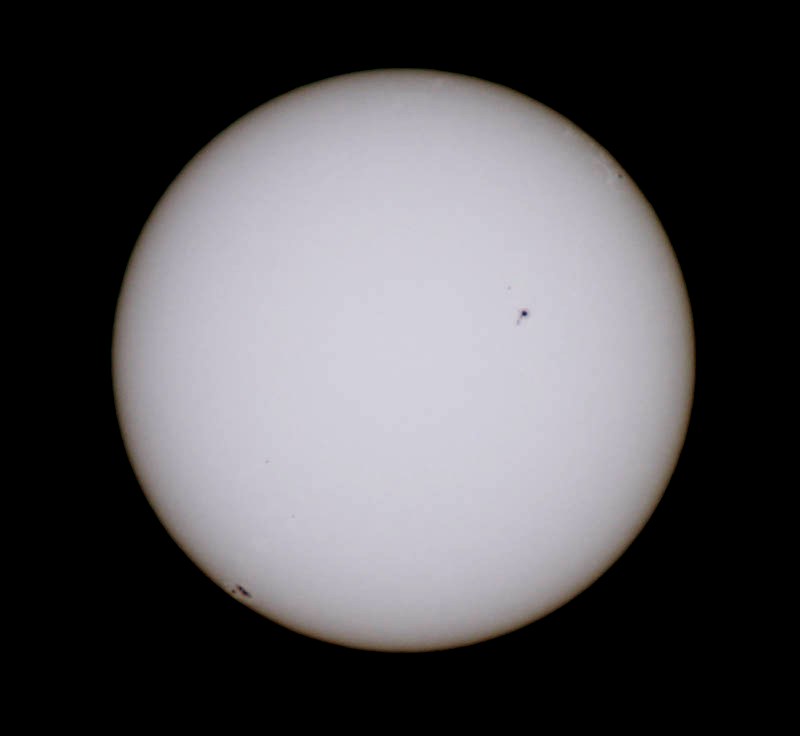
Astrozap Solar Filter, made of Baader Planetarium Solar Film (D5 ?)
At 500mm FL of Sigma Zoom of 150-500mm,
with 2X Extender, made by Sigma Corp.
5/5/2012 11:11 AM PDT
File Name : IMG_9906.CR2
Directory : F:/Photos/2012/2012-astro/2012-05-05-Sun/raw
File Size : 15 MB
File Modification Date/Time : 2012:05:05 11:10:52-07:00
File Type : CR2
MIME Type : image/x-canon-cr2
Exif Byte Order : Little-endian (Intel, II)
Image Width : 4752
Image Height : 3168
Bits Per Sample : 8 8 8
Compression : JPEG (old-style)
Make : Canon
Camera Model Name : Canon EOS Kiss X3
Modify Date : 2012:05:05 11:10:47
Exposure Time : 1/200
F Number : 0.0
Exposure Program : Manual
ISO : 100
Note: RDF validation http://www.w3.org/RDF/Validator/
先日Mixiに投稿した M83は半月下で20枚のLightで、枚数が不足だったので、
あと20枚月の出以前に撮ってスタックした。1枚の露光時間は60秒。
EOS Kiss X3 ISO3200 VC200L と Reducer

あと NGC2403のLight40枚も撮ったのだが、枚数がぜんぜん足りないので、
あと40枚撮って合計80枚をスタックした。 一枚の露光時間は75秒。

今回のM83とNGC2403を含めていままでこちらの眼視のバイブルとステラリウムをみて
どれを撮るか決めてたのだが、こちらに届く一月遅れの天文ガイドをみるとたいてい
一緒の天体が載ってる。なんで天ガがおれのまねをするのかーといいたい気分だ。
銀河を撮ろうと思ってる連中の考えることは似たようなものだろー。
なおこの投稿はMixi へのFeedのテスト投稿。
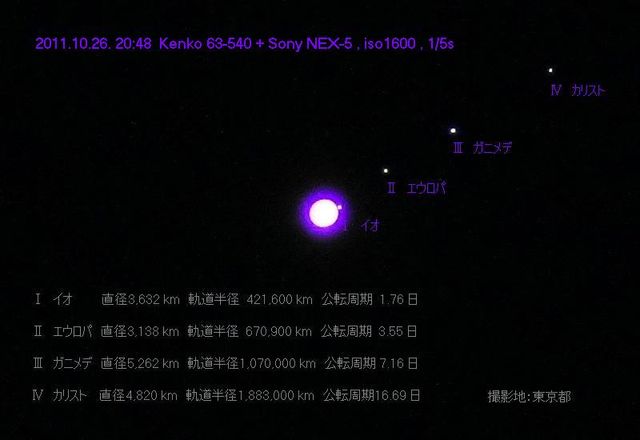
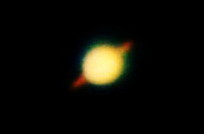
Mixi のチャオさんが10月26日に撮った木星の月、ガリレオ衛星が一線に並んだ珍しい写真です。
木星の月はオペラグラスでも良く見えます。 イオ、エウロパ、ガニメデ、カリスト(ゼウスのLoverの名前)です。
月の公転周期に注目!
高速周回で4っつの月が共振してて、2〜3時間も経つと動いたのが分かります。
「ガリレオはこれらの天体の動きを数日間観測し、木星の周りを回っていることを確信した。
この発見は、ガリレオが信じていたニコラウス・コペルニクスの地動説の裏付けの一つとなった」−Wikipedia
ということです。地球も高速周回する月があると、新月、三日月、半月、満月と1日半で見られていいのですが。
浦田
ウィキペディアを調べたら、木星は公転周期が12年/自転周期は10時間、とのこと。
もの凄い高速自転しながらゆっくり太陽の周りを公転、ということ。
しかも、ガス状の星で高速自転しているので、赤道近辺と極近辺では自転速度が違う
(差動回転になっている、、、)、など、。
ガリレオ衛星は軌道共鳴とやらで逓倍周期で高速公転、相互位置関係変化が観測できる、、。
ガリレオ衛星の他にも、小さな衛星が60個以上あって、、、。
人類の好奇心がこれまで明らかにしてきた知識の壮大な蓄積は流石に奥が深い。
(知っている人には当たり前かもしれないが)、自分にとって初めてのことを知る
というのは興味深く、楽しいものですね。
早速押入れの中から、古い双眼鏡を引っ張り出して今夜にでも観測してみます。
今の季節は、木星観測には最適のようですので、、。
今お昼ですが、厚い雲がかかっていて、、。今夜は雲が晴れると良いのですが、、。
木原
清水
浦田
木星の衛星は、SFでよく出てきて、いくつもの月が出てきたり、・・
そう言えば、木星の衛星では面白いことが起きているようで、
エウロパの場合、木星の巨大な引力による潮汐力で球体が歪み
その結果、星の内部が高温になっていて、表面は氷で覆われているのに、
内部は100Kmぐらいの水の層になっているそうです。
それがわかって、「しんかい6500」をエウロパへ送りたい、
と提案している学者の話を聞いたことがあります。
目的は、地球生命の起源を探るために。
地球も内部が高温で、地底に行くほど温度が上がり、
100度の温度帯が地球全体を覆っている。
その100度の温度帯に生命が存在していることがわかり、
しかもその生物量は、地上の全ての生物量を足したものより
遙かに多いことがわかってきたのだそうです。
すると、エウロパにも同様の生命体が存在している可能性が高い!
で、なぜ、「しんかい6500」かというと、
エウロパの表面の氷層は厚いが、何とか掘削できる範囲、
問題は100Kmの水圧であるが、重力が小さいので地球に換算すると、
6500m程度になって、「しんかい6500」で可能!
更に、大きさ重さとも、宇宙船で飛ばせる範囲に収まっている、
と言うのが理由でした。
半分お話のような、巧みな宇宙生命科学の紹介でした。
(真面目に極地で研究している先生です。念のため)
清水
浦田
木星の子ら一線秋の空
木星に右へならう子秋の空
鈴木
月四つジュピター巡り片方に全員整列奇しき秋の夜
俳句は切り取りと読み手の想像まかせで長短あり。短歌は
へたなりに、言いたいことを突っ込めるようです。
浦田
先週土曜日11月5日、Astro Hutechの
石川さんを訪問するため、AIC (上級画像処理コンファレンス)、
Santa Clara Hyatt Regencies
のExhibition会場に行きました。石川さんとの話の後、会場をさっと見ました。
正式なレジストレーションをしてないので、ついでにちょと見回らせてもらったわけです。
AP,SBIG,Celestron,Meade,PlainWave,
Apogee Imaging Systems等 有名どころ、20社くらいが
出てました。http://www.aicccd.com/2010/website/index.html 参照。
講演、ワークショップが約18で、画像処理高度技法、ワイドフィールド画像処理、
リッチークレチエンのコリメーション、等の上級天体写真分野をカバーする
コンファレンスのようでした。
3D用のメガネをかけてみるDeepSkyは驚きでした。
どこがどういうテクノロジーを使ってるのかさっぱりわかりません
が、3Dの星形成領域画像はいかにもそれらしく見えました。
プラネタリウムでは最近こういうのも見せてくれるのかな?
Meade の新型赤道儀LX800(常時ガイド), セレストロンの14インチ(?)
EdgeHD、SBIGの新技術の話等、技術進歩が体感できてよかった。
私の行く金属鉱山学会は参加者2万人、Exhibitorも200社以上、
この学会のあまりの小ささにも驚かされました。
Sottaku さんに教えてもらった本、
’1,001 Celestial Wonders to See Before You Die’ by M.E. Bakich
が来る。
1001天体のうち 250が良質のカラー写真で、たいへん気に入った。
Hi
———————————————–
Wordpress(XOOPS Version) を
MixiへLink したいのだか。
Hutechさんへのメール(要約、抜粋)は以下のようです。
>Hutechさん、
> 日本の天文趣味人の方々のなかには個人輸入のハードルが高い方がかなりおります。
> Mixiに Hutech社と石川さんの話、メールアドレスを紹介して
> おきます。プロがお手伝いをやってくれるのですから、日本側にとっては
> こころ強い話です。 Explore Scientificのような
> 新興メーカーは高割引で下ろすかも知れません。Hutechさんは名前が
> 知られてますからね。甘いかな?
>サブちゃん
Hutechさんの返事は:
どんな案件も勿論喜んでご協力させて頂きますよ。
出来る限りメーカーから仕入れて価格を抑えるようにしています。
ですので、遠慮なく日本語で問い合わせください、とお伝え願います。
とのことです。
ウエブサイトは:
メールは:
ishikawa@hutech.com
です。
Mixi名 SB
To Harry and ALL,
I have been using a Canon EOS Rebel XTi (same as EOS KISS X - funny name in Japan). I will call it “X”. Focusing through the viewfinder has been difficult. I bought a Canon EOS Rebel T1i, same as EOS KISS X3. I will call it “X3”. Its capability of high ISOs such as 12800, 6400, so forth, live-view and video, was quite attractive. The old Rebel XTi was given to my son. I have not yet used the video much and hope to use it in occasions such as the crash onto the Moon in the LCROSS project. The live-view in the new camera improved the quality of my photos “astronomically”.
Well, now there are some street rumors about the high noise with T1i. However, the noise evaluation data is sketchy. Therefore, I “borrowed” the old Rebel back from my son and performed a test, comparing the new Rebel against the old, literally side by side.
Based on Experimental design, the factors and the levels selected are:
Ambient temperature for camera: 7, 17 and 29 º C
ISO: 800 and 1600
Exposure seconds: 30,180,300 and 600 seconds
The dark images are plotted and the mean/standard-deviation of the RGB values (0-255 scale) is obtained (Photoshop Elements 7 is used). The mean noise RGB value will be called “MNRGB” from here on.
Summarizing the results:
1. There is a critical combination only below which X3 is better than X and above which X3 is worse than X. The combination is around 17 º C, 180 seconds, 1600 ISO. If, for example, one combination has 25 º C instead of 17 º C, X3 is worse. If, for another example, it has 300 seconds instead of 180 seconds, X3 noise is worse. In other words, X3 has a lower noise in the low noise region of low temps, low ISO and low seconds, when compared to X. X3 is worse at the higher noise region.
2. MNRGB (mean noise RGB value) of both X3 and X stay below 2 (0-255 scale) in the low noise region. When one of or all of the three factors; temps, ISO and seconds, increase, the MNRGB increases more rapidly in X3 than in X, reaching 60~80% higher noise, a rather poor temperature characteristics with X3.
3. In this paragraph, noise and signal levels are discussed.
I ran the dark noise exposures for the same combination twice with 1 hour separation. Subtracting the #1 bitmap from #2 bitmap, I obtained roughly 50% reduction of the noise.
I am a beginner and doubted text book writing, explaining the effect of dark noise reduction. Because the noise is “thermal” and, as the result, is random, where the noise reduction can be done only by averaging many images. But, It seems I was wrong and had to search some CCD related papers. I found ones written by Hamamatsu Photo electronics and Sony. My goodness! The involving physics was related to my area in the ancient time. So, I forgot most of them.
Mainly, the surface defects of semiconductor produce the surface energy levels from which the electron excites due to photon, creating the noise. Note that when the electron is excited from the bulk area, the excitation is normal. Therefore, the high noise intensity at various spots is originated in the manufacturing process and hence we can reduce the noise simply by subtracting a few, not many, averaged dark noises from a few averaged images. Since the image subtraction reduces the noise by 50%, I expect we can reduce the noise down to 1/3 to 1/4 if I do it statistically and carefully. I may be too optimistic, though.
This discussion leads to a conclusion that:
I will keep X3 and using it. Probably I will be able to take a relatively faint deep sky photos with up to the max combination; 10 minutes exposure at 1600 ISO at 17º C, typical California night temps. Although MNRGB is large, 12, with this combination, I will be able to reduce the MNRGB down to 3~4, using the dark subtraction.
4. Based on the noise, evaluated in #3, I estimated the RGB value of the rather faint clouds away from the Galaxy center, in M31, Andromeda, on my unprocessed image (300 seconds exposure, 800 ISO, Sigma 500mm Zoom of 80mm diameter, F/6.3, Orion skyglow filter). It was around 10, in 0-255 scale, above the background. Of course, the galaxy center was 154 above the background. This could give the RGB value of 40, as a signal (=10/5 x 1600/800 x 10), if I use the max combination. Because the noise level is 3~4, I can live with this scenario. But, correct me if my calculation of the nebula intensity is wrong.
5. The data shows a rather severe temperature effect in X3. Certainly I do not recommend X3 to my friends in New Orleans and Ghana, West Africa. Probably, X3 is okay with my Canadian friend if he forgets about three hot nights in one summer. For my fellow Californian hobbyists, the choice would be a little complex, probably depending on his need for the video capability.
I do not have any data about “KISS X2” which seems a recommendation of some of the scope shops in Japan. It is said to be between X3 and X.
6. Additionally, the data shows that high ISO & short exposure is less noisy than low ISO & long exposure, suggesting a possibility of “point-and-shoot” deep-sky astrograph. But, a further test using the high ISO will be required to confirm the fact. Please note that grainy surface with high ISO is not fully related to this thermal noise, I believe.
7. One more additional finding is that the camera is heated up internally during the long exposure and, as the result, the noise generation increases by almost two fold for X3. A good preparation and image taking right at the beginning, before heating-up, is favored. Variable angle LCD display from Nikon could be effective to a certain extent because the LCD panel and the power delivery system generates a lot of heat.
The RGB values are shown in:
http://www.urata123.com/X-urata/astro/EOSNoise/DarkNoiseComparison.pdf
The images of the dark files are attached in:
http://www.urata123.com/X-urata/astro/EOSNoise/DarkNoiseComparisonGraphs.pdf
A comparison is extended to Nikon D90 and D5000, attached in (this link is to be activated when a permission of the D90 and D5000 data generator is received):
http://www.urata123.com/X-urata/astro/EOSNoise/EOSvsDXX.pdf
The conclusion in this extension is probably that D90 and D5000 are par with X3 and X, respectively. The data is not as reliable as it needs to be and thus will be presented as just one reference.
Nobi
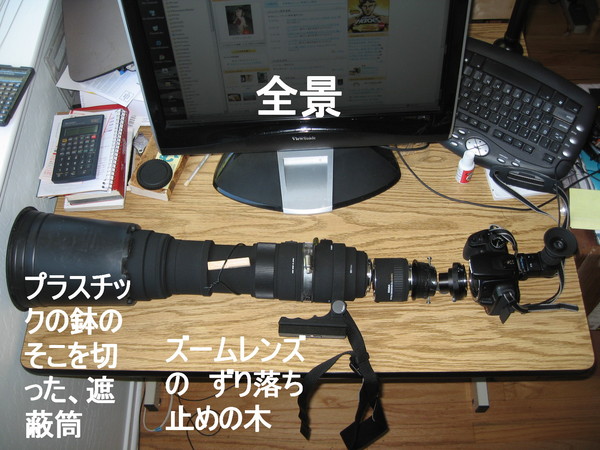
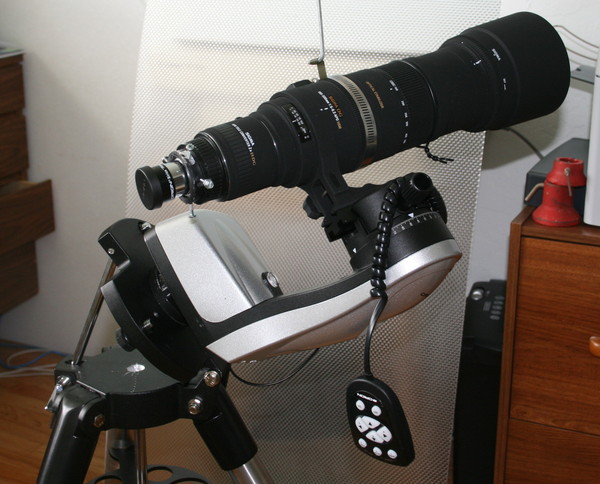
Sigmaズーム150ー500mmを買って、両方に使えるようなシステム
を模索しました。 望遠鏡への転用の写真と土星の写真です。
|

|
|
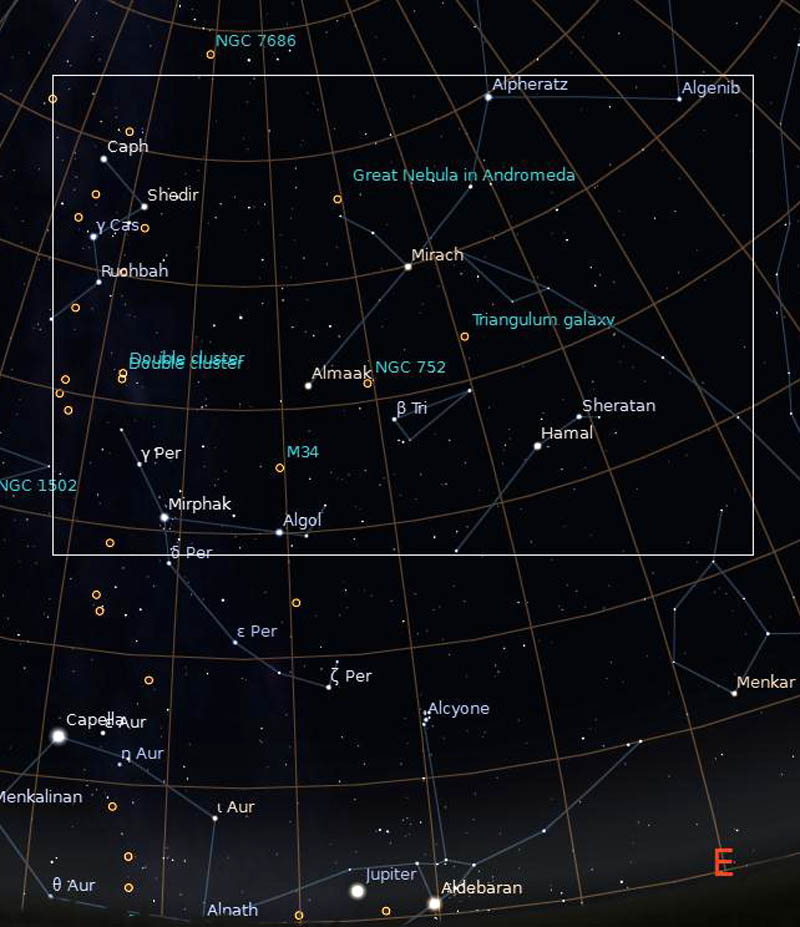
月、金星、オリオン星雲、スバル 等は
(注意)「鳥」にはCanon 300mmZoomの写真も混ざってます。
Poorman’s Astronomy (貧乏人の天文趣味)なので追尾は オリオンの
TeletrackーAltazimuth Control(返品で2万円)を買いました。しか
し、2XーExtender(Sigma)+2X Balowで4倍の2000mm焦点距離相
当にもってゆくと、三脚の微小振動で使い物にならないので、Celestron
NexStar4GT/5I の三脚/ウエッジ(赤道儀転換用のウエッジ付で買い得)(1万二千
円)を買いこれにTeletrackを載せました。 勉強したのは、望遠鏡は人
間と同じで 足(架台)が大事ということでした。 Teletrackの追尾の
精度はまだ精査してませんが、1?2分くらいならOkayみたいのようで
す。 低倍率150mm+カメラ直結で星を探すのでファインダースコー
プはいりません。
Sigma Zoom 150?500mmが2Xエクステンダーと接眼レンズをつけ、
Teletrack(Orion 社)にマウントされ、全体は セレストロン
(Celestron)社のNexstar 4&5のTripodに乗っています。
同じようなことを披露してるアメリカ人のHPが参考になりました(Eyepiece
Adapter for Canon EF Lenses Jan Michael Kratochvil ? 私の御近所の
ようです)。論文としての体裁をとり、非常に良く書けてます。
107 queries. 0.154 sec.
Powered by WordPress Module based on WordPress ME & WordPress


